1. Introduction
This manual provides detailed instructions for the installation, operation, and maintenance of your HIMICAR M18 Car MP3 Stereo. Please read this manual thoroughly before using the product to ensure proper function and to prevent damage.
2. Safety Information
- Electrical Safety: Ensure proper wiring connections to avoid short circuits or electrical hazards. Consult a professional for installation if you are unsure.
- Operating Environment: Do not expose the unit to extreme temperatures, direct sunlight, or excessive moisture.
- Driving Safety: Operate the unit responsibly. Avoid complex operations while driving to maintain focus on the road.
- Volume Control: Keep the volume at a moderate level to hear external traffic sounds and avoid hearing damage.
3. Package Contents
Verify that all items are present in the package:
- 1x HIMICAR M18 Car MP3 Stereo Unit
- 1x Remote Control
- 2x Power Cables / Wiring Harnesses
- 1x User Manual
- Mounting Accessories (brackets, screws)

Image: The package contents including the car stereo unit, remote control, wiring, and manual.
4. Product Overview
The HIMICAR M18 car stereo features a standard single-DIN size with a clear digital display and intuitive controls.
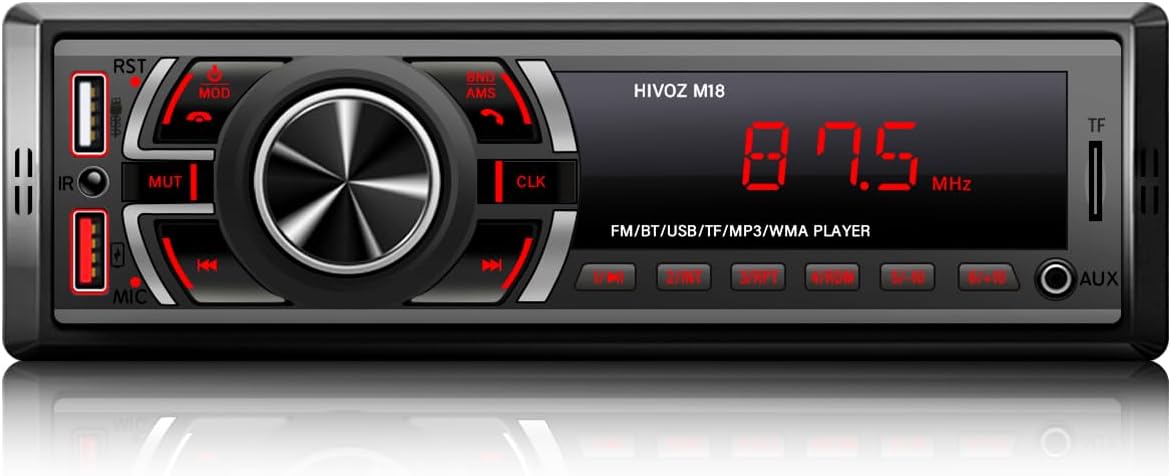
Image: Front view of the HIMICAR M18 car stereo, showing the display, rotary knob, buttons, and front ports.
Front Panel Controls and Ports:
- Power/Mode Button (MOD): Press to turn on/off or switch between modes (FM, Bluetooth, AUX, USB, TF).
- Rotary Knob: Adjusts volume. Press to select menu options.
- RST (Reset): Small button to reset the unit.
- MUTE: Mutes audio output.
- Band/AMS: Selects radio bands (FM1, FM2, FM3) or performs automatic memory scan.
- CLK (Clock): Displays or sets the clock.
- USB Ports: Two USB ports. One for media playback (U-Disk) and one for fast charging (2.1A).
- TF Card Slot: For playing media from a TF (Micro SD) card.
- AUX Input: 3.5mm jack for external audio devices.
- IR Sensor: For the remote control.
- MIC: Built-in microphone for hands-free calls.
5. Setup and Installation
Important: Disconnect the car battery's negative terminal before starting installation to prevent electrical shorts.
- Mounting: Install the car stereo into your vehicle's dashboard using the provided mounting brackets and screws. Ensure it is securely fastened.
- Wiring: Connect the power harness, speaker wires, and antenna cable according to your vehicle's wiring diagram and the stereo's instructions. Pay close attention to positive and negative terminals.
- Testing: Reconnect the car battery. Turn on the car stereo and perform basic function tests (power, volume, radio).
- Final Assembly: Secure any loose wires and reassemble the dashboard trim.
Note: If you are unfamiliar with car audio installation, it is recommended to seek professional assistance.
6. Operating Instructions
6.1. Bluetooth Connection
The M18 stereo features Bluetooth 5.0 for stable wireless connections.
- Turn on the car stereo.
- Activate Bluetooth on your mobile phone.
- Search for available devices and select "HIMICAR M18" (or similar name) to pair.
- Once connected, you can play music and make/receive hands-free calls.

Image: Illustration of Bluetooth 5.0 connectivity for music streaming and hands-free phone calls.
6.2. FM Radio Operation
The unit supports FM radio reception (87.5 - 108 MHz).
- Press the MOD button to switch to FM mode.
- Press the Band/AMS button to cycle through FM1, FM2, FM3 bands.
- Long press Band/AMS to automatically scan and save up to 18 stations.
- Use the << and >> buttons to manually tune or seek stations.

Image: Depiction of the car stereo integrated into a dashboard, showing FM radio functionality.
6.3. Voice Assistant Activation
After connecting your phone via Bluetooth, you can activate your phone's voice assistant.
- Long press the Rotary Knob to activate the voice assistant (e.g., Siri, Google Assistant).
- You can then issue voice commands for navigation, music playback, or phone calls.
Image: A hand interacting with the car stereo's rotary knob to activate voice control, with examples of voice commands.
6.4. USB and TF Card Playback
The unit supports MP3/WMA/WAV/FLAC audio formats from USB drives (U-Disk) and TF cards up to 32GB.
- Insert a USB drive into the designated USB port or a TF card into the TF card slot.
- The unit will automatically switch to USB/TF mode and begin playback. If not, press MOD to select the correct source.
- Use the << and >> buttons to skip tracks.

Image: Visual representation of various playback options including USB, 2.1A fast charge, AUX, and TF card.
6.5. Audio Settings
Customize your listening experience with various audio settings.
- The unit supports a 240W amplifier output and preset equalizer modes (Classic, Jazz, Pop, etc.).
- Subwoofer output is also supported for enhanced bass.
- Refer to the on-screen menu (accessed via the rotary knob) for detailed sound adjustments.

Image: Depiction of sound output and equalizer settings, highlighting the unit's audio capabilities and subwoofer compatibility.
6.6. Steering Wheel Control
The included remote control can be mounted on your steering wheel for convenient operation.
- Attach the remote control to your steering wheel using the provided adapter.
- Use the remote to adjust volume, change tracks, or answer/end calls without taking your hands off the wheel.

Image: A user operating the car stereo using a steering wheel-mounted remote control, illustrating safe driving interaction.
6.7. Phone Charging
One of the USB ports is dedicated to fast charging your mobile devices.
- Connect your smartphone (Android/iOS) to the 2.1A USB charging port using a compatible USB cable.
- The unit will provide fast charging for your device.

Image: The car stereo with a smartphone connected to the USB port for charging, indicating fast charging capability.
6.8. Backlight Color Adjustment
The unit features a 7-color button backlight that can be customized.
- Through the mobile application (CarMedias for Apple, CarMedia for Android), you can adjust the backlight color.
- You can also set the backlight to cycle through colors automatically.

Image: The car stereo display showing different backlight color options for the buttons.
7. Maintenance
- Cleaning: Use a soft, dry cloth to clean the unit's surface. Do not use abrasive cleaners or solvents.
- Dust: Regularly remove dust from the unit's vents to ensure proper cooling.
- Connections: Periodically check all wiring connections to ensure they are secure.
8. Troubleshooting
| Problem | Possible Cause | Solution |
|---|---|---|
| No power | Incorrect wiring; Blown fuse; Car battery issue | Check power connections; Replace fuse; Check car battery |
| No sound | Speaker wires disconnected; Volume too low; Incorrect audio source | Check speaker connections; Increase volume; Select correct source |
| Bluetooth not connecting | Bluetooth not enabled; Device too far; Interference | Ensure Bluetooth is on; Move device closer; Restart unit and phone |
| Poor FM reception | Antenna not connected; Weak signal area; Interference | Check antenna connection; Try different location; Scan for stations again |
| USB/TF not playing | Unsupported file format; Corrupted media; Incorrect insertion | Ensure files are compatible; Try different media; Reinsert USB/TF card |
9. Specifications
| Feature | Detail |
|---|---|
| Brand | HIMICAR |
| Model | M18 |
| Connectivity Technology | Bluetooth, USB, AUX |
| Special Features | Volume Control, Voice Control, Hands-Free Calling |
| Compatible Devices | Smartphone, Tablet |
| Audio Output Mode | Stereo |
| Audio Output Type | Speakers |
| FM Frequency Range | 87.5 - 108 MHz |
| USB Charging Port | 2.1A |
| Product Dimensions | 17.8 x 5.5 x 5 cm |
| Weight | 310 g |
10. Warranty and Support
For warranty information and customer support, please refer to the documentation provided with your purchase or contact the seller directly. Keep your proof of purchase for any warranty claims.