1. Product Overview
The ASUS TUF GAMING B760M-PLUS WIFI motherboard is designed to support the latest 13th and 12th Gen Intel Core processors. It integrates robust features for stable performance, including an upgraded power solution and a comprehensive cooling system. This motherboard is built with military-grade components to ensure durability and reliability for demanding computing tasks and gaming sessions.
Key Features:
- Intel LGA 1700 Socket: Compatible with 13th Gen Intel Core processors & 12th Gen Intel Core, Pentium Gold, and Celeron Processors.
- Enhanced Power Solution: Features 12+1 DrMOS power stages, a six-layer PCB, 8+4 ProCool sockets, military-grade TUF components, and Digi+ VRM for maximum durability and stable power delivery.
- Comprehensive Cooling: Equipped with enlarged VRM heatsinks, M.2 heatsinks, a PCH heatsink, hybrid fan headers, and Fan Xpert 4 for efficient thermal management.
- Latest Connectivity: Includes a PCIe 5.0 slot, PCIe 4.0 M.2 slots, rear USB 3.2 Gen 2x2 Type-C, front panel header for USB 3.2 Gen 2 Type-C, and Thunderbolt (USB4) header support.
- Online Gaming Ready: Features Intel WiFi 6, Realtek 2.5Gb Ethernet, and TUF LANGuard for reliable and fast network connectivity.
- Two-way AI Noise-Cancelation: Reduces background noise from both microphone input and audio output for clear communication.
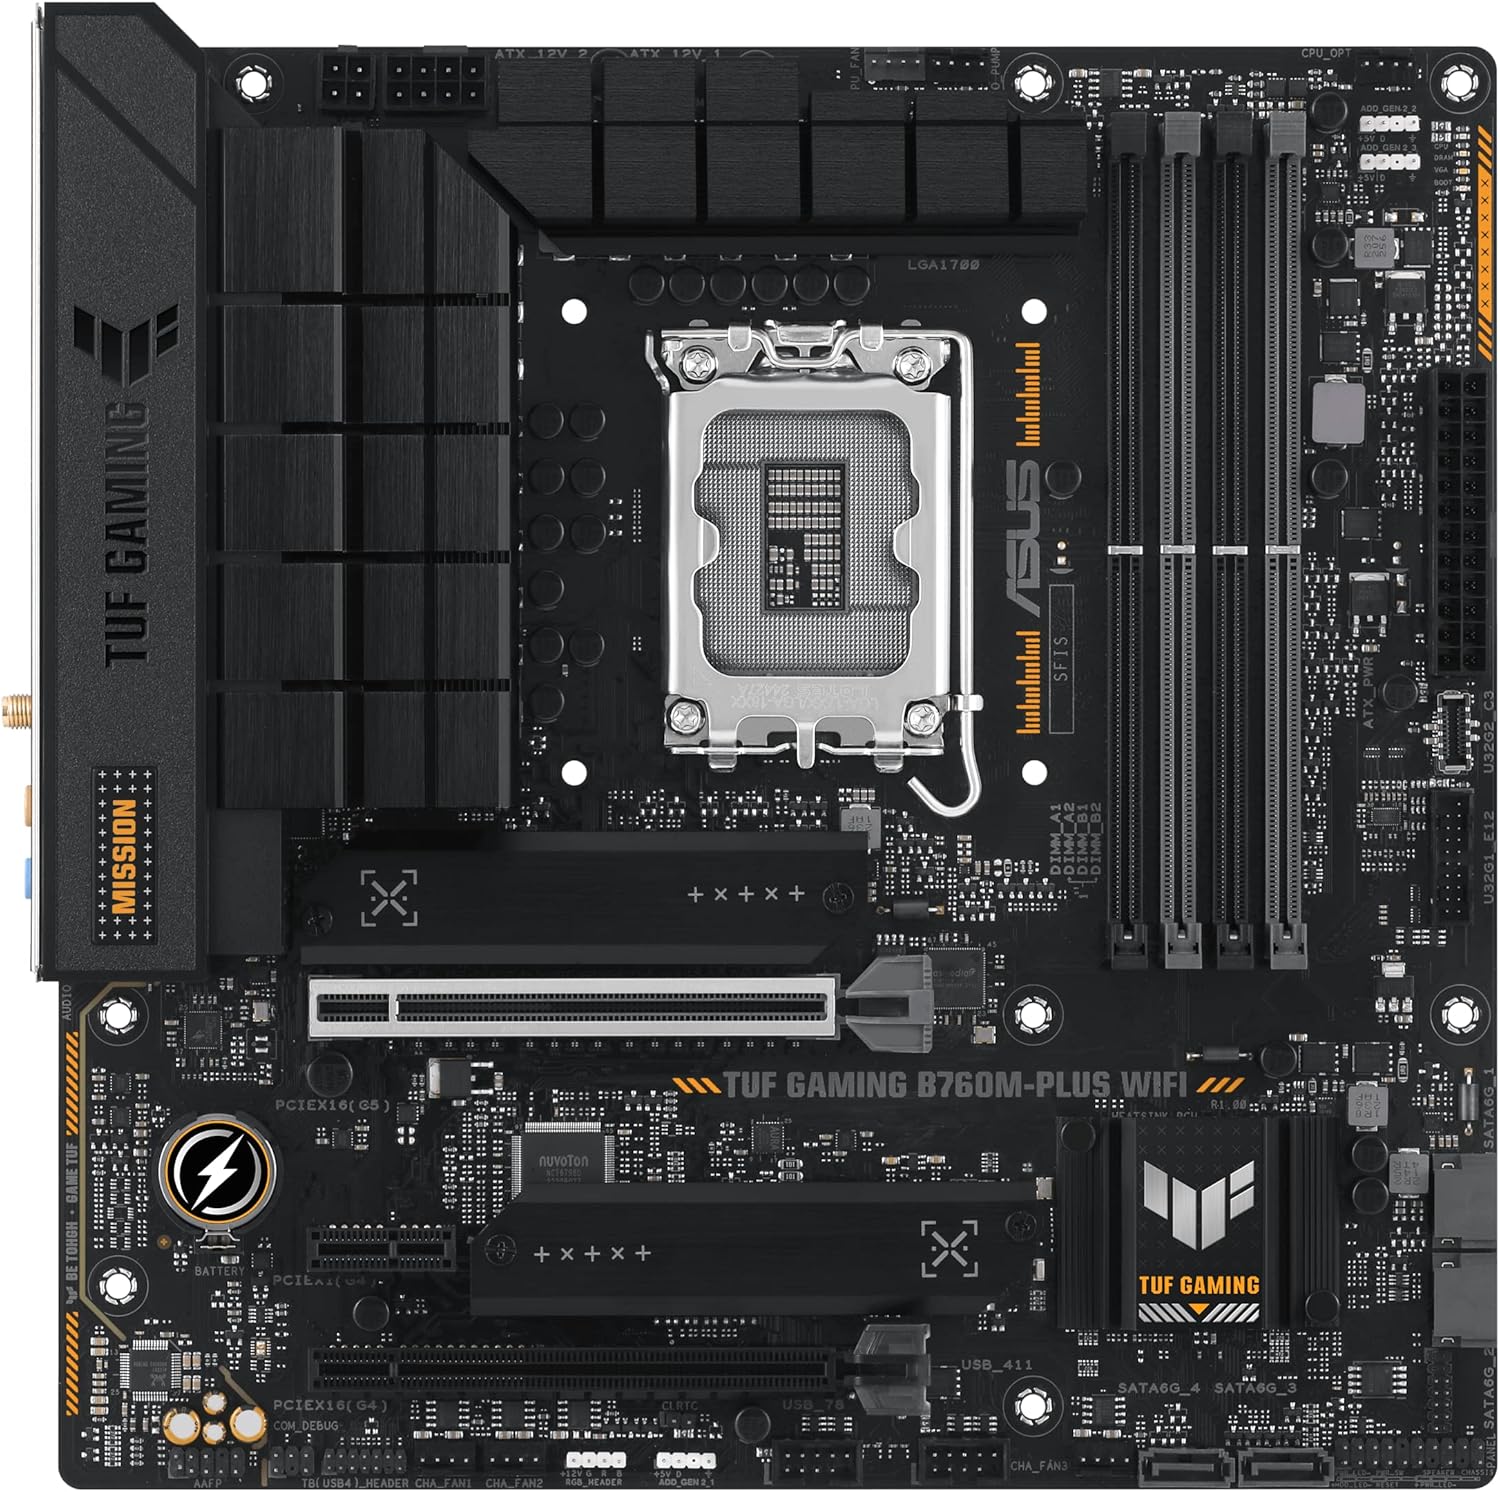
Figure 1.1: The ASUS TUF Gaming B760M-PLUS WiFi Motherboard, its retail packaging, and included WiFi antenna.
2. Safety Information
Always observe the following safety precautions when handling or installing the motherboard:
- Disconnect the power cord from the wall outlet before touching any component.
- Wear an anti-static wrist strap or frequently touch a grounded metal object to discharge static electricity before handling the motherboard.
- Hold the motherboard by its edges and avoid touching the components or connectors.
- Ensure proper ventilation in your PC case to prevent overheating.
- Do not expose the motherboard to moisture or extreme temperatures.
- Refer to the power supply unit (PSU) manual for proper installation and safety guidelines.
3. Setup and Installation
This section provides instructions for installing the motherboard and its primary components.
3.1. Installing the CPU
- Locate the LGA 1700 CPU socket on the motherboard.
- Open the CPU socket lever and lift the load plate.
- Carefully align the CPU with the socket, ensuring the triangular mark on the CPU matches the mark on the socket. Do not force the CPU into the socket.
- Lower the load plate and press down the lever until it locks into place.

Figure 3.1: Top-down view highlighting the LGA 1700 CPU socket.
3.2. Installing DDR5 Memory Modules
- Locate the four DDR5 DIMM slots. For dual-channel configuration, refer to the motherboard manual for recommended slot pairing (usually A2 and B2 first).
- Open the clips at both ends of the DIMM slot.
- Align the notch on the DDR5 memory module with the key in the DIMM slot.
- Press down firmly on both ends of the memory module until the clips snap into place.
3.3. Installing M.2 SSDs
The motherboard features multiple M.2 slots, including support for PCIe 4.0. Some slots may have heatsinks pre-installed.
- Unscrew and remove the M.2 heatsink (if present) from the desired M.2 slot.
- Insert the M.2 SSD into the slot at a 30-degree angle.
- Gently push down the M.2 SSD and secure it with the provided screw or Q-Latch mechanism.
- Reattach the M.2 heatsink, ensuring proper contact with the thermal pad.
3.4. Installing the Graphics Card (GPU)
The primary PCIe 5.0 x16 slot is designed for graphics cards.
- Locate the PCIe 5.0 x16 slot (the topmost long slot).
- Open the retention clip at the end of the slot.
- Align the graphics card with the slot and press down firmly until it is fully seated and the retention clip snaps shut.
- Secure the graphics card to the PC case with screws.

Figure 3.2: Angled view showing the PCIe 5.0 slot and M.2 slots.
3.5. Connecting Power Cables
- 24-pin ATX Power Connector: Connect the main 24-pin power cable from your PSU to the corresponding connector on the motherboard.
- 8-pin + 4-pin CPU Power Connectors: Connect the 8-pin and 4-pin CPU power cables from your PSU to the connectors located near the CPU socket.
- SATA Power and Data Cables: Connect SATA power cables from the PSU to your storage drives and SATA data cables from the motherboard to your storage drives.
3.6. Connecting Front Panel Connectors
Connect the case's front panel cables (Power LED, HDD LED, Power Switch, Reset Switch, USB, Audio) to their respective headers on the motherboard. Refer to the motherboard layout diagram in the full user manual for exact pin locations.
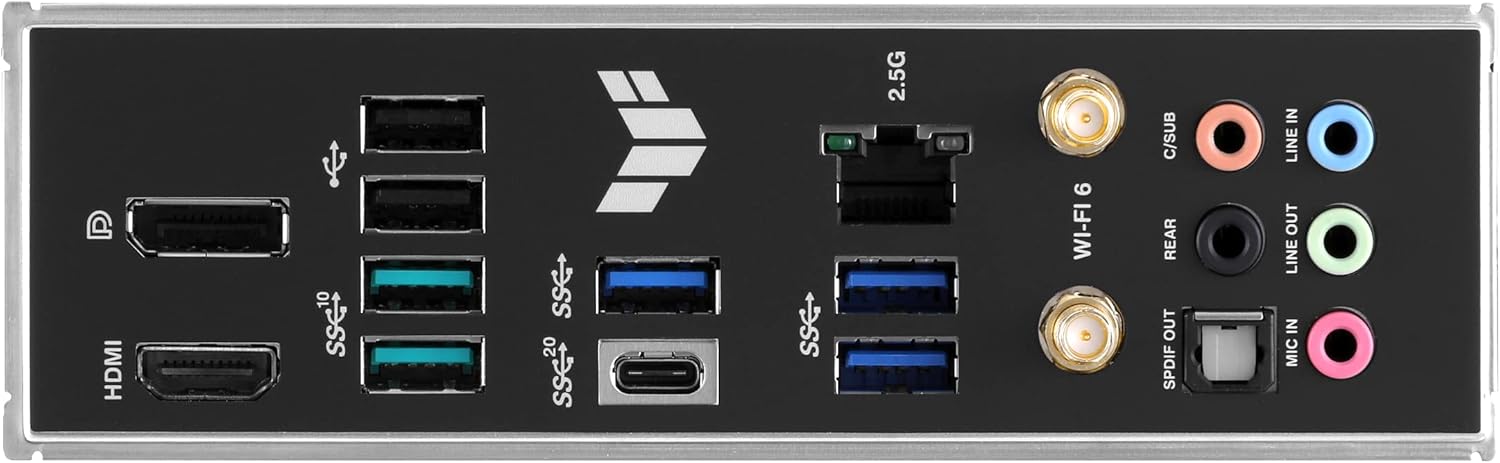
Figure 3.3: Rear I/O panel showing various connectivity options.
4. Operating Instructions
Once all hardware components are installed, you can proceed with system operation.
4.1. First Boot and BIOS Setup
- Connect a monitor, keyboard, and mouse.
- Power on your system. Press the DEL key repeatedly during startup to enter the BIOS/UEFI setup utility.
- In the BIOS, you can configure boot order, enable XMP for memory, adjust fan curves, and set other system parameters.
- Save changes and exit the BIOS to continue with operating system installation.
4.2. Driver Installation
After installing your operating system, install the necessary drivers for optimal performance. Drivers can be found on the ASUS support website for your specific motherboard model.
- Chipset Drivers
- LAN Drivers (Realtek 2.5Gb Ethernet)
- WiFi Drivers (Intel WiFi 6)
- Audio Drivers
- Intel Management Engine Interface (MEI) Drivers
- Graphics Drivers (for integrated graphics or discrete GPU)
4.3. Software Utilities
ASUS provides several software utilities to enhance your experience:
- Armoury Crate: A centralized utility for managing drivers, utilities, BIOS updates, and Aura Sync RGB lighting.
- Fan Xpert 4: For advanced fan control and system cooling optimization.
- AI Suite 3: A comprehensive suite for system tuning and monitoring.
5. Maintenance
Regular maintenance helps ensure the longevity and optimal performance of your motherboard.
- Dust Removal: Periodically clean dust from the motherboard and components using compressed air. Ensure the system is powered off and unplugged.
- BIOS Updates: Check the ASUS support website for the latest BIOS versions. BIOS updates can improve compatibility, stability, and performance. Follow the instructions carefully when updating the BIOS.
- Driver Updates: Keep your drivers updated to ensure compatibility with new software and hardware, and to benefit from performance improvements and bug fixes.
- Cable Management: Ensure cables inside the case are neatly managed to improve airflow and prevent obstruction.
6. Troubleshooting
This section addresses common issues you might encounter.
| Problem | Possible Cause / Solution |
|---|---|
| System does not power on. |
|
| No display output. |
|
| System unstable or crashes. |
|
| WiFi or LAN not working. |
|
| GPU does not fit into the PCIe slot due to shroud. |
|
7. Specifications
| Feature | Detail |
|---|---|
| CPU Socket | LGA 1700 |
| Compatible Processors | 13th Gen Intel Core, 12th Gen Intel Core, Pentium Gold, Celeron Processors |
| Chipset | Intel B760 |
| RAM Memory Technology | DDR5 |
| Memory Slots | 4 x DIMM slots, Max. 192GB |
| Supported Memory Speed | DDR5 7200+(OC)/7000(OC)/6800(OC)/6600(OC)/6400(OC)/6200(OC)/6000(OC)/5800(OC)/5600/5400/5200/5000/4800 MHz |
| PCIe Slots | 1 x PCIe 5.0 x16, 2 x PCIe 4.0 x16 (x4 mode), 1 x PCIe 4.0 x1 |
| M.2 Slots | 2 x PCIe 4.0 M.2 slots |
| Storage | 4 x SATA 6Gb/s ports |
| USB Ports (Rear) | 1 x USB 3.2 Gen 2x2 Type-C, Multiple USB 3.2 Gen 2, USB 3.2 Gen 1, USB 2.0 |
| USB Ports (Front Headers) | USB 3.2 Gen 2 Type-C, USB 3.2 Gen 1, USB 2.0 |
| Networking | Intel WiFi 6 (802.11ax), Realtek 2.5Gb Ethernet |
| Audio | Realtek 7.1 Surround Sound High Definition Audio CODEC |
| Form Factor | mATX (Micro-ATX) |
| Dimensions | 11 x 10.85 x 2.7 inches (Product Dimensions) |
| Item Weight | 3.08 pounds |
8. Warranty and Support
ASUS products typically come with a manufacturer's warranty. Please refer to the warranty card included with your product or visit the official ASUS support website for detailed warranty terms and conditions specific to your region and model.
For technical support, driver downloads, BIOS updates, and troubleshooting guides, please visit the official ASUS support website:
When contacting support, please have your motherboard's model name (TUF GAMING B760M-PLUS WIFI) and serial number ready.


