B36H4-AD
Generic B36H4-AD Desktop Motherboard User Manual
Model: B36H4-AD
1. Introduction
This manual provides detailed instructions for the installation, operation, and maintenance of the Generic B36H4-AD Desktop Motherboard. This motherboard is designed for use in personal computers and is compatible with specific Intel processors and DDR4 RAM. Please read this manual thoroughly before proceeding with any installation or operation.
The B36H4-AD motherboard is compatible with systems such as TC-885, N50-600, and P03-600.
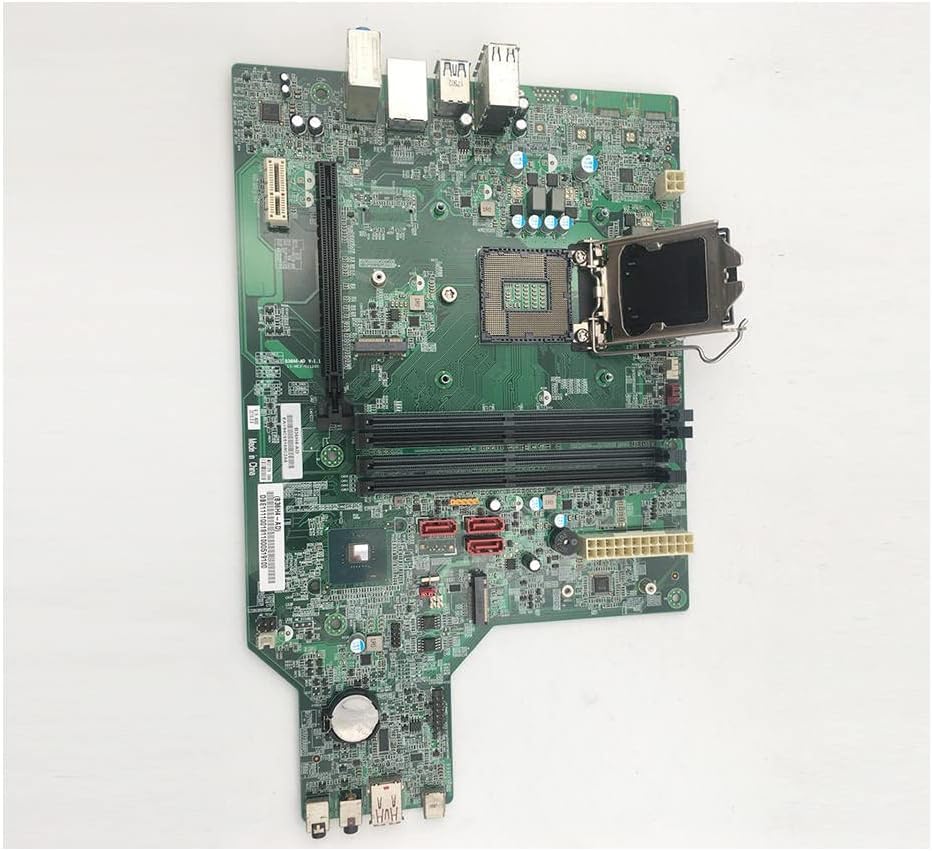
Figure 1.1: Overview of the Generic B36H4-AD Desktop Motherboard. This image displays the full layout of the motherboard, including the CPU socket, RAM slots, and various connectors.
2. Setup and Installation
Before installing the motherboard, ensure your system components are compatible. The B36H4-AD supports LGA 1151 CPUs and DDR4 RAM.
2.1. Component Compatibility
- CPU Socket: LGA 1151
- Compatible Processors: Intel Core i7-7700K, Intel Core i7-8700K, Intel Core i9-9900K, Intel Core i5-10600K, Intel Core i7-10700K
- RAM Technology: DDR4
- Chipset: Intel B360
2.2. Motherboard Installation
- Prepare the Case: Ensure your computer case is ready for motherboard installation. Install standoffs as required.
- Install the CPU: Carefully open the CPU socket lever. Align the CPU with the socket, ensuring the notches match. Gently place the CPU into the socket and close the lever to secure it.
- Install RAM Modules: Open the clips on the DDR4 RAM slots. Align the RAM module with the slot, ensuring the notch on the module matches the key in the slot. Press down firmly on both ends until the clips snap into place.
- Mount the Motherboard: Carefully place the motherboard into the case, aligning it with the standoffs. Secure the motherboard with screws.
- Connect Power: Connect the 24-pin ATX main power connector and the 8-pin (or 4-pin) CPU power connector from your power supply to the motherboard.
- Connect Storage Devices: Connect SATA data cables from your storage drives (HDD/SSD) to the SATA ports on the motherboard.
- Connect Front Panel Cables: Connect the power button, reset button, USB ports, and audio jacks from your case to the corresponding headers on the motherboard. Refer to your case manual for specific pin assignments.
- Install Expansion Cards: If applicable, install graphics cards or other expansion cards into the PCIe slots.

Figure 2.1: Close-up view of the LGA 1151 CPU socket and DDR4 RAM slots. Proper alignment is crucial during CPU installation.

Figure 2.2: Detail of the SATA ports (red connectors) and the Intel B360 chipset on the motherboard. These ports are used for connecting storage devices.
3. Operating Instructions
Once all components are installed and connected, you can power on your system.
3.1. First Boot
- After connecting the power supply to a wall outlet, press the power button on your computer case.
- The system should power on, and you should see a display on your monitor.
- Access the BIOS/UEFI setup by pressing the designated key during boot (commonly Del, F2, F10, or F12).
- Configure boot order, system time, and other settings as needed.
3.2. Driver Installation
After installing your operating system, install the necessary drivers for the motherboard chipset, integrated graphics (if used), audio, and network. These drivers are typically provided by the operating system or can be downloaded from the manufacturer's website.

Figure 3.1: Rear Input/Output (I/O) panel of the B36H4-AD motherboard, showing various ports for peripherals like USB, Ethernet, and audio.
4. Maintenance
Proper maintenance ensures the longevity and stable operation of your motherboard.
- Dust Removal: Regularly clean dust from inside your computer case, especially from fans and heatsinks, using compressed air. Dust accumulation can lead to overheating.
- BIOS/UEFI Updates: Periodically check the manufacturer's website for BIOS/UEFI updates. Updates can improve stability, add support for new hardware, or fix bugs. Follow the update instructions carefully to avoid damaging the motherboard.
- Cable Management: Ensure internal cables are neatly routed to improve airflow and prevent interference.
- Environmental Conditions: Operate the computer in a well-ventilated area, away from direct sunlight, excessive heat, or humidity.

Figure 4.1: Various internal connectors on the B36H4-AD motherboard, including power connectors and front panel headers, which should be kept clear of dust.
5. Troubleshooting
This section provides solutions to common issues you might encounter.
| Problem | Possible Cause | Solution |
|---|---|---|
| System does not power on. | Loose power cables, faulty power supply, incorrect front panel connection. | Check all power connections (24-pin ATX, 8-pin CPU). Ensure front panel power switch is correctly connected. Test power supply. |
| No display on monitor. | Loose graphics card, incorrect monitor connection, faulty RAM. | Reseat graphics card. Check monitor cable connection. Reseat RAM modules. Try one RAM module at a time. |
| System reboots unexpectedly. | Overheating, unstable power, faulty RAM. | Check CPU and case fan operation. Ensure proper airflow. Test RAM with diagnostic tools. |
| Operating system not detected. | Incorrect boot order, loose SATA cable, faulty storage drive. | Check BIOS/UEFI boot order. Reseat SATA cables. Test storage drive. |
If the issue persists, consult a qualified technician or refer to the manufacturer's support resources.

Figure 5.1: Rear view of the B36H4-AD motherboard, showing the CPU backplate. This area should be clear of obstructions for proper cooling.
6. Specifications
Key technical specifications for the Generic B36H4-AD Desktop Motherboard:
| Feature | Detail |
|---|---|
| Model Name | B36H4-AD |
| Manufacturer | Generic |
| CPU Socket | LGA 1151 |
| Chipset Type | Intel B360 |
| RAM Memory Technology | DDR4 |
| Memory Clock Speed | 1600 MHz |
| Main Power Connector Type | ATX |
| Graphics Card Interface | Integrated |
| Compatible Devices | Personal Computer |
| Date First Available | March 28, 2023 |
7. Warranty and Support
For warranty information and technical support, please refer to the documentation provided with your purchase or contact the manufacturer directly. Specific warranty terms may vary based on region and retailer.
For further assistance, you may visit the product page on Amazon or contact your vendor.
Related Documents - B36H4-AD
 |
Brennenstuhl HL 600 AD Rechargeable LED Hand Lamp - User Manual Comprehensive operating instructions for the Brennenstuhl HL 600 AD rechargeable LED hand lamp, covering safety, technical specifications, operation, charging, battery replacement, and disposal. |
 |
A&D AD-4212C Series Production Weighing Unit Instruction Manual Comprehensive instruction manual for the A&D AD-4212C series production weighing units, detailing features, installation, operation, specifications, and troubleshooting for industrial weighing applications. |
 |
USA Roller Sports Figure Rules 2024-2025: Adult Events Official rulebook for USA Roller Sports adult figure skating competitions for the 2024-2025 season, detailing disciplines, eligibility, competition formats, warm-ups, judging, and costume regulations. |
 |
Brother PT-D210 P-touch Label Maker User's Guide This user's guide for the Brother PT-D210 P-touch label maker covers setup, operation, formatting, and troubleshooting. Learn to create custom labels with TZe tapes. |
 |
Cassettes Digest: 1981 Test Reports on Cassette Decks & Tapes A comprehensive 1981 guide featuring test reports and technical analysis of 50 cassette decks and 77 blank tapes by Gordon King, covering audio technology, performance, and selection for hi-fi enthusiasts. |
 |
OHAUS EXPLORER PLUS™ Semi-Micro Balances: Features, Specifications, and Accessories Detailed datasheet for OHAUS EXPLORER PLUS™ Semi-Micro Balances, covering features, technical specifications, outline dimensions, approvals, and available accessories. |