WAVLINK WN578R2
WAVLINK N300 WiFi Range Extender User Manual
Model: WN578R2
Product Overview
The WAVLINK N300 WiFi Range Extender is designed to boost your existing WiFi coverage and eliminate dead zones. It supports 802.11n WiFi technology, providing wireless network coverage up to 300Mbps. This versatile device features dual Ethernet ports, external adjustable antennas, and a WPS button for easy setup, making it an ideal solution for extending your home network.

Figure 1: WAVLINK N300 WiFi Range Extender, front view with signal indicators.
Key features include:
- N300 WiFi Technology: Provides up to 300Mbps wireless speed for smooth browsing and streaming.
- Dual Ethernet Ports: Offers 10/100Mbps data transfer rates for wired connections.
- External Antennas: Two adjustable high-gain antennas enhance signal strength and coverage.
- Multiple Operating Modes: Supports Repeater, Access Point (AP), and Router modes to suit various networking needs.
- WPS Button: Enables quick and secure connection establishment with compatible routers.
- Secure Network Access: Features advanced encryption technologies (WEP, WPA, WPA2) to protect your network.

Figure 2: Illustration of the WiFi extender extending network coverage throughout a home.
The extender is designed for wall-plug installation, offering a compact and convenient solution for expanding your wireless network.
Package Contents
Upon opening the package, please verify that all items are present and in good condition:
- WAVLINK N300 WiFi Extender (Model: WN578R2)
- Quick Installation Guide (not included in this digital manual)
If any items are missing or damaged, please contact WAVLINK customer support.
Physical Components
Familiarize yourself with the various parts and indicators of your WAVLINK WiFi Extender:

Figure 3: Key physical components and ports of the WAVLINK WiFi Extender.
- WPS Button: Used for quick, secure setup with WPS-enabled routers.
- WLAN LED: Indicates wireless activity.
- Power/WPS LED: Indicates power status and WPS connection status.
- WAN/LAN LED: Indicates activity on the WAN/LAN port.
- LAN LED: Indicates activity on the LAN port.
- WAN/LAN Port: Ethernet port for connecting to a router or wired device.
- LAN Port: Additional Ethernet port for connecting wired devices.
- ON/OFF Switch: Power toggle for the device.
- Reset Button: Recessed button to restore factory default settings.
- Mode Switch: Allows selection between Repeater, Access Point, and Router modes.
- External Antennas: Two adjustable antennas for optimal signal reception and transmission.

Figure 4: Internal components highlighting the high-performance chip and external antennas.
Setup Instructions
The WAVLINK N300 WiFi Extender offers multiple setup methods. Choose the one that best suits your needs.
Method 1: WPS (Wi-Fi Protected Setup)
WPS is the easiest way to set up your extender if your main router supports it.
- Plug the WAVLINK extender into an electrical outlet near your main router. Wait for the Power/WPS LED to light up.
- Press the WPS button on your main router for approximately 3 seconds.
- Within 2 minutes, press the WPS button on the WAVLINK extender for 3 seconds.
- The Power/WPS LED on the extender will blink rapidly during the connection process and then turn solid when successfully connected.
- Once connected, you can unplug the extender and move it to a desired location within your router's WiFi range but closer to the area needing extended coverage. Ensure the WLAN LED is solid, indicating a good signal.

Figure 5: Easy installation using the WPS button.
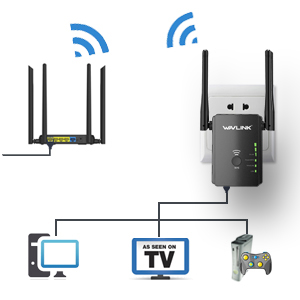
Figure 6: One-key WPS encryption for secure connection.
Method 2: Web Browser Configuration
This method is suitable if your router does not have a WPS button or for more advanced settings.
- Plug the WAVLINK extender into an electrical outlet near your computer or main router.
- Connect your computer to the extender:
- Wireless: Connect to the extender's default WiFi network (e.g., "WAVLINK_EXT" or similar, check the label on the device).
- Wired: Connect your computer to one of the extender's LAN ports using an Ethernet cable.
- Open a web browser (e.g., Chrome, Firefox, Edge) and enter the default IP address or domain name (e.g., 192.168.10.1 or ap.setup) into the address bar. Refer to the device label or quick start guide for the exact address.
- Enter the default login credentials (usually "admin" for both username and password).
- Follow the on-screen instructions of the setup wizard to configure the extender. You will typically select your main WiFi network and enter its password.
- Once configured, the extender will restart. You can then unplug it and place it in your desired location.
Operating Modes
The WAVLINK N300 WiFi Extender supports three primary operating modes:
1. Repeater Mode
In Repeater Mode, the extender wirelessly connects to your existing router and amplifies its signal, extending the WiFi coverage to areas with weak or no signal. This mode is ideal for eliminating WiFi dead zones.

Figure 7: Repeater Mode setup, boosting existing WiFi without a cable connection to the router.
2. Access Point (AP) Mode
In AP Mode, the extender connects to your router via an Ethernet cable and transforms your wired network connection into a wireless hotspot. This is useful for adding WiFi capability to a wired-only network or creating a new WiFi network in a specific area.

Figure 8: AP Mode setup, connecting via Ethernet to create a WiFi hotspot.
3. Router Mode
In Router Mode, the device functions as a standalone router, connecting directly to your modem via an Ethernet cable to create a new private wireless network. This mode is suitable for small offices or homes without an existing router.

Figure 9: Router Mode setup, connecting via Ethernet to function as a primary router.
To switch between modes, use the physical mode switch located on the side of the device, or configure through the web interface.
Maintenance
Proper maintenance ensures the longevity and optimal performance of your WAVLINK WiFi Extender.
- Placement: Place the extender in an open area, away from obstructions like large metal objects, concrete walls, and other electronic devices that may cause interference. Avoid placing it in enclosed spaces.
- Cleaning: Regularly clean the device with a soft, dry cloth. Do not use liquid cleaners or aerosols. Ensure the ventilation holes are free from dust and debris.
- Firmware Updates: Periodically check the WAVLINK official website for firmware updates. Updating the firmware can improve performance, add new features, and fix bugs. Follow the instructions provided on the website carefully when performing updates.
- Power Cycle: If you experience connectivity issues, try power cycling the device by unplugging it from the power outlet for 10-15 seconds and then plugging it back in.
Troubleshooting
If you encounter issues with your WAVLINK WiFi Extender, refer to the following common troubleshooting steps:
- No Power/LEDs Off:
Ensure the extender is securely plugged into a working electrical outlet. Check the ON/OFF switch on the device. Try a different outlet.
- Cannot Connect to the Extender's WiFi:
Verify that the extender is powered on. Ensure you are selecting the correct WiFi network name (SSID) for the extender. If you changed the SSID during setup, use the new name. Re-enter the WiFi password carefully.
- Weak Signal or Frequent Disconnections:
Relocate the extender closer to your main router. Ensure there are no major obstructions (thick walls, large appliances) between the extender and your router. Adjust the external antennas for optimal signal reception. Remember, extenders improve coverage, not necessarily raw speed, which is dependent on your internet service provider.

Figure 10: Optimal placement of the extender for improved signal in a room.
- Setup Issues (WPS or Web Interface):
If WPS fails, try the web browser configuration method. Ensure you are entering the correct default IP address/domain and login credentials. If you previously changed the login details and forgot them, you may need to perform a factory reset.
- Factory Reset:
If all else fails, you can perform a factory reset. With the extender powered on, use a paperclip or a thin object to press and hold the recessed Reset button for about 5-10 seconds until the LEDs flash. The device will reboot with factory default settings, and you will need to set it up again.
- Wired Devices Not Connecting:
Ensure the Ethernet cable is securely connected to both the extender's LAN port and your wired device. Check the LAN LED on the extender; it should be lit when a device is connected and active. Verify the extender is in a mode that supports wired connections (e.g., Repeater or AP mode).
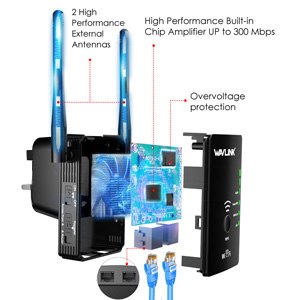
Figure 11: Connecting wired devices to the extender's Ethernet ports.
Specifications
| Feature | Detail |
|---|---|
| Model Number | WN578R2 |
| Wireless Standard | 802.11n |
| Data Transfer Rate | Up to 300 Mbps |
| Frequency Band | 2.4 GHz |
| Ethernet Ports | 2 x 10/100 Mbps (WAN/LAN, LAN) |
| Antennas | 2 x External Adjustable High-Gain Antennas |
| Security | WEP, WPA, WPA2 (up to 128-bit encryption) |
| Dimensions | 4.76 x 4.69 x 3.43 inches (Package) |
| Item Weight | 7.4 ounces |
| Power Supply | Wall Plug |
Warranty and Support
WAVLINK is committed to providing reliable products and excellent customer service. For warranty information, please refer to the documentation included with your purchase or visit the official WAVLINK website.
For technical support, product inquiries, or assistance with setup and troubleshooting, please contact WAVLINK support:
- Phone Support: +1 8889730883 (UTC -5) Monday - Friday 9AM - 6PM
- Email Support: Contact@wavlink.com
- Official Website: Visit www.wavlink.com for FAQs, drivers, firmware updates, and additional support resources.
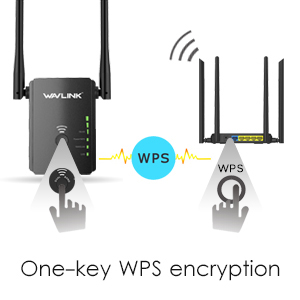
Figure 12: WAVLINK customer support contact details.