RayHong RS500XR
RayHong Portable Digital Video Magnifier User Manual
Model: RS500XR
Introduction
This manual provides comprehensive instructions for the operation and maintenance of your RayHong Portable Digital Video Magnifier. Designed to assist individuals with visual impairments such as macular degeneration, low vision, color blindness, and amblyopia, this device offers powerful magnification and various display modes to enhance reading and viewing experiences.
Please read this manual thoroughly before using the device to ensure proper function and to maximize its benefits.
Product Overview
The RayHong Portable Digital Video Magnifier features a 5.0-inch HD color LCD screen, 2X-32X zoom magnification, and 26 color modes. It includes an integrated foldable handle and bracket for ergonomic use and can connect to external displays.

Image: The RayHong Portable Digital Video Magnifier, showing magnified text on its screen.
Package Contents
Verify that all items are present in the package:
- RayHong Portable Digital Video Magnifier (Model: RS500XR)
- Charging Cable (USB)
- Power Adapter
- TV Cable (AV)
- HDMI Cable (if included with specific model variant)
- Cleaning Cloth
- User Manual (this document)
- Carrying Pouch
Device Layout and Buttons
Familiarize yourself with the device's buttons and ports:

Image: A diagram illustrating the dimensions and button layout of the RayHong Portable Digital Video Magnifier. Key buttons include Far/Near, Mode, Save, Power, Zoom In, Freeze, Zoom Out, and Focus.
- Power On/Off Button: Located on the bottom left, used to turn the device on or off.
- Far/Near Button (A): Switches between the far camera (for distant objects like street signs) and the near camera (for reading close-up text).
- Mode Button (M): Cycles through the 26 available color modes.
- Save Button: Saves the current image to the device's memory.
- Zoom In Button (+): Increases magnification.
- Zoom Out Button (-): Decreases magnification.
- Freeze Button: Freezes the current image on the screen for closer inspection.
- Focus Button: Activates or adjusts the auto-focus function.
- HDMI Port: For connecting to an external display via HDMI cable.
- USB Port: For charging and connecting to a computer.
- LED Light: Provides illumination for reading in low light conditions.
Setup
1. Charging the Device
Before first use, fully charge the device. Connect the USB charging cable to the device's USB port and the other end to the power adapter. Plug the adapter into a wall outlet. The charging indicator light will show the charging status. A full charge typically takes approximately 4 hours.

Image: An illustration depicting the 2500mAh high-capacity battery, indicating long-lasting power.
2. Powering On/Off
Press and hold the Power On/Off Button for a few seconds to turn the device on. Repeat the action to turn it off.
3. Adjusting the Foldable Handle and Bracket
The device features an integrated handle and a foldable bracket. The handle can be rotated 180 degrees to accommodate both left and right-handed users. The bracket allows the device to be angled at approximately 45 degrees, providing a comfortable reading position without needing to hunch over.

Image: The RayHong magnifier with its integrated handle and foldable bracket, demonstrating how it can be positioned for comfortable reading.
Operating Instructions
1. Adjusting Magnification (Zoom)
Use the Zoom In (+) and Zoom Out (-) buttons to adjust the magnification level from 2X to 32X. The current magnification level will be displayed on the screen.
2. Switching Between Far and Near Cameras
Press the Far/Near Button (A) to toggle between the near camera (for close-up reading) and the far camera (for viewing distant objects like whiteboards or street signs).

Image: The magnifier demonstrating its ability to switch between a close-up view (e.g., strawberries) and a distant view (e.g., an exit sign), highlighting the far/near camera function.

Image: The magnifier showcasing its auto-focus feature, demonstrating clear focus at both 2 meters and 5 meters distance in a classroom setting.
3. Changing Color Modes
Press the Mode Button (M) repeatedly to cycle through the 26 available color modes. These modes are designed to provide optimal contrast and readability for different visual needs. The device memorizes your last used mode, so you don't need to readjust it every time you power on.
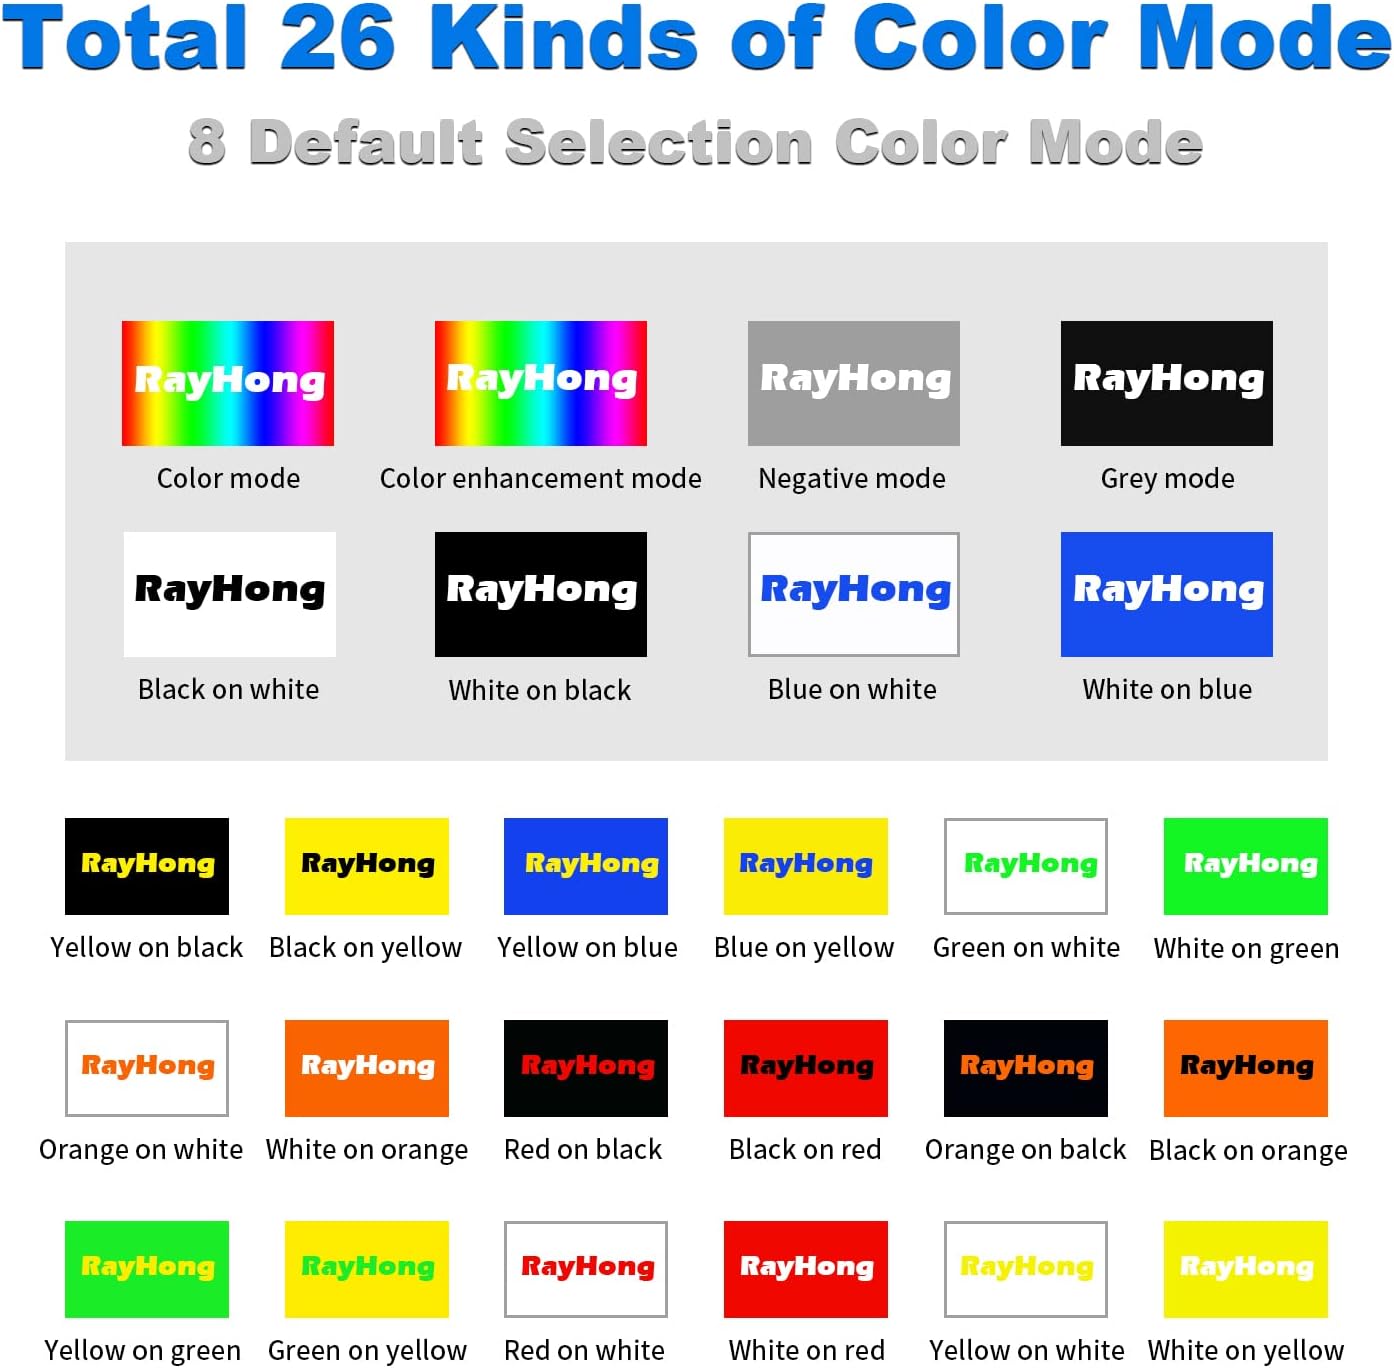
Image: A comprehensive chart illustrating the 26 different color modes available on the RayHong magnifier, including various combinations like black on white, white on black, yellow on black, and more.
4. Freezing an Image
Press the Freeze Button to capture and hold the current image on the screen. This is useful for examining details without needing to keep the device perfectly still over the text or object. Press the button again to unfreeze.

Image: The magnifier demonstrating its image freeze function, showing a clear, static image of a street sign on its screen.
5. Saving Images
Press the Save Button to store the currently displayed image. Saved images can be reviewed later.
6. Connecting to a Television
The magnifier can be connected to a television for a larger display. Use the provided AV cable or an HDMI cable (if applicable) to connect the device to your TV. When connected, the magnifier's LCD screen will turn off automatically, and the image will be displayed on the television.

Image: A diagram illustrating the connection methods for the magnifier to a television, showing both AV and HDMI cable connections for larger and clearer visual output.
7. Writing on Bracket
The design of the magnifier allows for comfortable writing. With the bracket extended, you can place the device over a document and write underneath it, making it easier to fill out forms or sign documents.

Image: A hand writing on a document, with the RayHong magnifier positioned above it using its bracket, demonstrating its utility for writing tasks.
8. Voice Memo Function (if applicable)
Some models may support a voice memo function, allowing you to record short audio notes (e.g., 30 seconds) associated with a captured image. Refer to the on-screen prompts or specific model features for activation.

Image: The magnifier displaying a text and an icon indicating support for a 30-second picture voice memo feature.
Maintenance and Care
- Cleaning: Use the provided cleaning cloth or a soft, lint-free cloth to gently wipe the screen and body of the device. Do not use abrasive cleaners, alcohol, or solvents.
- Storage: Store the device in a cool, dry place, away from direct sunlight and extreme temperatures. Use the carrying pouch to protect it from dust and scratches.
- Battery Care: To prolong battery life, avoid fully discharging the battery frequently. Charge the device regularly, even if not in use for extended periods.
- Avoid Moisture: The device is not waterproof. Keep it away from water and high humidity to prevent damage.
Troubleshooting
| Problem | Possible Cause | Solution |
|---|---|---|
| Device does not turn on. | Battery is low or depleted. | Charge the device fully. |
| Screen is blank or distorted. | Device might be connected to an external display (TV). | Disconnect from the TV. If not connected, try restarting the device. |
| Image is blurry or out of focus. | Incorrect camera mode (far/near) or focus issue. | Switch between far and near camera modes. Press the Focus button to re-engage auto-focus. Ensure adequate lighting. |
| Cannot change color modes. | Mode button not pressed correctly or device frozen. | Ensure the device is not in "freeze" mode. Press the Mode button firmly. |
| No image on TV when connected. | Incorrect cable connection or TV input. | Check cable connections (AV/HDMI). Ensure TV input is set to the correct source (e.g., AV1, HDMI1). |
Specifications
| Feature | Detail |
|---|---|
| Model Number | RS500XR |
| Screen Size | 5.0 inches |
| Magnification | 2X - 32X |
| Color Modes | 26 modes |
| Display Resolution | 800*480 HD |
| Battery Type | Lithium Polymer (included) |
| Battery Capacity | 2500mAh (estimated from image) |
| Product Dimensions | 5.71"L x 3.35"W (145mm x 85mm) |
| Item Weight | 9.5 ounces (270 Grams) |
| Lens Material | Glass |
| Connectivity | USB, HDMI, AV |
Warranty and Support
RayHong products are designed for reliability and performance. For warranty information, please refer to the documentation included with your purchase or visit the official RayHong website. For technical support, troubleshooting assistance, or replacement parts, please contact RayHong customer service through the details provided on their official website or your purchase platform.
Manufacturer: RayHong
ASIN: B0BZNHBDSN
Important Safety Information
- Do not expose the device to extreme temperatures or direct sunlight for prolonged periods.
- Do not attempt to disassemble or repair the device yourself. Refer to qualified service personnel.
- Keep the device away from small children to prevent accidental ingestion of small parts.
- Dispose of the device and its battery according to local regulations. Do not dispose of in household waste.
Ask a question about this manual
Ask about setup, troubleshooting, compatibility, parts, safety, or missing instructions. Manuals+ will review the question and use this page’s manual context to help answer it.