1. Introduction
The Ashdown Studio MiniRig is a compact yet powerful bass amplification system designed for bassists seeking classic Ashdown tone and comprehensive control. This unit combines a 250-watt solid-state bass amplifier head with a 2x10-inch speaker cabinet, offering versatility for practice, studio recording, and live performances. This manual provides essential information for the setup, operation, and maintenance of your Studio MiniRig.
2. Key Features
- 250W Solid-state Bass Amplifier Head with Passive/Active Switch
- Footswitchable Overdrive
- 4-ohm 2 x 10" Speaker Cabinet
- Headphone Output
- DI Output
- FX Loop
3. Setup
Follow these steps to set up your Ashdown Studio MiniRig:
- Placement: Position the 2x10 speaker cabinet on a stable, level surface. Place the amplifier head securely on top of the cabinet.
- Power Connection: Ensure the amplifier's power switch is in the 'OFF' position. Connect the supplied power cable to the AC input on the rear panel of the amplifier head and then to a suitable mains power outlet.
- Speaker Connection: Connect the speaker output from the amplifier head to the input on the speaker cabinet using a high-quality speaker cable. Ensure a secure connection at both ends.
- Instrument Connection: Connect your bass guitar to the 'INPUT' jack on the front panel of the amplifier head. Use the 'PASSIVE/ACTIVE' switch to match your instrument's output level.
- Initial Settings: Before powering on, set all EQ controls to their center (12 o'clock) position, and turn the 'GAIN' and 'VOLUME' controls fully counter-clockwise.

Figure 3.1: Front view of the Ashdown Studio MiniRig, showcasing the amplifier head atop the 2x10 speaker cabinet.
4. Controls and Connections
4.1 Front Panel Controls
- INPUT: 6.35mm jack for connecting your instrument.
- PASSIVE/ACTIVE Switch: Selects input sensitivity for passive or active bass pickups.
- PRE-GAIN: Adjusts the input gain level.
- DRIVE: Controls the amount of valve-emulated overdrive.
- BASS, LO-MID, MIDDLE, HI-MID, TREBLE: 5-band equalizer for tone shaping.
- VOLUME: Master output volume control.
- HEADPHONES: 6.35mm stereo jack for private practice.
4.2 Rear Panel Connections
- POWER Switch: Turns the amplifier on or off.
- POWER Input: Connects to mains power via the supplied cable.
- SPEAKER OUT: Connects to the speaker cabinet.
- DI OUT (XLR): Balanced XLR output for connecting to a mixing console or recording interface.
- FX LOOP (SEND/RETURN): For connecting external effects processors.
- FTSW (Footswitch): Input for an optional footswitch to control features like overdrive.
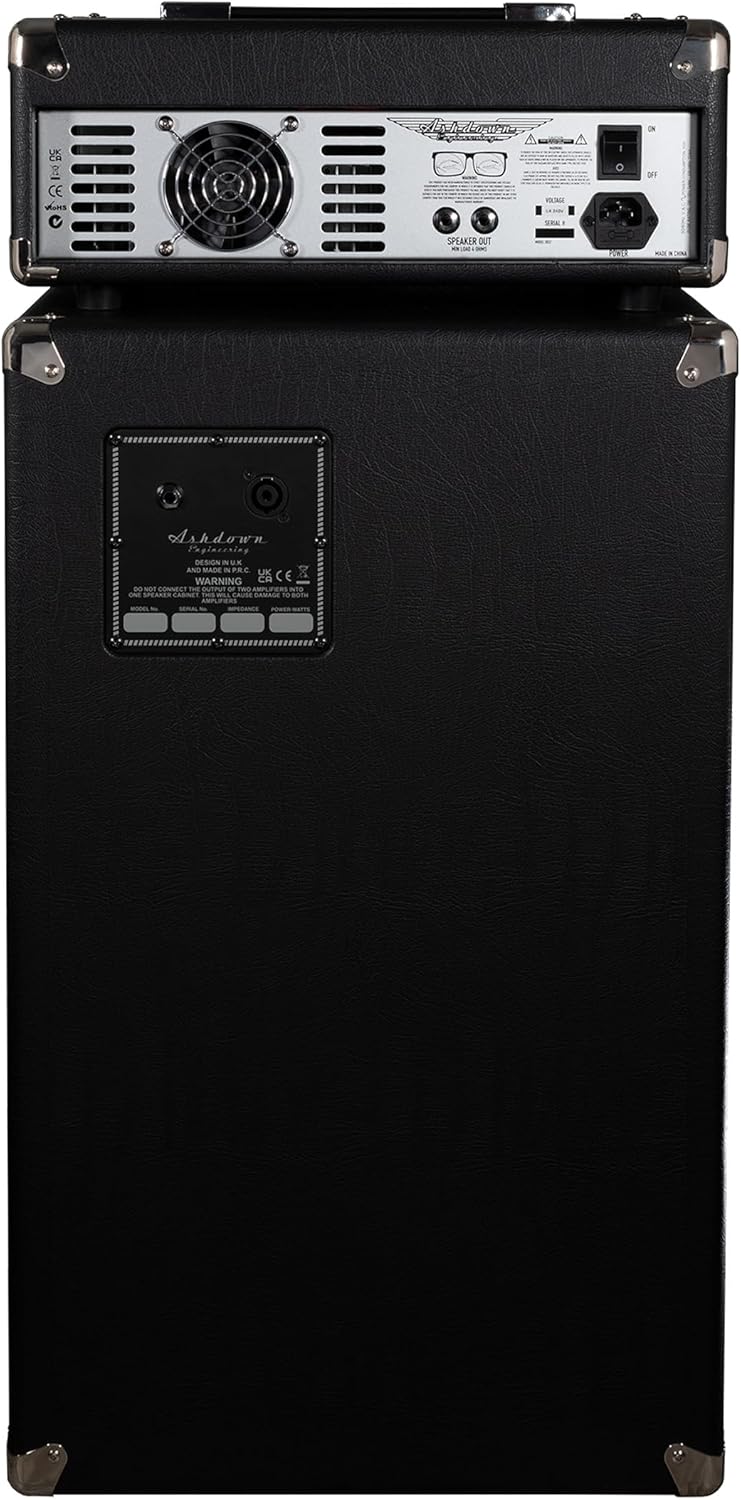
Figure 4.1: Rear panel of the Studio MiniRig, displaying input/output jacks, power switch, and other connections.
5. Operation
- Power On: After all connections are made, switch the 'POWER' button to the 'ON' position.
- Adjusting Gain: Slowly increase the 'PRE-GAIN' control until you achieve your desired input level. Avoid excessive gain to prevent unwanted distortion, unless using the overdrive feature.
- Tone Shaping: Use the 5-band EQ controls (BASS, LO-MID, MIDDLE, HI-MID, TREBLE) to sculpt your desired bass tone. Experiment with these controls to find the sound that best suits your playing style and environment.
- Overdrive: Engage the 'DRIVE' control to add valve-emulated overdrive. An optional footswitch can be used for hands-free activation during performance.
- Master Volume: Gradually increase the 'VOLUME' control to reach your desired overall output level.
- Headphones: For silent practice, plug headphones into the 'HEADPHONES' jack. This will mute the speaker output.

Figure 5.1: The Ashdown Studio MiniRig set up with a bass guitar, illustrating its compact size in a home environment.
6. Sound and Power
The Studio MiniRig delivers 250 watts of solid-state power through two 10-inch custom speakers. This configuration provides a commanding tonal presence and classic Ashdown low-end tone. The amplifier head features a 5-band EQ for precise tone shaping and a footswitchable valve-emulated overdrive for added tonal versatility. The custom-designed speakers are optimized to reproduce the full frequency range of your bass with clarity and punch.
7. Maintenance
- Cleaning: Use a soft, dry cloth to clean the exterior of the amplifier and cabinet. Avoid abrasive cleaners or solvents.
- Storage: Store the unit in a dry, cool environment away from direct sunlight and extreme temperatures.
- Transportation: When transporting, ensure all cables are disconnected and the unit is securely packed. Utilize the integrated side handle for safe carrying.
- Ventilation: Ensure proper ventilation around the amplifier head to prevent overheating. Do not block any vents.

Figure 7.1: Side view of the Studio MiniRig cabinet, showing the integrated carrying handle for portability.
8. Troubleshooting
- No Power: Check the power cable connection at both the amplifier and the wall outlet. Ensure the power switch is 'ON'.
- No Sound: Verify that your instrument cable is connected correctly. Check the speaker cable connection between the head and cabinet. Ensure 'VOLUME' and 'PRE-GAIN' controls are not at zero. If headphones are plugged in, unplug them to enable speaker output.
- Distorted Sound: Reduce the 'PRE-GAIN' or 'DRIVE' controls. Check your instrument's output level. Ensure speaker impedance matches the amplifier's requirements.
- Hum/Noise: Ensure all cables are properly shielded and connected. Try using a different power outlet.
9. Specifications
| Feature | Detail |
|---|---|
| Brand | Ashdown |
| Model Number | STUDIO-MINIRIG |
| Output Wattage | 250 Watts |
| Speaker Configuration | 2 x 10-inch |
| Item Weight | 62.7 pounds (28.5 Kilograms) |
| Product Dimensions | 31.5 x 13.78 x 33.86 inches |
| Compatible Devices | Bass Guitar |
| Connector Type | 6.35mm Jack |
| Color | Black |
10. Warranty and Support
For detailed warranty information and customer support, please refer to the documentation included with your product or visit the official Ashdown Engineering website. You can typically find contact information for technical support and service centers there.