1. Introduction
This manual provides essential information for the assembly, operation, and maintenance of your Giantex Set of 4 Patio Chairs. These outdoor stackable dining chairs are designed with armrests, a 330 LBS capacity, all-weather fabric, and a heavy-duty rustproof steel frame, suitable for various outdoor settings such as porches, yards, pools, and gardens.

Image 1.1: Giantex Set of 4 Patio Chairs, illustrating their stackable design and individual appearance.
2. Safety Information
- Maximum Weight Capacity: Each chair is designed to support a maximum weight of 330 lbs (approximately 150 kg). Do not exceed this limit to prevent damage or injury.
- Ensure all bolts and screws are securely tightened before use. Periodically check and re-tighten as necessary.
- Do not stand on the chairs.
- Keep children under supervision when near or using the chairs.
3. Package Contents
Before beginning assembly, please verify that all components are present and undamaged. If any parts are missing or damaged, contact customer support.
- 4 x Patio Chair Frames (disassembled)
- 4 x Seat and Back Fabric sections
- Assembly Hardware (screws, washers, Allen wrench)
- Instruction Manual
4. Setup and Assembly
The Giantex Patio Chairs require minimal assembly. Follow these general guidelines for a smooth setup:
- Unpack Components: Carefully remove all parts from the packaging. Lay them out on a clean, soft surface to prevent scratches.
- Identify Parts: Refer to the included diagram (if any) to identify the different frame sections, fabric, and hardware.
- Initial Assembly (Loose Fit): Begin by attaching the main frame components. Insert all screws into their respective holes, but do not tighten them fully at this stage. This allows for flexibility to align subsequent parts.
- Attach Seat and Back Fabric: Position the fabric onto the frame. It is crucial to ensure the fabric is properly aligned with all attachment points. Some users have found it easier to attach the longer screws and spacers for the seat fabric before fully tightening other frame screws.
- Leveling and Final Tightening: Once all components are loosely assembled, place the chair on a flat, level surface. Apply gentle pressure to ensure all legs are touching the ground evenly. Then, systematically tighten all screws, starting from the center and working outwards. This helps prevent wobbling.
- Repeat for Remaining Chairs: Follow the same steps for the other chairs in the set.
Note: Some users have reported that holes may not align perfectly or that the provided Allen wrench can be challenging to use. Patience and a systematic approach (loose fitting first, then leveling and tightening) are recommended. Using a ratchet with an Allen key attachment may ease the process.

Image 4.1: Key features for assembly and design, including anti-slip footpads and stackable design.
5. Operating Instructions
These patio chairs are designed for comfortable outdoor dining and relaxation.
- Placement: Suitable for outdoor environments such as patios, gardens, poolside areas, and backyards.
- Comfort: The ergonomic backrest and curved armrests provide lumbar support and overall comfort for extended periods of sitting.
- Stackable Design: When not in use for extended periods, the chairs can be stacked together to save space, making storage convenient.

Image 5.1: Giantex patio chairs in a backyard dining setup.

Image 5.2: The ergonomic design of the chair for comfort.

Image 5.3: Examples of suitable outdoor scenarios for the chairs.
6. Maintenance
Proper care will extend the life and appearance of your patio chairs.
- Cleaning: Wipe clean with a damp cloth. For stubborn dirt, use a mild soap solution and rinse thoroughly. Avoid harsh chemicals or abrasive cleaners.
- Fabric Care: The high-grade fabric is breathable and easy to dry. Allow the fabric to air dry completely after cleaning or rain to prevent mildew.
- Frame Care: The steel frame is plastic-sprayed for rust resistance. Inspect the frame periodically for any signs of wear or rust, especially in areas where the coating might be compromised.
- Hardware Check: Regularly check all screws and bolts to ensure they remain tight. Re-tighten as needed to maintain stability.
- Storage: When not in use for extended periods, especially during harsh weather conditions, store the chairs in a dry, protected area. The stackable design facilitates compact storage.

Image 6.1: Features of the breathable and wearable fabric.

Image 6.2: Details of the rustproof steel frame construction.
7. Troubleshooting
This section addresses common issues that may arise during assembly or use.
- Chair Wobbles After Assembly:
- Ensure all screws were initially left loose during assembly.
- Place the chair on a perfectly flat surface before tightening all screws.
- Loosen all screws slightly, press down on the seat to ensure all four legs are evenly touching the ground, then re-tighten all screws firmly.
- Difficulty Aligning Screw Holes:
- This can occur if screws are tightened too early. Ensure all components are loosely fitted before attempting to fully secure any single screw.
- Gently manipulate the frame pieces to align the holes. Sometimes slight pressure or wiggling is needed.
- Verify that you are using the correct screws for each location as per the assembly diagram.
- Screws Not Threading Properly:
- Ensure the screw is inserted straight into the hole and not at an angle.
- Do not force screws. If a screw is difficult to turn, remove it, check for any obstructions or misthreading, and try again.
- Verify that the screw type and length match the intended hole.
8. Specifications
| Feature | Detail |
|---|---|
| Brand | Giantex |
| Model Number | GT10473BN-4-PN |
| Color | Brown & Black |
| Product Dimensions (D x W x H) | 29" x 21.5" x 35.5" |
| Seat Height | 16.5" |
| Maximum Weight Recommendation | 330 Pounds (per chair) |
| Material | Steel Frame, High-Grade Fabric (Textilene) |
| Style | Stackable |
| Indoor/Outdoor Usage | Outdoor |
| Included Components | 4 Patio Dining Chairs |
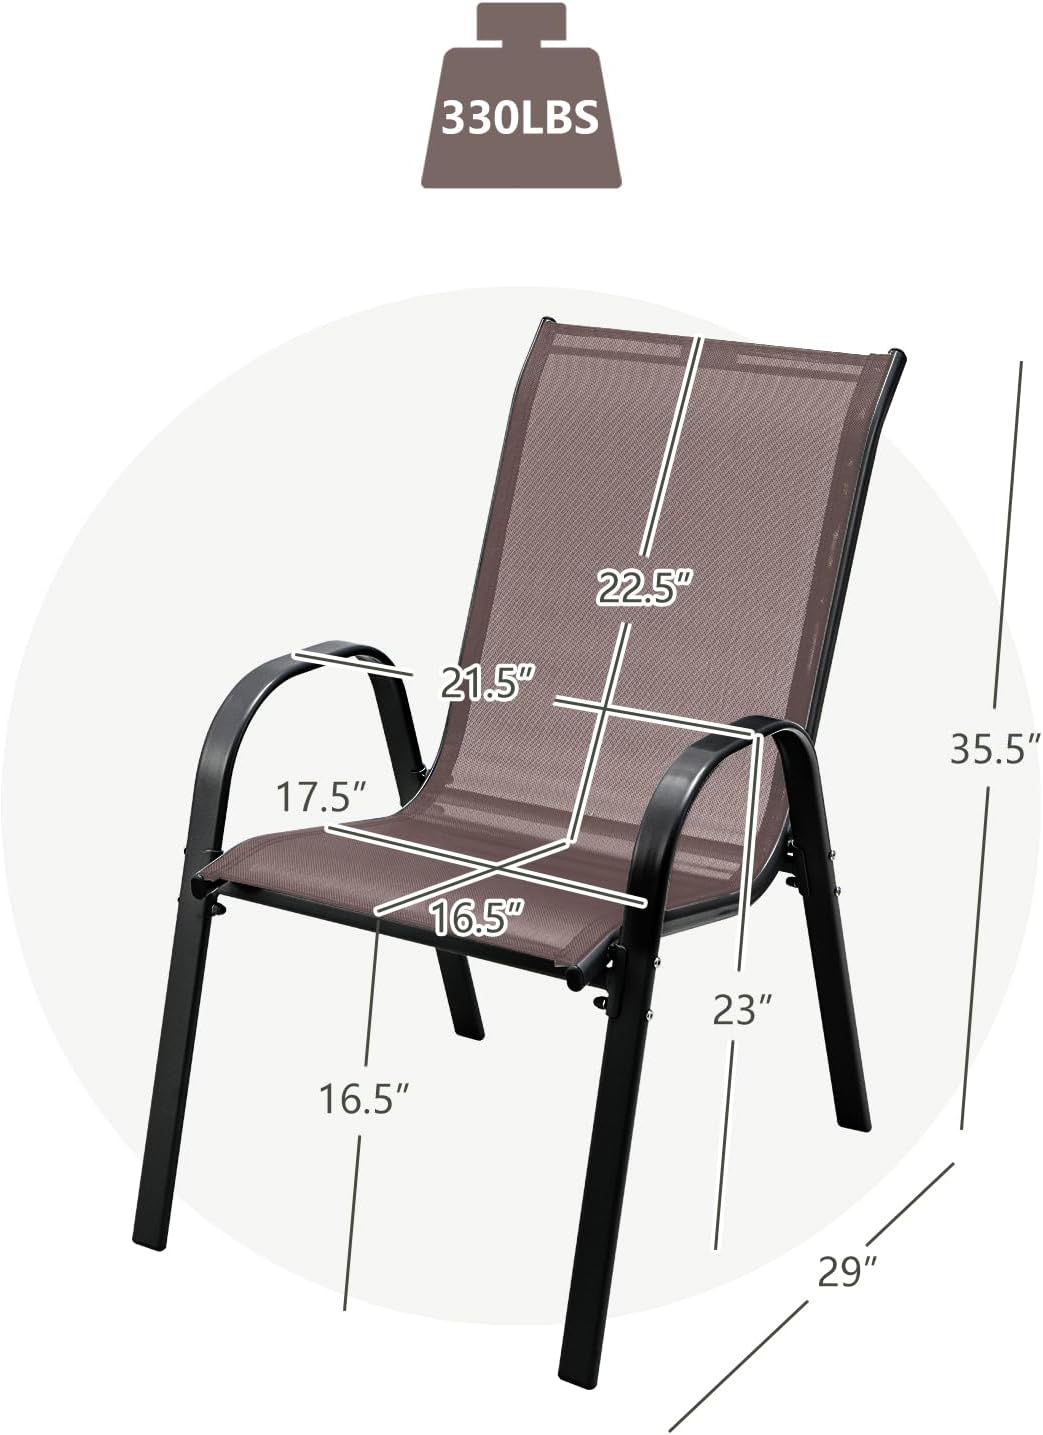
Image 8.1: Detailed dimensions of the patio chair.
9. Warranty and Support
For warranty information, please refer to the documentation provided at the time of purchase or contact the retailer directly. For product support, inquiries, or to report missing/damaged parts, please contact Giantex customer service through their official website or the platform where the product was purchased.
You can visit the Giantex Store on Amazon for more information.


