1. Introduction
This manual provides comprehensive instructions for the Beok BOT-R6X Wireless Programmable Gas Boiler Thermostat. This device is designed to efficiently control water heating systems, specifically gas boilers, by allowing precise temperature adjustments to maintain a comfortable indoor environment. Please read this manual carefully before installation and operation to ensure proper use and optimal performance.
2. Product Overview
The Beok BOT-R6X thermostat utilizes 433MHz RF wireless technology, allowing the thermostat unit to communicate with the receiver unit up to 30 meters away. This provides flexibility in placement within your home. It offers dual power supply options: USB or 3x AA batteries. Key features include programmable modes, parental control, power-off memory, anti-freeze protection, temperature compensation, and adjustable hysteresis.

Figure 2.1: The thermostat communicates wirelessly with the receiver up to 30 meters.
3. Package Contents
Upon opening the package, please verify that all the following items are included:
- 1 x Thermostat (batteries not included)
- 1 x Stand
- 1 x Receiver
- 1 x Product Manual (this document)
- 2 x Screws
- 1 x Type-C USB Cable
- 1 x Passive Connection Cable

Figure 3.1: All components included in the product package.
4. Setup and Installation
4.1. Receiver Connection to Gas Boiler
The receiver unit must be wired to your gas boiler. Ensure the power supply to the boiler is turned off before proceeding with any wiring. Connect the receiver according to the wiring diagram provided below. The receiver controls the boiler's on/off function based on signals from the thermostat.

Figure 4.1: Detailed wiring diagram for connecting the receiver to a gas boiler.
4.2. Power Supply Options for Thermostat
The thermostat unit can be powered in two ways:
- Battery-Powered: Insert three 1.5 Volt AA batteries (not included) into the battery compartment. This allows for complete portability of the thermostat.
- USB-Powered: Connect the provided Type-C USB cable to the thermostat and a suitable USB power adapter (not included).

Figure 4.2: The thermostat supports both USB and battery power options.
4.3. Thermostat Placement Options
The thermostat offers flexible placement options to suit your preference:
- Desktop Placement: Use the included stand to place the thermostat on any flat surface, such as a desk or table. The stand can be easily attached or removed.
- Wall Mounting: For a fixed installation, the thermostat can be mounted on a wall. Use the provided screws and follow the indicated expansion screw locations (59mm spacing, 3-3.5mm diameter) for secure mounting.

Figure 4.3: Thermostat placed on a desktop using its removable stand.
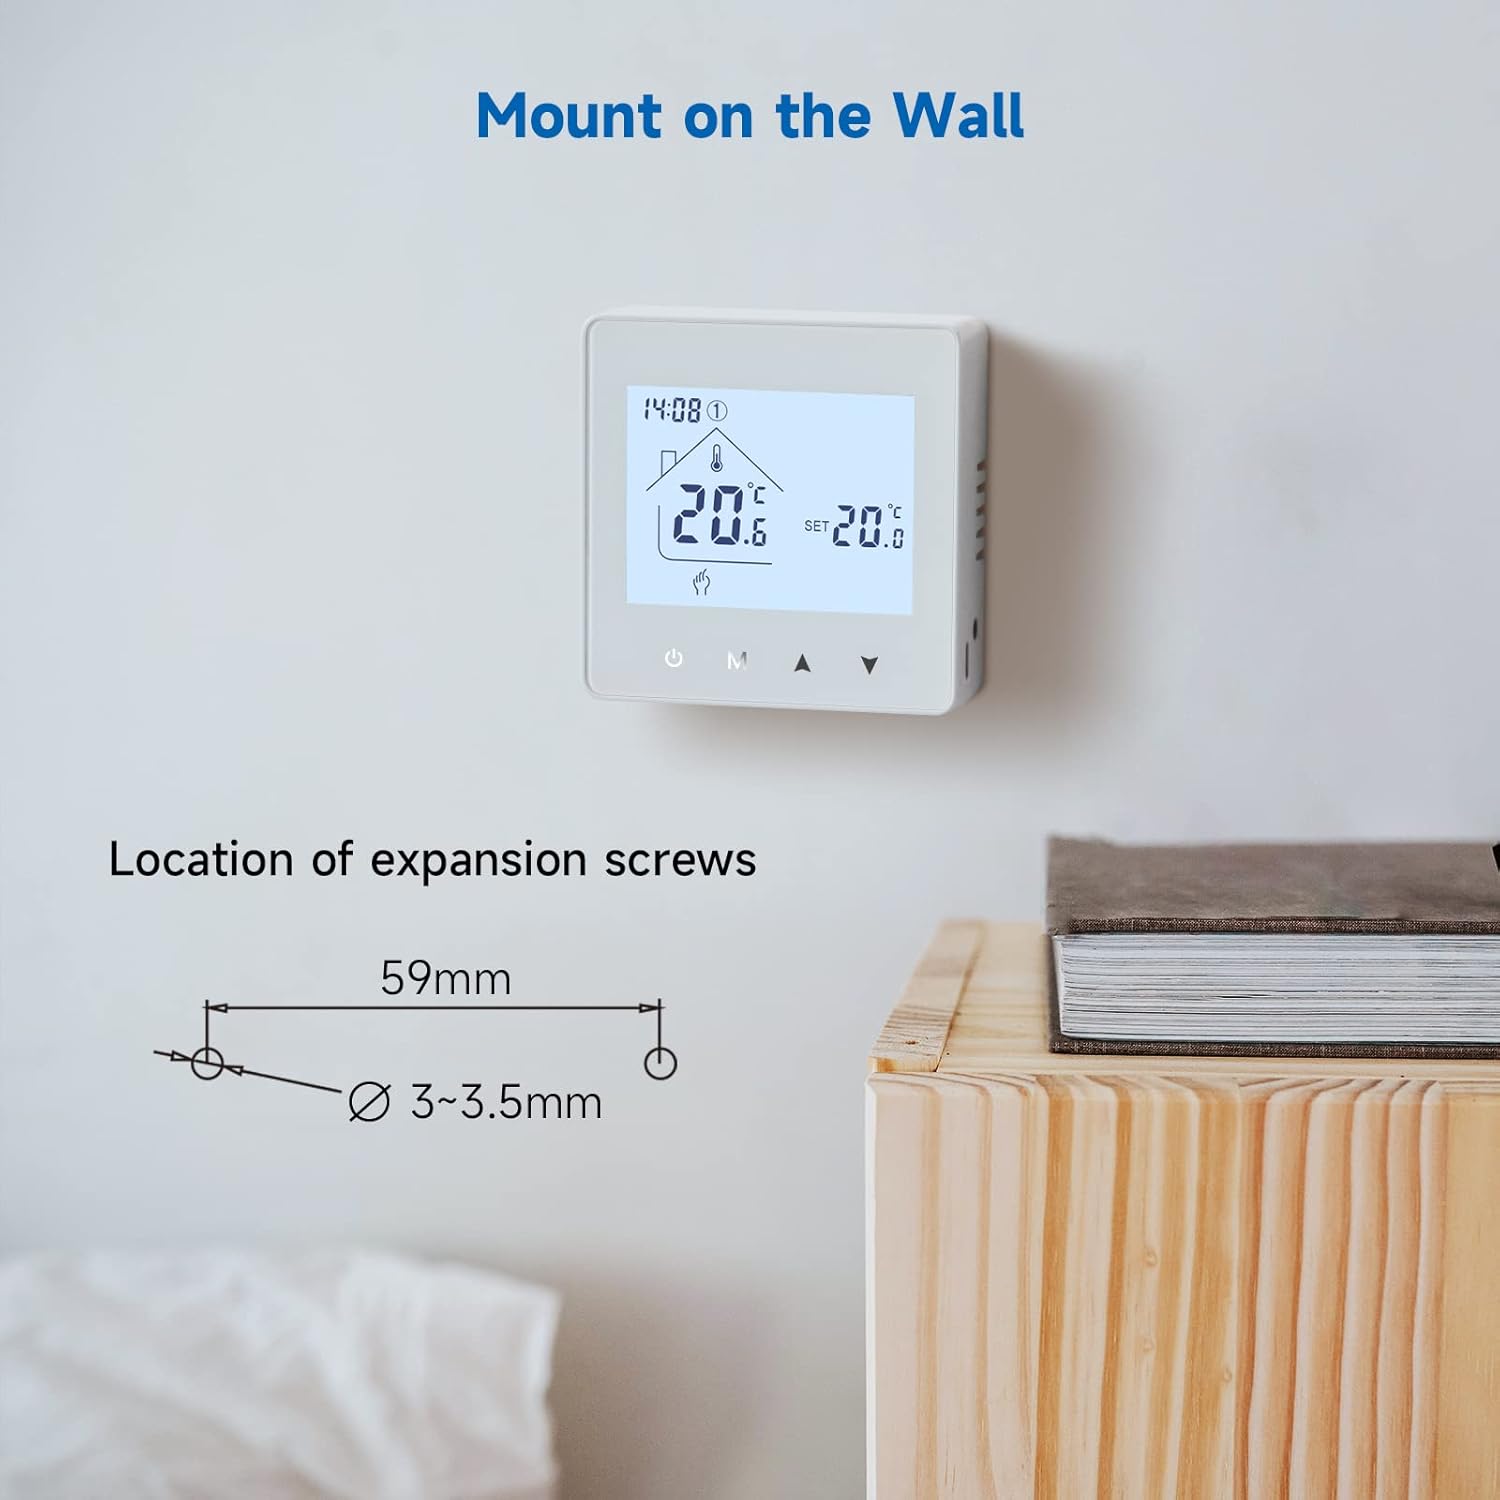
Figure 4.4: Wall mounting instructions with screw dimensions.
5. Operating Instructions
5.1. Basic Operation
Use the power button to turn the thermostat on or off. The display will show the current room temperature and the set temperature. Use the up and down arrows to adjust the desired temperature.
5.2. Programming Functions (Automatic Mode)
The thermostat features a programmable automatic mode, allowing you to set different temperatures for various times of the day and week. This helps optimize energy consumption and comfort.

Figure 5.1: Automatic mode icon and example programming schedule for weekdays and weekends.
To enter programming mode, press the 'M' button until the automatic mode icon (house with clock) appears. Use the up/down arrows and 'M' button to navigate and set your desired schedule. An example schedule might be:
- Weekdays: 7:00 AM (20°C), 8:30 AM (4°C), 11:30 AM (20°C), 12:40 PM (4°C), 6:30 PM (22°C), 10:30 PM (17°C)
- Weekends: 8:30 AM (24°C), 11:00 PM (17°C)
5.3. Advanced Functions
The thermostat includes several advanced features for enhanced control and safety:
- Parental Control (Child Lock): Prevents unauthorized changes to settings.
- Power-off Memory: Retains settings even after a power outage.
- Anti-freeze Protection: Automatically activates heating if the temperature drops below a set minimum to prevent pipes from freezing.
- Temperature Compensation: Allows for calibration of the displayed temperature to match an external reference.
- Hysteresis: Defines the temperature differential before the heating system switches on or off, preventing rapid cycling.
- Factory Reset: Resets all settings to their default values.

Figure 5.2: Visual representation of advanced thermostat functions.
5.4. Maintaining Constant Room Temperature
The thermostat works to maintain your set temperature by cycling the boiler on and off. For example, if the set temperature is 24°C, the heating might turn on at 23.5°C and turn off at 24.5°C, ensuring a stable and comfortable environment.

Figure 5.3: Example of temperature regulation to maintain a constant room temperature.
6. Maintenance
To ensure the longevity and accurate operation of your Beok BOT-R6X thermostat, follow these simple maintenance guidelines:
- Cleaning: Regularly wipe the thermostat's display and casing with a soft, dry cloth. Avoid using abrasive cleaners or solvents.
- Battery Replacement: If using battery power, replace the three AA batteries when the low battery indicator appears on the display. Ensure correct polarity when inserting new batteries.
- Environmental Conditions: Keep the thermostat away from direct sunlight, drafts, and heat sources that could affect its temperature readings.
7. Troubleshooting
If you encounter issues with your thermostat, please refer to the following common troubleshooting steps:
- Thermostat Not Responding: Check the power supply. If battery-powered, replace the batteries. If USB-powered, ensure the cable is securely connected and the power adapter is functioning.
- Heating Not Activating: Verify that the receiver is properly connected to the gas boiler and that the boiler's power supply is on. Ensure the thermostat is within the 30-meter wireless range of the receiver. Check the set temperature; it must be higher than the current room temperature for heating to activate.
- Inaccurate Temperature Reading: Ensure the thermostat is not placed near heat sources, direct sunlight, or drafts. If calibration is needed, use the temperature compensation feature in advanced settings.
- Settings Lost: If settings are not retained after a power cycle, ensure the power-off memory function is enabled (if applicable) or consider performing a factory reset and reconfiguring.
- Wireless Connection Issues: If the thermostat and receiver lose connection, try moving the thermostat closer to the receiver. Obstacles like thick walls or metal objects can interfere with the RF signal.
If problems persist after attempting these steps, please contact customer support.
8. Specifications
| Feature | Specification |
|---|---|
| Brand | BEOK CONTROLS |
| Model Number | BOT-R6X |
| Dimensions (L x W x H) | 8.6 x 8.6 x 2.8 cm |
| Weight | 400 grams |
| Voltage | 230 Volts |
| Material | Plastic |
| Connectivity Technology | RF Wireless (433MHz), USB (for power) |
| Power Source | 3x AA Batteries (not included) or USB Type-C |
| Control Method | Remote Control |
| Specific Uses for Product | Heating (Gas Boiler Systems) |
9. Warranty and Support
Beok Controls is committed to providing high-quality products and customer satisfaction. While specific warranty details are not provided in this manual, for any questions, technical assistance, or support regarding your Beok BOT-R6X thermostat, please contact Beok Controls customer service. Refer to the product packaging or the official Beok Controls website for contact information.


