ASUS PRO WS W680-ACE IPMI
ASUS Pro WS W680-ACE IPMI Workstation Motherboard User Manual
Model: PRO WS W680-ACE IPMI
Introduction
The ASUS Pro WS W680-ACE IPMI Workstation Motherboard is engineered for demanding professional applications such as AI training, deep learning, animation, 3D rendering, and media production. It offers robust features including expandable graphics, extensive storage options, advanced connectivity, and high reliability. This manual provides essential information for setting up, operating, maintaining, and troubleshooting your motherboard.
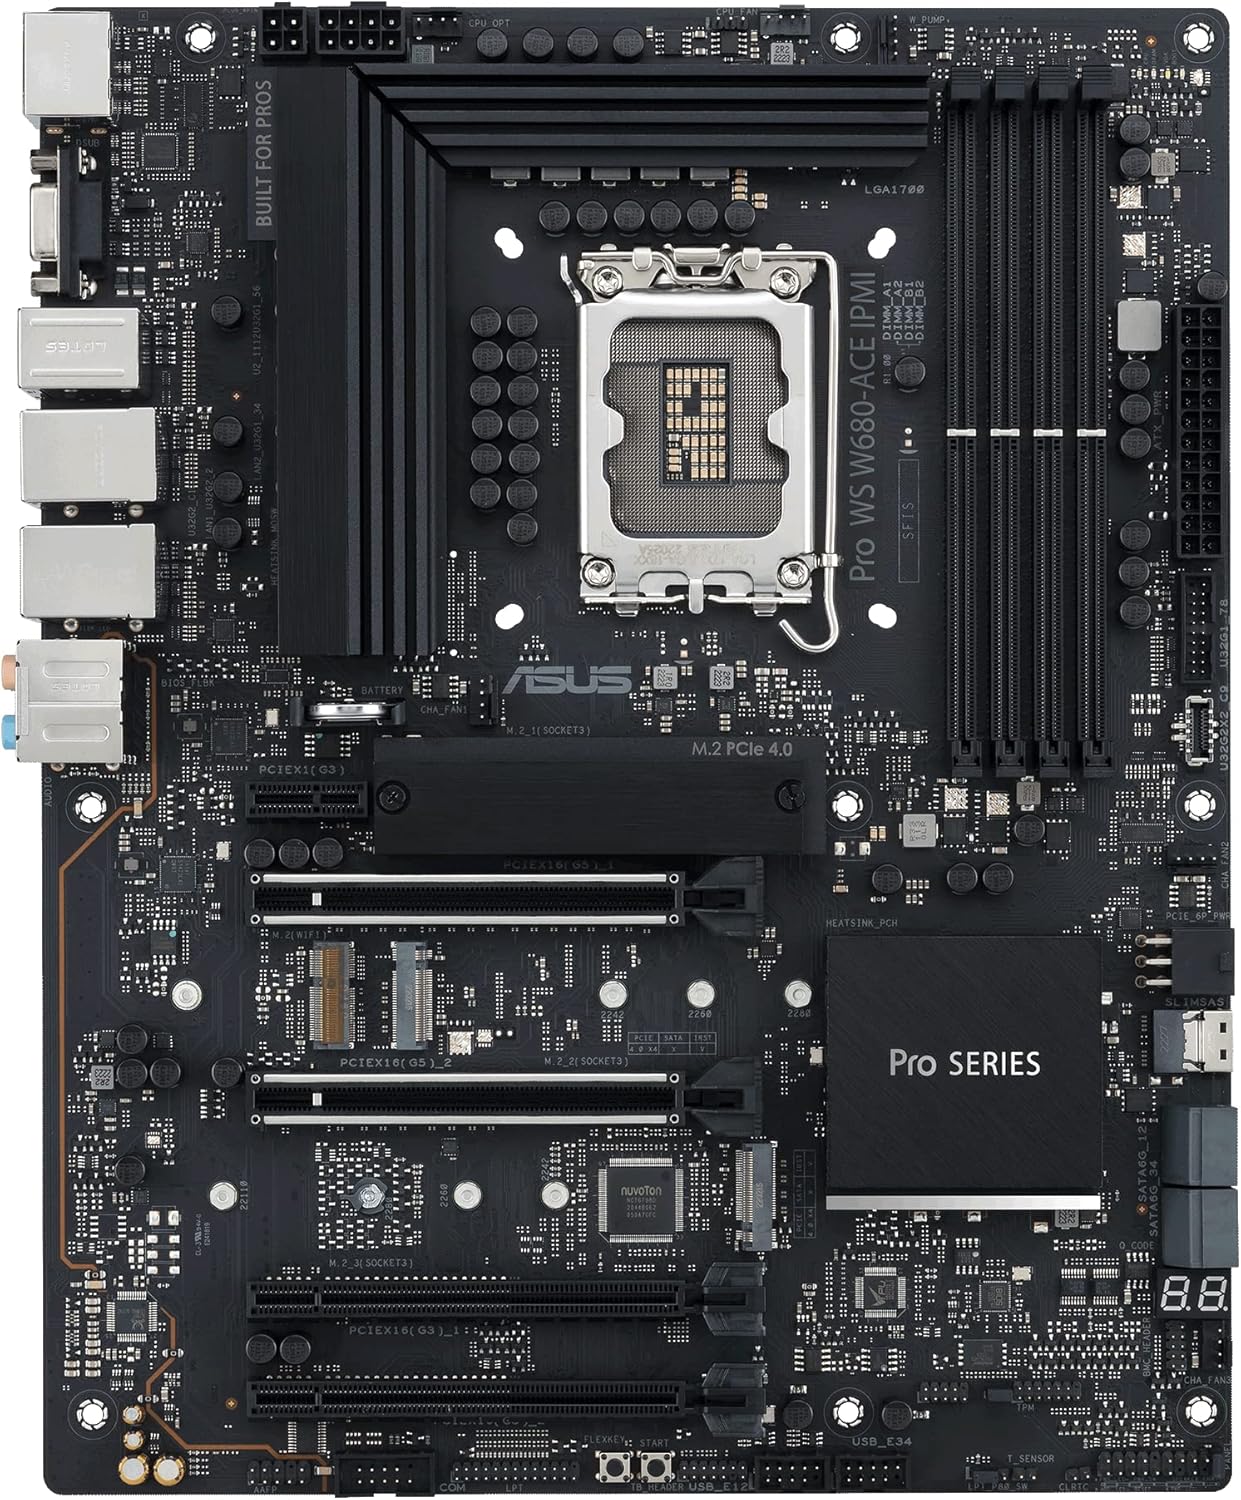
Figure 1: Overview of the ASUS Pro WS W680-ACE IPMI Workstation Motherboard, showcasing its layout and key components.
Setup and Installation
Before beginning installation, ensure your workspace is clean and static-free. Always handle the motherboard by its edges and avoid touching components directly.
1. CPU Installation
This motherboard supports Intel LGA 1700 socket processors (13th Gen Intel Core, 12th Gen Intel Core, Pentium Gold, and Celeron Processors). Carefully align the CPU with the socket's triangle marker and gently place it into the socket. Close the load plate and secure the retention lever.
Figure 2: The LGA 1700 CPU socket, ready for processor installation.
2. Memory (RAM) Installation
The motherboard features DDR5 memory slots and supports ECC memory. Open the clips on both ends of the DIMM slot. Align the memory module with the slot key and press firmly until the clips snap into place. For optimal performance, refer to the motherboard's manual for recommended memory configurations (e.g., dual-channel setup).

Figure 3: Illustration of the DDR5 memory slots, highlighting proper module insertion.
3. Storage Device Installation
This motherboard includes 3 x M.2 PCIe 4.0 slots and SlimSAS for storage. For M.2 SSDs, insert the drive into the slot at an angle and secure it with the M.2 Q-Latch mechanism. For SATA drives, connect the SATA data cable to the motherboard's SATA ports and the power cable from your power supply.

Figure 4: M.2 slots for high-speed NVMe SSDs.

Figure 5: The innovative M.2 Q-Latch for tool-less SSD installation.
4. Expansion Card Installation
The motherboard features Dual PCIe 5.0 Safeslots and dual PCIe 3.0 slots. Insert your graphics card or other expansion cards firmly into the appropriate PCIe slot until it clicks into place. Secure the card with a screw to the chassis.
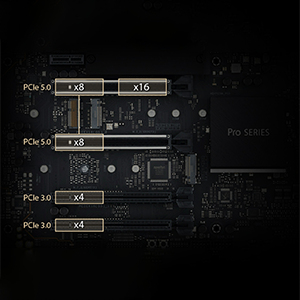
Figure 6: PCIe 5.0 and PCIe 3.0 slots for various expansion cards.
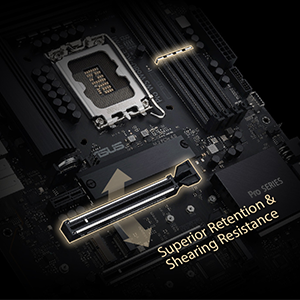
Figure 7: PCIe SafeSlot design for enhanced retention and shearing resistance.
5. Power Connections
Connect the 24-pin ATX power connector and the 8-pin (or 4+4 pin) CPU power connector from your power supply to the corresponding ports on the motherboard. Ensure all connections are secure.
6. Front Panel and Rear I/O Connections
Connect your chassis' front panel connectors (power button, reset button, USB ports, audio jacks) to the appropriate headers on the motherboard. Connect peripherals such as monitors, keyboards, and mice to the rear I/O panel ports.
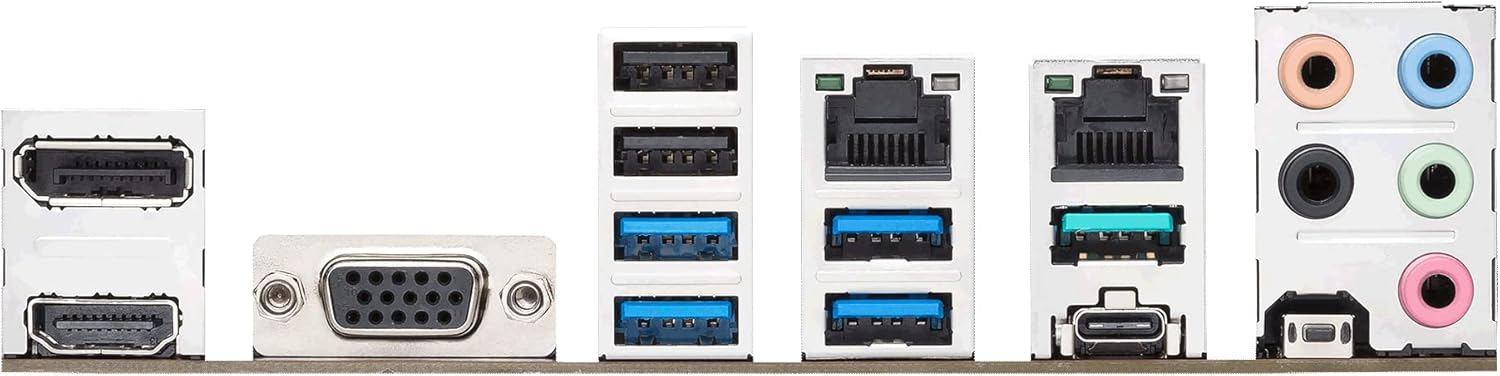
Figure 8: The rear I/O panel featuring various connectivity options including USB, LAN, and audio ports.

Figure 9: Dual Intel 2.5Gb Ethernet ports for high-speed network connectivity.
Operating Instructions
1. Initial Boot and BIOS/UEFI Setup
Upon first boot, press the DEL or F2 key during the POST (Power-On Self-Test) to enter the BIOS/UEFI setup utility. Here you can configure boot order, system time, and various hardware settings. Save changes and exit to continue booting into your operating system installer.
2. IPMI/BMC Functionality
The ASUS Pro WS W680-ACE IPMI motherboard includes an Integrated Platform Management Interface (IPMI) for remote management. This allows for out-of-band control, monitoring, and troubleshooting of the system, even when the main operating system is not running. Connect the dedicated IPMI LAN port to your network. Access the IPMI web interface via a web browser using the assigned IP address. Default login credentials are typically provided in a separate IPMI manual or on a sticker on the IPMI card.
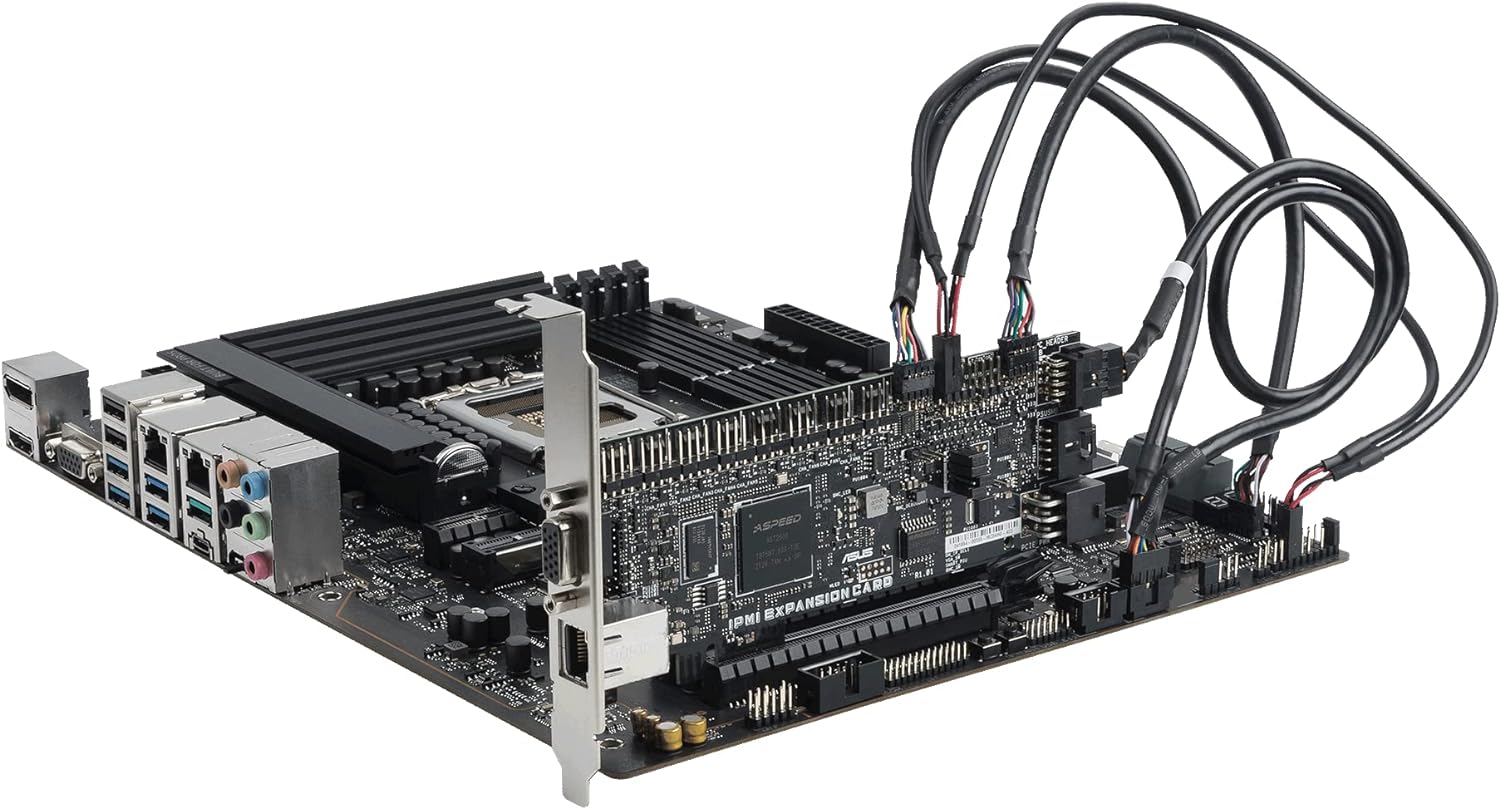
Figure 10: The motherboard with the IPMI expansion card, enabling advanced remote management capabilities.
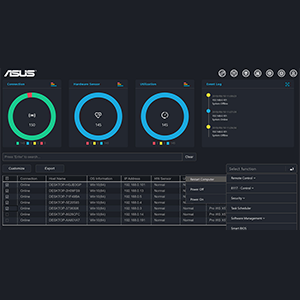
Figure 11: An example of a remote management interface, providing system monitoring and control.
For advanced security management, the motherboard supports features like USB port management, software blacklisting, and Regedit on/off controls via ASUS Control Center Express.
3. Driver Installation
After installing your operating system, install the necessary drivers from the ASUS support website or the included driver DVD/USB drive. This includes chipset drivers, LAN drivers, audio drivers, and any other specific drivers for integrated components.
Maintenance
1. Cleaning
Regularly clean your system to prevent dust buildup, which can lead to overheating and component failure. Use compressed air to remove dust from heatsinks, fans, and other components. Ensure the system is powered off and unplugged before cleaning.
2. BIOS Updates
Periodically check the ASUS support website for BIOS updates. BIOS updates can improve system stability, compatibility, and performance. Follow the instructions provided by ASUS carefully when performing a BIOS update. Note that some updates may require updating Intel ME firmware prior to the BIOS update, which might necessitate a Windows operating system environment.
3. Driver Updates
Keep your system drivers updated to ensure optimal performance and compatibility with new software and hardware. Drivers can be downloaded from the official ASUS support website.
Troubleshooting
Common Issues and Solutions
- System Fails to Boot:
- Check all power connections (24-pin ATX, 8-pin CPU, PCIe power for graphics card).
- Reseat RAM modules. Try booting with only one RAM module installed.
- Reseat the CPU. Inspect the CPU socket for any bent pins.
- Clear CMOS (Complementary Metal-Oxide-Semiconductor) settings by removing the CMOS battery for a few minutes or using the clear CMOS jumper.
- No Display Output:
- Ensure the monitor is connected to the correct display output (integrated graphics or discrete graphics card).
- Verify the graphics card is properly seated in its PCIe slot and has adequate power.
- Test with a different monitor or display cable.
- IPMI/BMC Connectivity Issues:
- Ensure the dedicated IPMI LAN port is connected to the network.
- Verify network settings (IP address, subnet mask, gateway) for the IPMI interface.
- Check if the IPMI functionality is enabled in the BIOS.
- If using Linux, ensure no monitor is plugged into the server when attempting remote control via BMC, as it may interfere with primary display output.
- SlimSAS Port Not Working:
- Ensure the SlimSAS cable is correctly connected. Note that the SlimSAS-SAS port may not support SAS disks directly and might require a SAS controller card in a PCIe slot. SlimSAS to SATA connections should work.
- Check BIOS settings for options related to SlimSAS enablement, as it might not be under standard storage settings.
- Driver Related Problems:
- Reinstall drivers from the official ASUS website.
- Use Device Manager (Windows) or equivalent tools (Linux) to check for unrecognized devices or driver conflicts.
If you encounter persistent issues, refer to the comprehensive user manual available on the ASUS support website or contact ASUS customer support.
Specifications
| Feature | Detail |
|---|---|
| Brand | ASUS |
| Model Name | PRO WS W680-ACE IPMI |
| CPU Socket | LGA 1700 |
| Compatible Processors | Intel Celeron, Intel Pentium Gold, 12th/13th Gen Intel Core |
| RAM Memory Technology | DIMM (DDR5, ECC support) |
| Memory Clock Speed | 4400 MHz |
| Chipset Type | Intel W680 |
| PCIe Slots | Dual PCIe 5.0 Safeslots, Dual PCIe 3.0 slots |
| M.2 Slots | 3 x M.2 PCIe 4.0 |
| LAN | Dual Intel 2.5Gb Ethernet |
| USB Ports | Front panel USB 3.2 Gen2x2 Type-C, multiple USB 2.0/3.0 ports |
| Dimensions (LxWxH) | 8.9 x 2.36 x 7.17 inches |
| Item Weight | 4.19 pounds |
| Color | BLACK |
Warranty and Support
ASUS provides warranty coverage for its products. For detailed warranty terms and conditions, please refer to the warranty card included with your product or visit the official ASUS support website. You may also consider purchasing extended protection plans, such as the 4-Year Protection Plan or Complete Protect, available through authorized retailers.
For technical assistance, driver downloads, BIOS updates, and further documentation, please visit the official ASUS support website. When contacting support, have your product model number (PRO WS W680-ACE IPMI) and serial number ready.
ASUS Support Website: https://www.asus.com/support/
Related Documents - PRO WS W680-ACE IPMI
 |
ASUS PRIME B650M-A AX II Motherboard User Guide This user guide provides comprehensive information for installing and configuring the ASUS PRIME B650M-A AX II motherboard, including safety precautions, component layout, BIOS and RAID support, and specifications. |
 |
ASUS PRIME Z790-P WIFI Motherboard User Guide Comprehensive user guide for the ASUS PRIME Z790-P WIFI motherboard, covering installation, specifications, safety information, and BIOS setup. Learn about its features for building a high-performance PC. |
 |
ASUS PRIME Z590-P Motherboard User Manual This user manual provides detailed information on the ASUS PRIME Z590-P motherboard, including specifications, installation guides, BIOS setup, and safety precautions. Learn how to build and configure your PC system with this comprehensive guide from ASUS. |
 |
ASUS ROG Strix Z690-I Gaming WiFi Motherboard User Manual Comprehensive user guide for the ASUS ROG Strix Z690-I Gaming WiFi motherboard, covering installation, basic setup, BIOS configuration, and technical specifications for Intel 12th Gen processors. |
 |
ASUS PRIME B650M-A AX Motherboard: Features, Specifications, and User Guide A comprehensive guide to the ASUS PRIME B650M-A AX motherboard, detailing its features, specifications, installation precautions, BIOS/RAID support, and connectivity options. Includes information on CPU socket, memory, expansion slots, and rear panel I/O. |
 |
ASUS TUF GAMING B850-PLUS WIFI Motherboard User Manual Comprehensive user manual for the ASUS TUF GAMING B850-PLUS WIFI motherboard, detailing installation, specifications, BIOS/RAID support, and safety information. |
Ask a question about this manual
Ask about setup, troubleshooting, compatibility, parts, safety, or missing instructions. Manuals+ will review the question and use this page’s manual context to help answer it.