1. Introduction
Thank you for choosing the GreenForest 40-inch Computer Desk. This manual provides detailed instructions for assembly, operation, and maintenance to ensure optimal use and longevity of your desk. Please read this manual thoroughly before assembly and retain it for future reference.
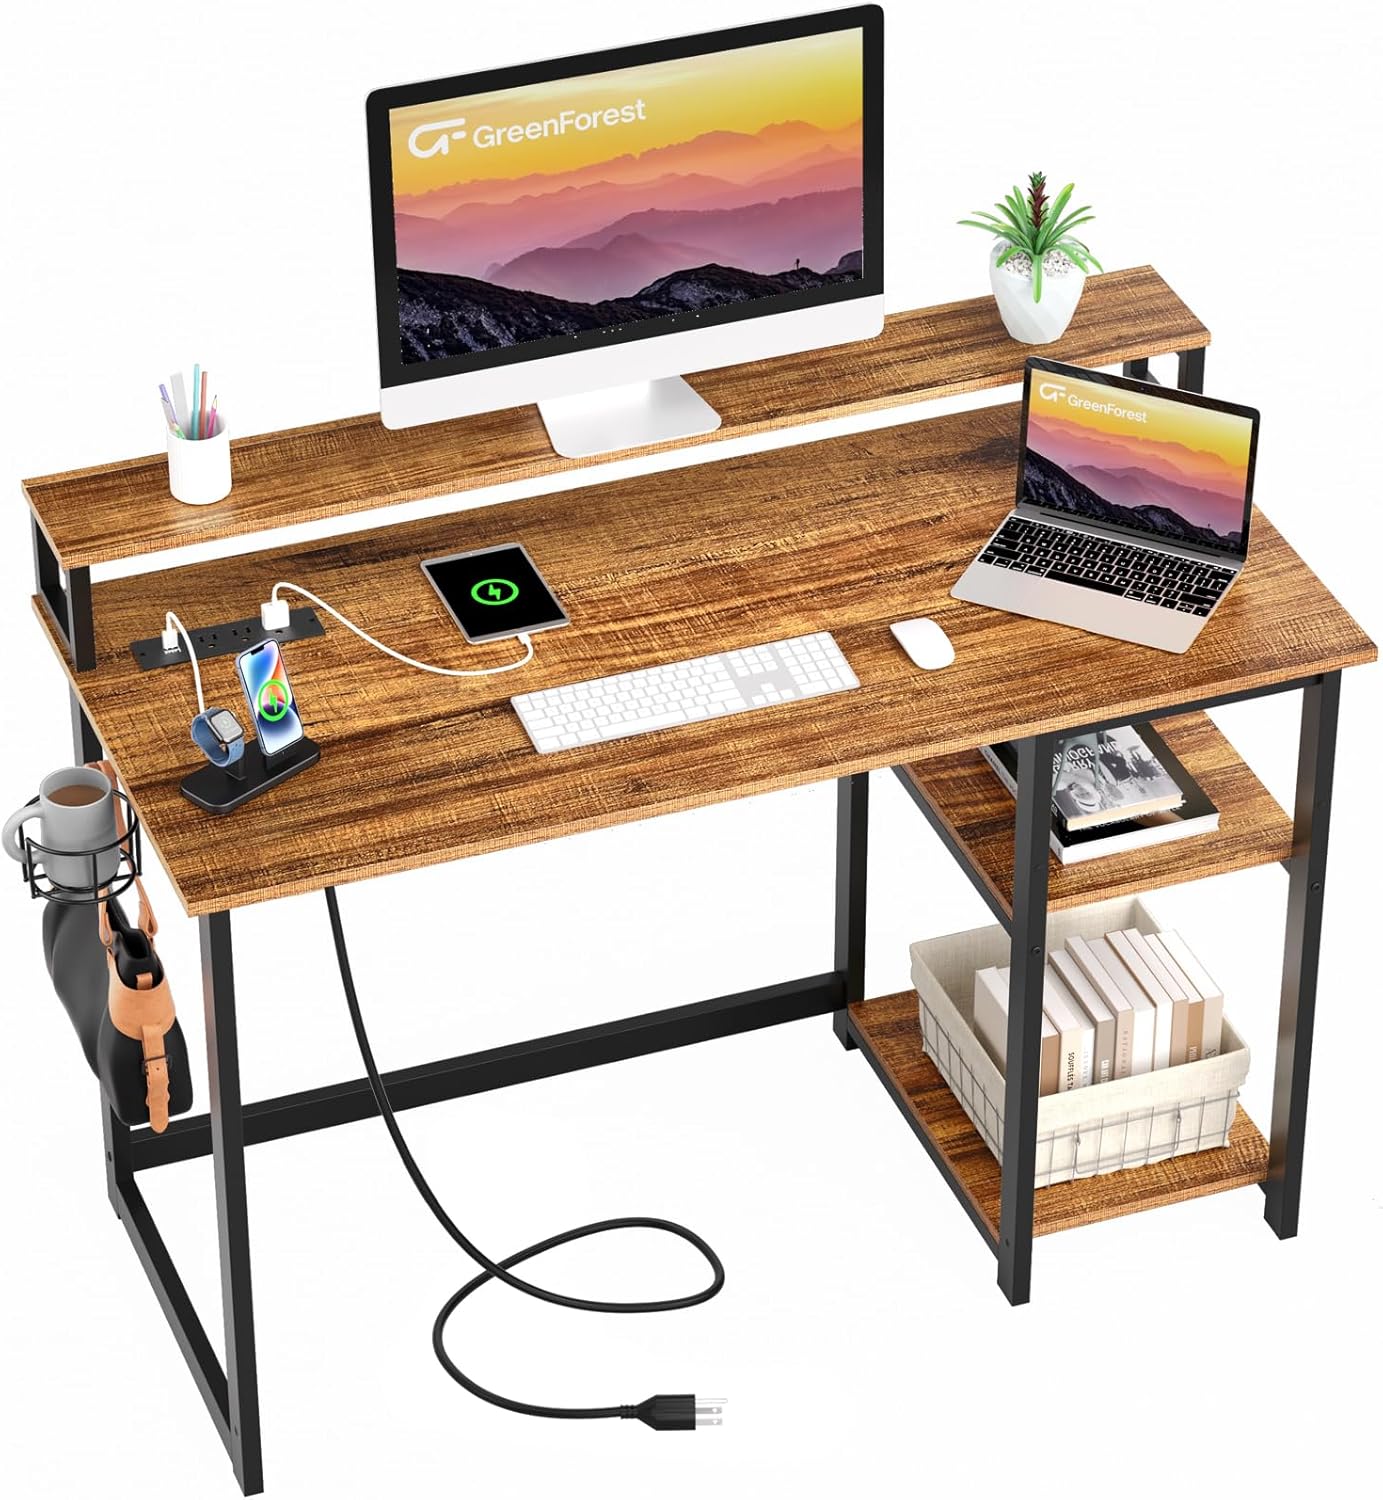
Image: The GreenForest 40-inch Computer Desk, showcasing its monitor stand, integrated power outlets, and overall design.
2. Safety Information
Important Safety Instructions:
- Follow general safety guidelines for assembling, using, and maintaining desks.
- Observe all weight limits specified for the desk and its components.
- Ensure the desk is stable and placed on a level surface to prevent tipping.
- Properly anchor the desk if necessary, especially in areas prone to seismic activity or if heavy items are placed on top.
- Keep all assembly hardware out of reach of children.
- Do not overload the power outlets; adhere to the specified electrical ratings.
3. Package Contents
Before beginning assembly, verify that all components listed below are present and undamaged. If any parts are missing or damaged, please contact customer support.
- Desktop Panel
- Monitor Stand Shelf
- Side Storage Shelves (2 tiers)
- Metal Frame Components (legs, crossbars)
- Recessed Power Strip with 3 AC Outlets and 2 USB Ports
- Cup Holder
- Headphone Hook
- Assembly Hardware (screws, bolts, Allen wrench)
- Instruction Manual
4. Setup and Assembly
Follow these steps carefully for proper assembly. It is recommended to assemble the desk on a soft, clean surface to prevent scratches.
- Unpack and Identify Parts: Lay out all components and hardware. Refer to the included parts list to ensure everything is present.
- Assemble the Frame: Attach the metal frame components according to the diagrams in your separate assembly guide. Ensure all screws are finger-tightened initially.
- Attach Desktop Panel: Secure the desktop panel to the assembled frame.
- Install Monitor Stand: Position the monitor stand shelf on the designated supports on the desktop.
- Install Side Storage Shelves: The two-tier storage shelves are reversible. Decide whether you want them on the left or right side of the desk. Adjust their height using the pre-drilled holes as needed. You can also remove the middle shelf to accommodate larger items like a computer tower.
- Install Power Strip: Carefully place the recessed power strip into its designated slot on the desktop. Secure it if necessary with provided screws.
- Attach Accessories: Mount the cup holder and headphone hook to the side of the desk as desired.
- Final Tightening: Once all components are in place and aligned, fully tighten all screws and bolts using the provided Allen wrench. Do not overtighten.

Image: Detailed diagram showing the dimensions of the desk, the monitor stand, the recessed power strip, and the adjustable holes for the side shelves.

Image: Illustration demonstrating the reversible nature of the side storage shelves, allowing them to be installed on either the left or right side of the desk.

Image: Visual guide on adjusting the height of the side shelves using pre-drilled holes and the option to remove the middle shelf for larger items like a computer tower.
5. Operating Instructions
This section details how to utilize the various features of your GreenForest computer desk.
5.1. Using the Power Outlets and USB Ports
The desk features a recessed power strip with 3 AC outlets (125V/12A) and 2 USB charging ports (5V/2A). This allows for convenient charging of electronic devices directly from your workspace.
- Plug the desk's main power cord (6.5-foot) into a wall outlet.
- Connect your devices to the AC outlets or USB ports as needed.
- Ensure devices are compatible with the specified voltage and amperage.
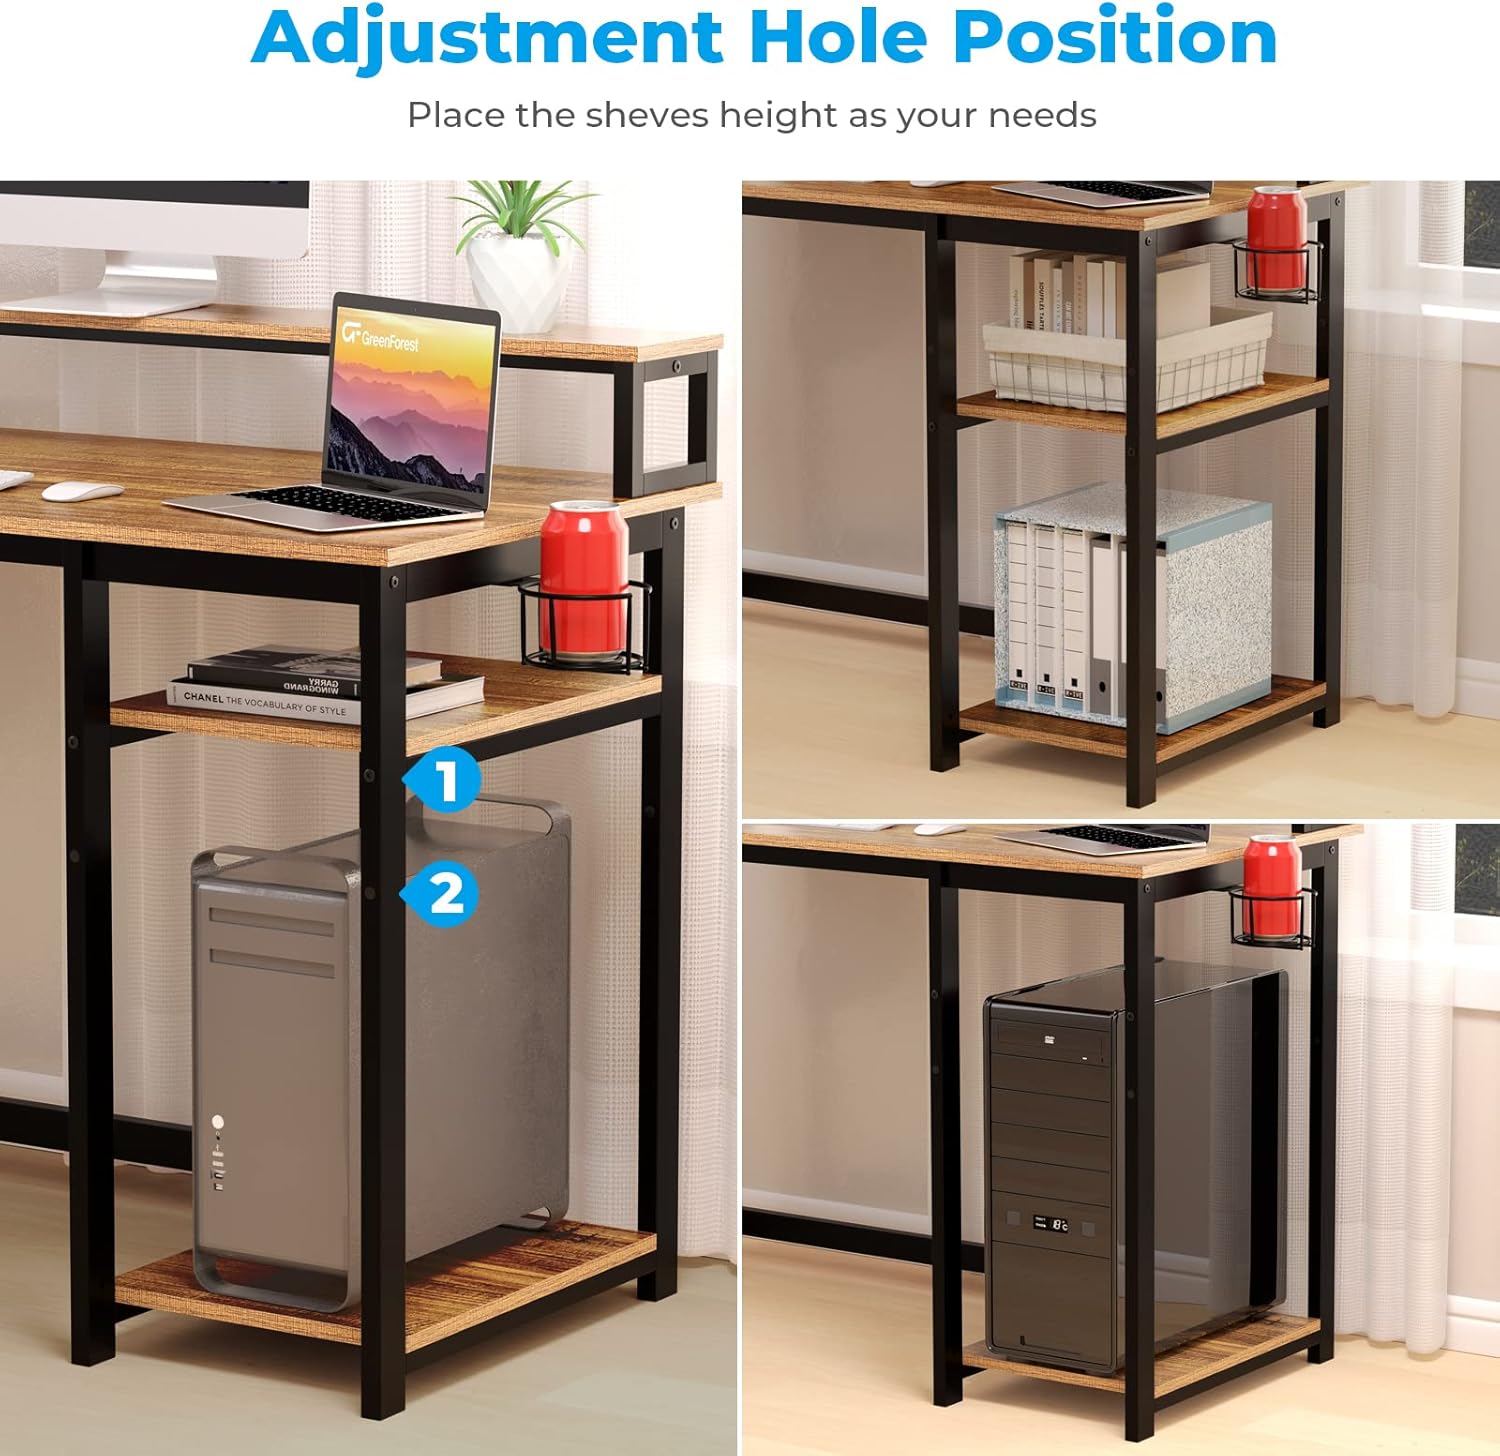
Image: A close-up view of the recessed power strip, showing its 3 AC outlets and 2 USB ports in use with various electronic devices.
5.2. Utilizing the Monitor Stand
The built-in monitor stand is designed to elevate your monitor(s) to an ergonomic height, reducing neck strain and promoting better posture. It can accommodate up to two monitors or laptops.
- Place your monitor(s) or laptop(s) directly on the monitor stand shelf.
- The elevated position helps create additional usable space on the main desktop surface.

Image: A visual comparison demonstrating the ergonomic benefits of using a monitor stand to achieve a proper viewing height and posture.
5.3. Reversible Storage Shelves
The two-tier storage shelves can be configured on either the left or right side of the desk during assembly. Their height is adjustable, and the middle shelf can be removed to create space for larger items like a computer tower.
- To adjust shelf height, loosen the screws, reposition the shelf to the desired pre-drilled holes, and re-tighten.
- To remove the middle shelf, simply unscrew it from its supports.
5.4. Cup Holder and Headphone Hook
The integrated cup holder and headphone hook provide convenient storage, keeping your beverages and headphones easily accessible and off the main desktop surface, contributing to a more organized workspace.
6. Maintenance
Proper care will extend the life and appearance of your GreenForest desk.
- Cleaning: Wipe the desk surfaces with a damp cloth. Avoid harsh chemicals or abrasive cleaners that could damage the finish.
- Spills: Clean up spills immediately to prevent staining or damage to the engineered wood.
- Hardware: Periodically check all screws and bolts to ensure they remain tight. Re-tighten if necessary.
- Weight Distribution: Distribute weight evenly across the desktop and shelves to maintain stability and prevent warping.
7. Troubleshooting
If you encounter issues with your desk, refer to the following common problems and solutions.
- Desk is unstable or wobbly:
- Ensure all screws and bolts are fully tightened.
- Verify the desk is on a level surface. Adjust floor glides if present.
- Check that all frame components are correctly assembled according to the instructions.
- Power outlets/USB ports are not working:
- Confirm the desk's main power cord is securely plugged into a functional wall outlet.
- Check if the wall outlet itself is receiving power (test with another device).
- Ensure the power strip is correctly seated and connected within the desk.
- Avoid overloading the power strip; check the total wattage of connected devices.
- Difficulty during assembly (e.g., holes not aligning):
- Do not fully tighten all screws until the entire section is assembled. This allows for minor adjustments.
- Double-check the orientation of parts against the assembly diagrams. Some parts may appear similar but have specific orientations.
- If a specific hole is misaligned, try loosening surrounding screws slightly to provide more play, then secure the problematic screw, and finally re-tighten all others.
If problems persist, please contact GreenForest customer support.
8. Specifications
| Feature | Detail |
|---|---|
| Brand | GreenForest |
| Model Number | DESK |
| Product Dimensions (D x W x H) | 19.68"D x 39.37"W x 29.5"H |
| Color | Brown (Walnut finish) |
| Style | Modern |
| Top Material Type | Engineered Wood |
| Base Material | Metal |
| Item Weight | 33.95 Pounds |
| Special Features | Built-in Monitor Stand, Recessed Power Outlets (3 AC, 2 USB), Reversible Storage Shelves, Cup Holder, Headphone Hook |
| Power Strip Rating | 125V/12A (AC), 5V/2A (USB) |
| Power Cord Length | 6.5 feet |
| Maximum Weight Recommendation | 150 Pounds |
| Required Assembly | Yes |
| Product Care Instructions | Wipe with Damp Cloth |
9. Warranty Information
This GreenForest desk comes with a Limited Warranty. For specific details regarding coverage, duration, and terms, please refer to the warranty documentation included with your purchase or contact GreenForest customer support.
10. Customer Support
For any questions, assistance with assembly, or to report missing/damaged parts, please contact GreenForest customer support.
You can also visit the official GreenForest store for more information and products: