Introduction
This user manual provides detailed instructions for the installation, operation, and maintenance of your MASTERFUN Automatic Chicken Coop Door. Designed for convenience and the safety of your poultry, this solar-powered door features intelligent obstacle sensors and remote control capabilities. Please read this manual thoroughly before use to ensure proper function and longevity of the product.
Package Contents
Upon opening your package, please verify that all components listed below are present and undamaged:
- Automatic Chicken Coop Door Unit (with integrated control panel)
- Solar Panel (with 2.8m cable)
- Remote Control
- USB-C Charging Cable (1.0m)
- Universal Wheel (for door mechanism)
- Screws Kit (for installation)
- User Manual (this document)

Image: All components included in the MASTERFUN Automatic Chicken Coop Door package. This includes the main door unit, a solar panel, a remote control, a USB-C charging cable, a universal wheel, and a set of screws for mounting.
Setup and Installation
Follow these steps for proper installation of your automatic chicken coop door:
- Prepare the Opening: Ensure your chicken coop has an opening of at least 10.83 inches (27.5 cm) high and 9.45 inches (24 cm) wide. This is the required space for the door to operate effectively.
- Mount the Door Unit: Position the automatic chicken coop door unit over the prepared opening. Use the provided screws to securely fasten the door to the coop. Avoid over-tightening the screws to prevent damage to the unit or coop structure.
- Charge the Battery: Before initial use, fully charge the internal lithium battery using a 5V/2A adapter via the USB-C cable. This ensures optimal performance.
- Connect the Solar Panel: After charging, connect the solar panel to the door unit. Position the solar panel in a location that receives maximum direct sunlight throughout the day for continuous charging. The solar panel provides 365 days of non-stop power when adequately exposed to sunlight.

Image: A chicken coop with a marked opening, illustrating the required dimensions of 9.45 inches in width and 10.83 inches in height for the door installation.

Image: A hand using a screwdriver to attach the automatic chicken coop door to the side of a wooden coop, demonstrating the mounting process.

Image: An illustration showing the chicken coop door connected to both a solar panel on the roof and a USB-C cable for charging, highlighting the dual power options.
Operating Instructions
Your MASTERFUN Automatic Chicken Coop Door offers multiple operating modes for your convenience.
Control Panel Overview

Image: A detailed diagram of the control panel on the chicken coop door, indicating the functions of the LCD screen, buttons (Up, Down, Set), Type-C port, waterproof cover, and indicators for charging, battery, and alarm.
- LCD Display: Shows current time, open time, and close time.
- Up/Down Buttons: Used for adjusting time settings.
- Set Button: Confirms settings.
- Waterproof Cover: Protects the manual control knob.
- Charging Indicator: Shows charging status.
- Battery Power Indicator: Displays current battery level.
- Abnormal Alarm Light: Illuminates if a predator attempts to open the door.
- Alarm Switch Prompt: Indicates if the alarm is active.
- Turn On/Off Screen: Button to control display visibility.
Setting the Time and Timer Modes
The door features a clear LCD display for easy time setting. You can set specific opening and closing times.
- Current Time Setting: Press the Set button and the Up or Down buttons to adjust the current time.
- Automatic Open/Close Time Setting: Press the Set button and the Up or Down buttons to set the desired open and close times. For example, set to open at 05:00 and close at 18:00.
Remote Control Operation
The included remote control allows you to operate the door from up to 15 meters away.
- Manual Open or Close: Press the Up or Down button on the remote control once to manually open or close the door.
- Alarm Function: The remote control can also be used to trigger or turn off the alarm sound if a predator attempts to forcibly open the door.

Image: An illustration demonstrating the three operational modes: Timer Mode for scheduled opening/closing, Remote Control for manual operation from a distance, and Manual Control directly on the unit.
Intelligent Obstacle Sensors (Anti-Pinch Protection)
The door is equipped with smart IC sensors that detect obstacles. If the door encounters resistance while closing, it will automatically rebound approximately 3cm and then attempt to close again after 5 seconds, ensuring the safety of your chickens.
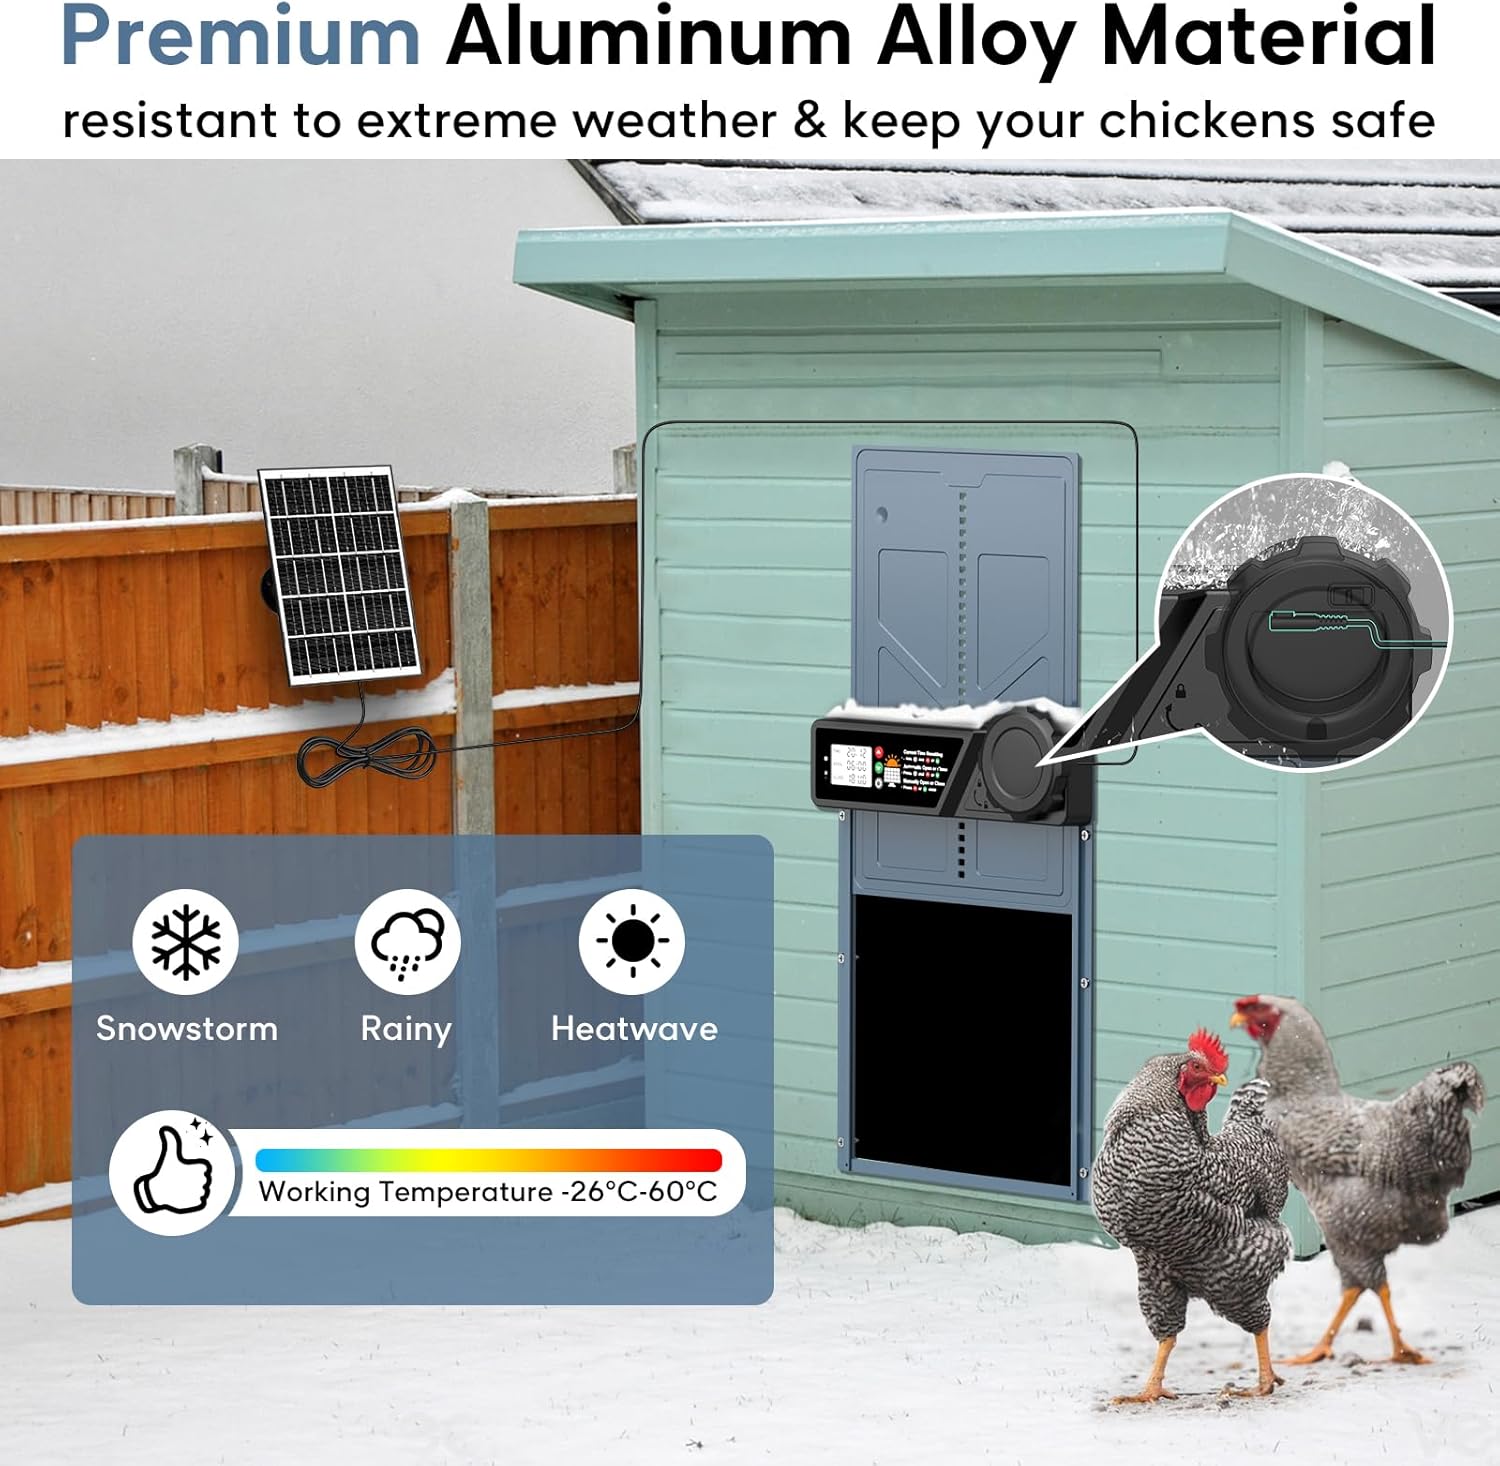
Image: A sequence illustrating the anti-pinch feature: the door closing, encountering a chicken, rebounding 3cm, and then safely closing after the chicken moves away.
Maintenance
Regular maintenance ensures the longevity and optimal performance of your MASTERFUN Automatic Chicken Coop Door.
- Cleaning: Periodically wipe down the door and control panel with a damp cloth to remove dirt and debris. Avoid using harsh chemicals or abrasive cleaners.
- Track Inspection: Ensure the door tracks are clear of obstructions (e.g., feathers, dirt, ice) that could impede smooth operation.
- Solar Panel Cleaning: Keep the solar panel clean to maximize charging efficiency. Dust or dirt on the panel can reduce its effectiveness.
- Battery Monitoring: While the solar panel provides continuous power, regularly check the battery indicator on the LCD screen, especially during prolonged periods of low sunlight, and charge via USB-C if needed.
- Weather Protection: Although the door is weatherproof, extreme weather conditions (heavy snow, ice) may require additional attention to ensure the door mechanism remains clear and operational.
Troubleshooting
If you encounter issues with your chicken coop door, refer to the following common problems and solutions:
| Problem | Possible Cause | Solution |
|---|---|---|
| Door not opening/closing automatically. | Incorrect time settings; low battery; obstruction in track. | Verify time settings on LCD. Charge battery fully. Clear any obstructions from the door track. |
| Remote control not working. | Remote battery low/dead; out of range. | Replace remote control batteries. Ensure you are within 15 meters of the door unit. |
| Door reopens immediately after closing. | Obstacle sensor triggered (e.g., chicken in the way). | Ensure the path is clear before the door closes. The door is designed to reopen for safety. |
| Solar panel not charging effectively. | Panel is dirty; insufficient sunlight; panel not properly connected. | Clean the solar panel. Relocate the panel to an area with more direct sunlight. Check cable connection. |
| LCD display is dim or off. | Battery low; display turned off. | Charge the battery. Press the "Turn On/Off Screen" button to activate the display. |
Product Specifications
| Feature | Detail |
|---|---|
| Model Number | JSM9BK |
| Dimensions (L x W x H) | 10.83" x 3.14" x 14.17" (27.5 cm x 8 cm x 36 cm) |
| Entryway Dimensions (Open) | 9.45" L x 10.83" H (24 cm x 27.5 cm) |
| Weight | 3.58 pounds (1.62 kg) |
| Material | Aluminum Alloy and ABS |
| Power Source | Solar-Powered (7W panel) & USB-C (5V/2A) |
| Battery Type | Internal Lithium Battery (2000mAh capacity) |
| Remote Control Range | Up to 15 meters |
| Operating Temperature | -26°C to 60°C (-14.8°F to 140°F) |
| Special Features | Timer Modes, Remote Control, Intelligent Obstacle Sensors, Weather Resistant, Rechargeable, Sun Proof |
| Target Audience | Chickens, Ducks, Geese, Rabbits, Pigeons (suitable for various small animals) |
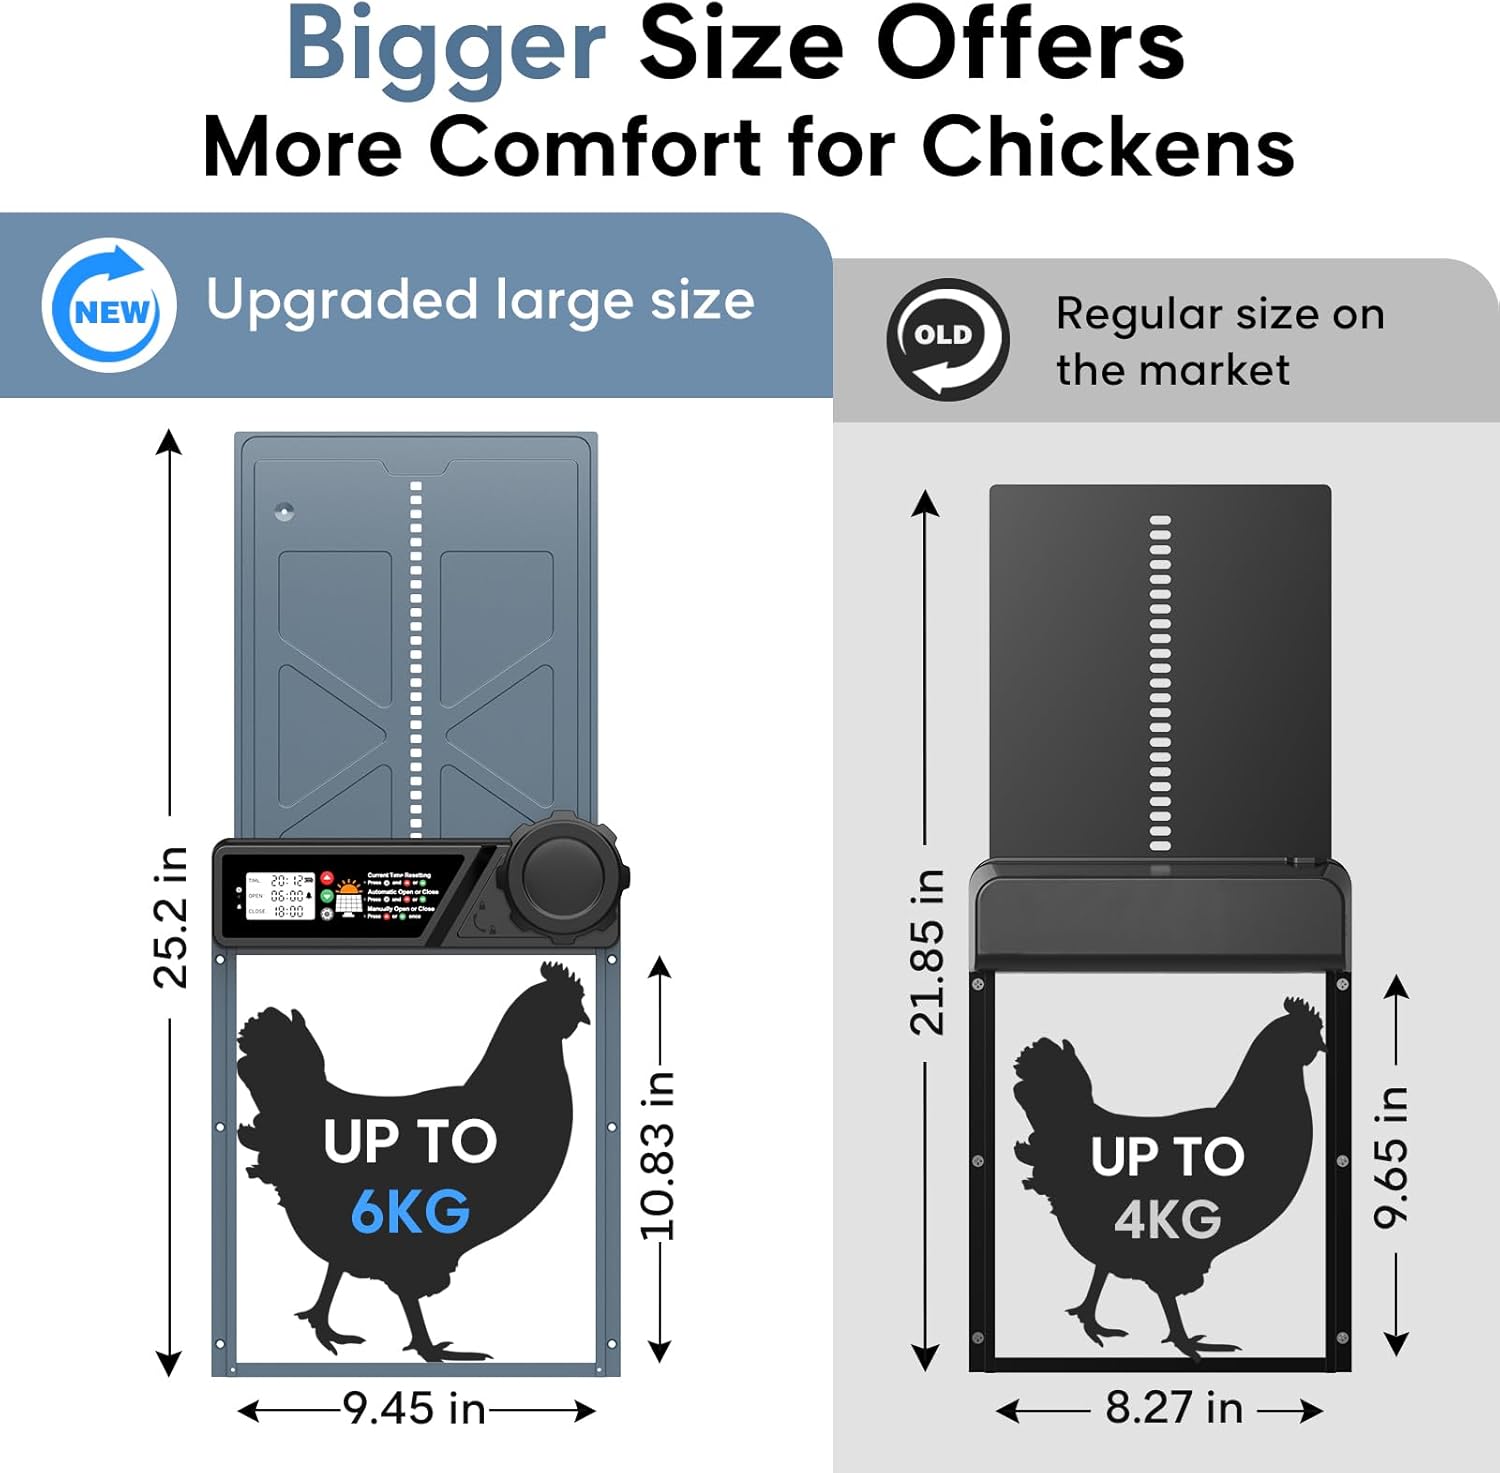
Image: A visual comparison highlighting the larger dimensions of the upgraded MASTERFUN chicken coop door (25.2 inches total height, 10.83 inches opening height, 9.45 inches opening width) compared to a regular size door, indicating suitability for chickens up to 6KG.
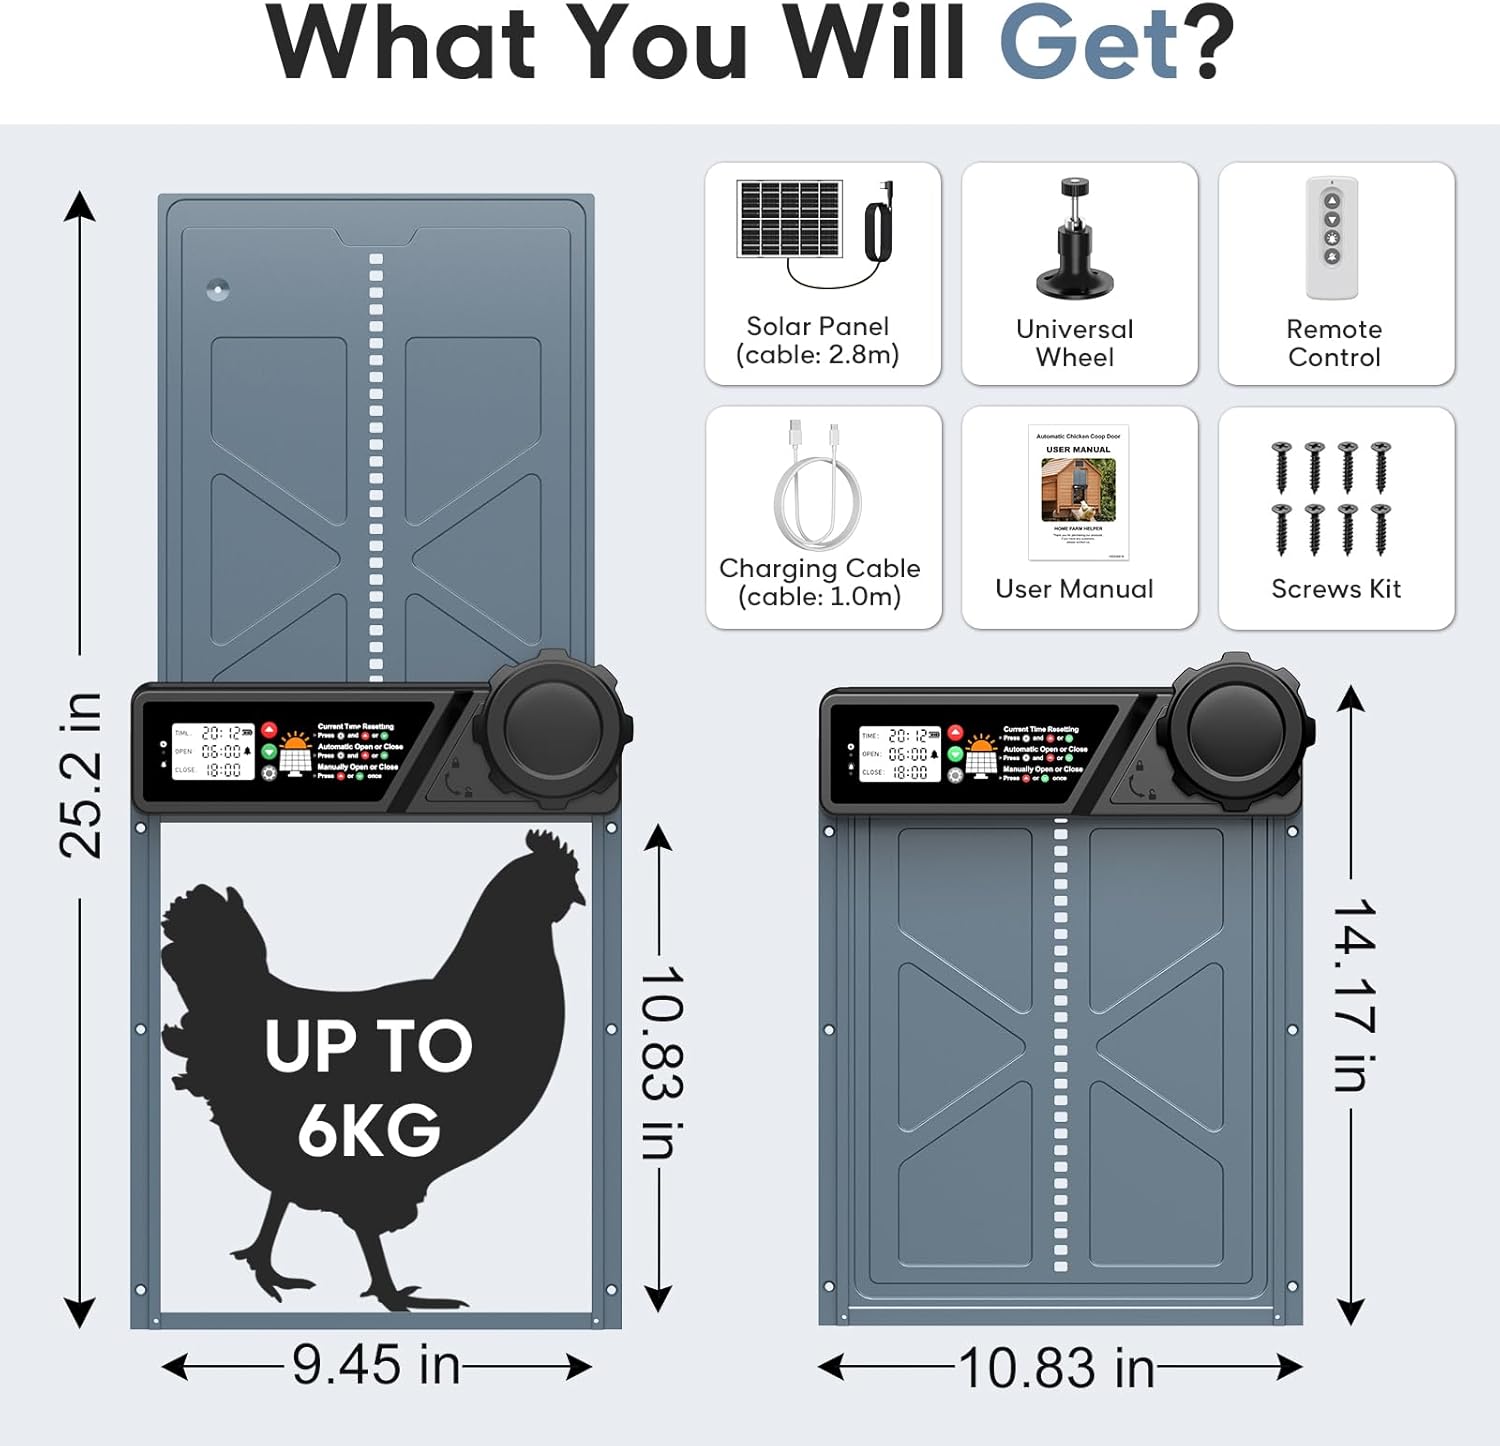
Image: An outdoor scene depicting the automatic chicken coop door installed on a coop, with various animals such as chickens, ducks, geese, rabbits, and a pigeon, illustrating its wide applicability for different poultry and small livestock.
Warranty & Support
Your MASTERFUN Automatic Chicken Coop Door comes with a 2-Year Warranty from the date of purchase. This warranty covers manufacturing defects and malfunctions under normal use.
For warranty claims, technical support, or any questions regarding your product, please contact MASTERFUN customer service through the retailer where you purchased the product or visit the official MASTERFUN website for contact information.
Please retain your proof of purchase for warranty validation.