Anchilly FZ31-9
Anchilly FZ31-9 Electric Oven Function Selection Switch User Manual
Model: FZ31-9 | 5 Pin, 5 Position Rotary Switch
1. Introduction
This manual provides essential information for the installation, operation, and maintenance of the Anchilly FZ31-9 Electric Oven Function Selection Switch. Please read this manual thoroughly before installation and use to ensure proper function and safety.
Important Note:
There are many variations of oven switches. Before purchasing or installing, verify that the pin quantity, number of positions (gears), and overall appearance of this product match your original switch. This will prevent incorrect model selection.
2. Product Overview
The Anchilly FZ31-9 is a 5-pin, 5-position rotary switch designed for electric oven function selection. It features a twist operation mode and is suitable for panel mounting.
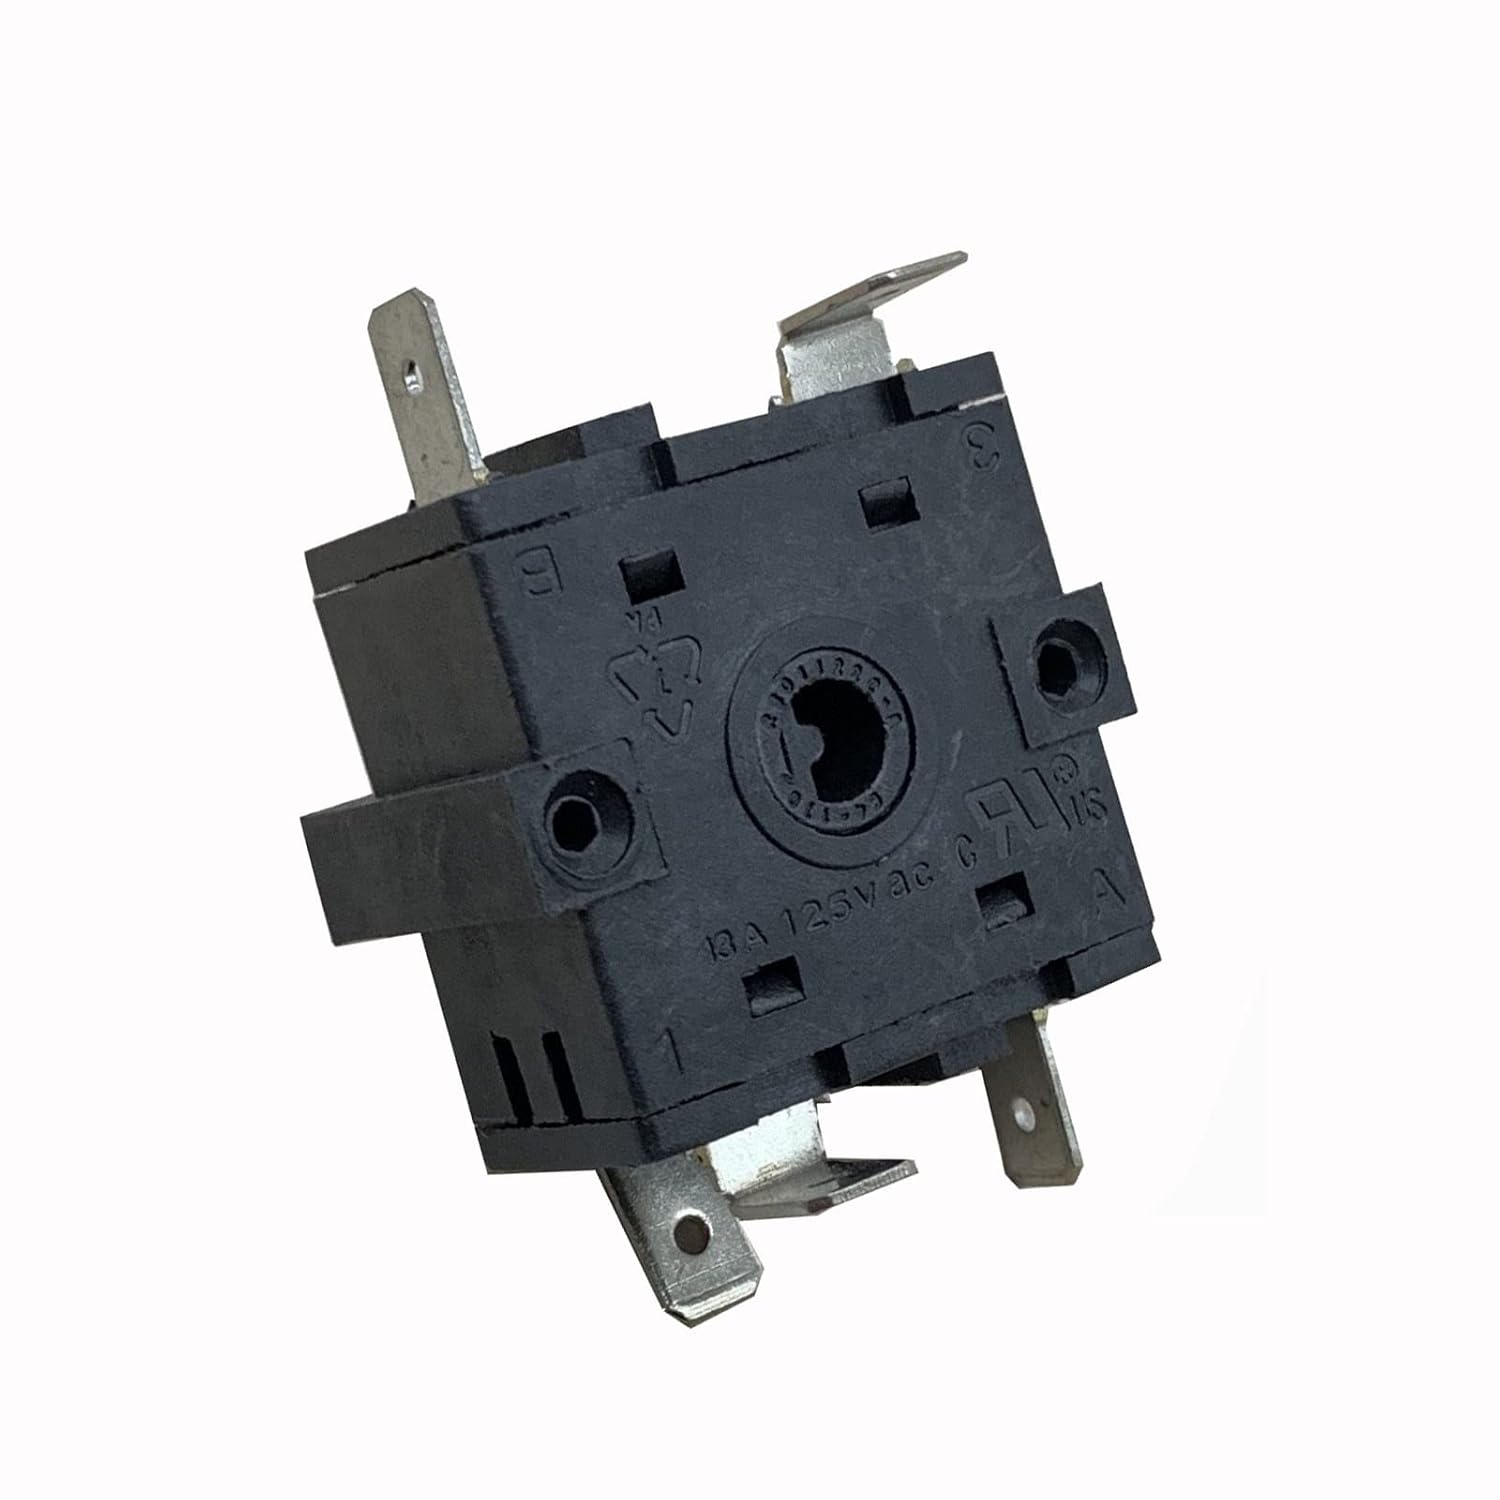
Figure 2.1: Top-down view of the Anchilly FZ31-9 switch, showing the central shaft and mounting holes. This image illustrates the general form factor of the switch.

Figure 2.2: Angled view of the Anchilly FZ31-9 switch, highlighting the rotary shaft and the side terminals. This perspective helps in identifying the switch's physical dimensions and connection points.
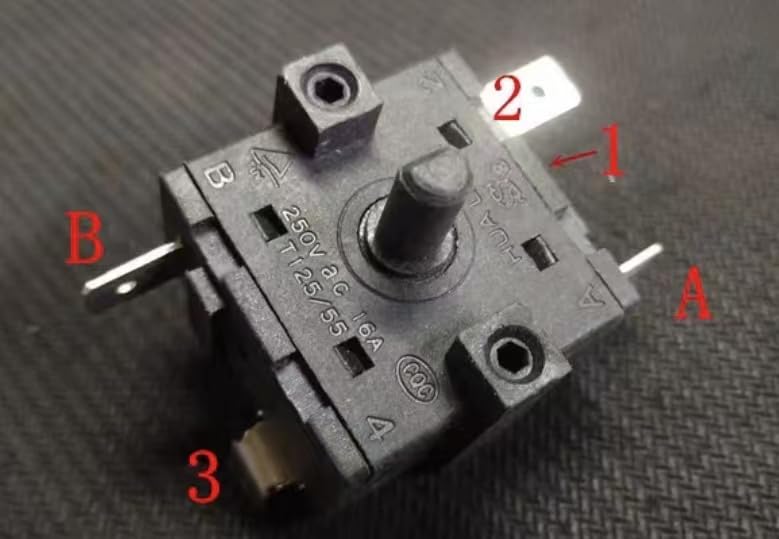
Figure 2.3: Detailed view of the Anchilly FZ31-9 switch, showing the numbered terminals and electrical ratings. Labels 'A' and 'B' indicate specific terminal groups, and numbers '1', '2', '3', '4' might correspond to positions or additional terminals. The voltage and current ratings (250V AC 16A, 125V AC 13A) are visible.
3. Specifications
| Feature | Detail |
|---|---|
| Model | FZ31-9 |
| Number of Pins | 5 |
| Number of Positions | 5 (including starting point) |
| Operation Mode | Twist (Rotary) |
| Rotation | Not 360-degree continuous rotation; able to twist 4 times from starting point. |
| Rated Voltage (AC) | 250V AC |
| Rated Current (AC) | 16A (at 250V AC), 13A (at 125V AC) |
| Contact Type | Normally Open |
| Terminal Type | Screw Terminal |
| Mounting Type | Panel Mount |
| Manufacturer | Anchilly |
4. Safety Information
WARNING:
- Always disconnect power to the appliance before attempting any installation, repair, or maintenance. Failure to do so can result in electric shock, injury, or death.
- Installation should only be performed by qualified personnel or a certified electrician.
- Ensure all connections are secure and properly insulated to prevent short circuits.
- Do not exceed the specified voltage and current ratings of the switch.
- Verify that the replacement switch matches the original switch's specifications (pin configuration, number of positions, electrical ratings) to ensure compatibility and safe operation.
5. Setup and Installation
This section outlines the general procedure for replacing an electric oven function selection switch. Specific steps may vary depending on your oven model.
5.1 Tools Required
- Screwdrivers (Phillips and/or Flathead)
- Pliers
- Wire Strippers (if new terminals are needed)
- Multimeter (for testing connections, optional but recommended)
- Insulated gloves (for safety)
5.2 Installation Steps
- Disconnect Power: Locate the circuit breaker for your oven and turn off the power. Confirm power is off using a multimeter or by attempting to operate the oven.
- Access the Switch: Depending on your oven model, you may need to remove the control panel, back panel, or top panel to access the existing function selection switch. Refer to your oven's service manual for specific instructions.
- Document Wiring: Before disconnecting any wires, take clear photographs of the existing wiring connections to the old switch. Note the position and color of each wire connected to each terminal. This is crucial for correct re-installation.
- Remove Old Switch: Carefully disconnect all wires from the old switch. Note that some terminals may be screw-type, while others may be push-on spade connectors. Remove any mounting screws or clips securing the old switch.
- Install New Switch: Position the Anchilly FZ31-9 switch in the same location as the old switch. Secure it with the appropriate mounting screws or clips.
- Connect Wiring: Refer to your photographs and notes to connect the wires to the new switch's terminals. Ensure each wire is securely fastened. For screw terminals, tighten screws firmly but do not overtighten. For spade connectors, ensure a snug fit.
- Verify Connections: Double-check all wiring connections against your documentation to ensure accuracy.
- Reassemble Oven: Carefully reassemble the oven panels, ensuring no wires are pinched or damaged.
- Restore Power: Turn the circuit breaker back on to restore power to the oven.
- Test Functionality: Test all oven functions to ensure the new switch operates correctly and selects the desired settings.
6. Operating Instructions
The Anchilly FZ31-9 switch operates as a rotary selector for oven functions. Once installed, its operation is integrated with your oven's control knob.
- Function Selection: Rotate the oven's control knob (which is attached to the switch shaft) to select the desired cooking function (e.g., Bake, Broil, Convection, Off).
- Positions: The switch has 5 distinct positions. You will feel a click or detent as you rotate the knob through each position.
- Rotation Limit: This switch does not rotate 360 degrees continuously. It has a defined start and end point, allowing for 4 twists from the starting position to reach all 5 positions. Do not force the knob beyond its rotational limits.
7. Maintenance
The Anchilly FZ31-9 switch is designed for durability and typically requires minimal maintenance. However, periodic checks can help ensure its longevity and proper function.
- Visual Inspection: Periodically inspect the switch and its connections for any signs of wear, corrosion, or loose wiring. This should be done with the power disconnected.
- Cleaning: If the switch or its terminals become dusty or dirty, gently clean them with a dry, soft brush or compressed air. Do not use liquid cleaners directly on the switch.
- Connection Integrity: Ensure all screw terminals remain tight and spade connectors are securely seated. Loose connections can lead to overheating or intermittent operation.
Note:
If the switch exhibits signs of damage, such as a burnt smell, visible melting, or inconsistent operation, it should be replaced immediately by a qualified technician.
8. Troubleshooting
If you experience issues with your oven's function selection after installing the Anchilly FZ31-9 switch, consider the following troubleshooting steps:
| Problem | Possible Cause | Solution |
|---|---|---|
| Oven functions not selecting or intermittent operation. |
|
|
| Switch knob feels stiff or does not rotate smoothly. |
|
|
| No power to the oven after switch replacement. |
|
|
If troubleshooting steps do not resolve the issue, it is recommended to consult a qualified appliance technician.
9. Warranty and Support
For warranty information or technical support regarding your Anchilly FZ31-9 Electric Oven Function Selection Switch, please refer to the retailer where the product was purchased or contact Anchilly customer service directly. Contact details are typically provided with your purchase documentation or on the manufacturer's official website.
When contacting support, please have your purchase details and the product model number (FZ31-9) available.
Ask a question about this manual
Ask about setup, troubleshooting, compatibility, parts, safety, or missing instructions. Manuals+ will review the question and use this page’s manual context to help answer it.