1. Introduction
The ZBAITU R10 Rotary Roller is an essential accessory designed to expand the capabilities of your ZBAITU laser engraver. It enables precise engraving on various cylindrical and round objects such as cups, bottles, pens, and tubes. This manual provides comprehensive instructions for the safe and effective use of your R10 Rotary Roller.

Image 1.1: ZBAITU R10 Rotary Roller with a blue can being engraved.
2. Safety Information
Always prioritize safety when operating laser engraving equipment. This rotary roller is an accessory to a laser engraver, and all safety precautions for your primary laser engraver apply. Additionally, observe the following:
- Ensure the rotary roller is securely placed on a stable surface.
- Never touch moving parts during operation.
- Disconnect power to the laser engraver before connecting or disconnecting the rotary roller.
- Wear appropriate laser safety glasses at all times when the laser is active.
- Operate in a well-ventilated area to dissipate fumes from engraving.
3. Product Features
- Wide Compatibility: Suitable for ZBAITU M37, M81, A40, and Z40 series laser engravers.
- Adjustable Roller Width: The roller width can be adjusted to 3mm, 33mm, or 63mm, accommodating various object diameters.
- High-Precision Engraving: Equipped with anti-slip rubber rollers and a precisely adjusted belt for accurate and consistent rotation.
- Adjustable Tailstock: Includes a height-adjustable tailstock to level objects with varying diameters at each end, such as wine glasses.
- Easy Setup: The unit comes pre-assembled and connects directly to the Y-axis motor of your compatible ZBAITU laser engraver.

Image 3.1: Diagram illustrating the three adjustable roller width settings: 3mm, 33mm, and 63mm.
4. Package Contents
Upon opening the package, verify that all components are present and undamaged:
- ZBAITU R10 Rotary Roller Unit
- Connection Cable (may vary based on engraver model)
- Adjustable Tailstock
5. Setup and Connection
The R10 Rotary Roller is designed for straightforward connection to your ZBAITU laser engraver. Ensure your engraver is powered off before proceeding with any connections.
5.1. Connecting to M37 & M81 Series Laser Engravers
There are two primary methods for connecting the R10 to M37 and M81 series engravers, depending on your specific engraver's Y-axis motor connection.
Method 1: Using a Dedicated Rotary Roller Cable
- Locate the Y-axis motor connection on your M37 or M81 engraver.
- Disconnect the existing Y-axis cable from the motor.
- Connect one end of the dedicated rotary roller cable to the Y-axis motor port.
- Connect the other end of the rotary roller cable to the R10 Rotary Roller unit.
Method 2: Direct Connection (No Dedicated Cable Needed)
- Locate the Y-axis motor connection on your M37 or M81 engraver.
- Disconnect the existing Y-axis cable from the motor.
- Directly connect the cable from the R10 Rotary Roller unit to the Y-axis motor port.

Image 5.1: Connection methods for ZBAITU M37 & M81 series laser engravers.
5.2. Connecting to A40 Series Laser Engravers
- Ensure your A40 engraver is powered off.
- Unplug the existing Y-axis cable from the A40 engraver's control board or Y-axis motor port.
- Plug one end of the R10 rotary roller cable into the now-empty Y-axis port.
- Plug the other end of the R10 rotary roller cable into the R10 Rotary Roller unit.
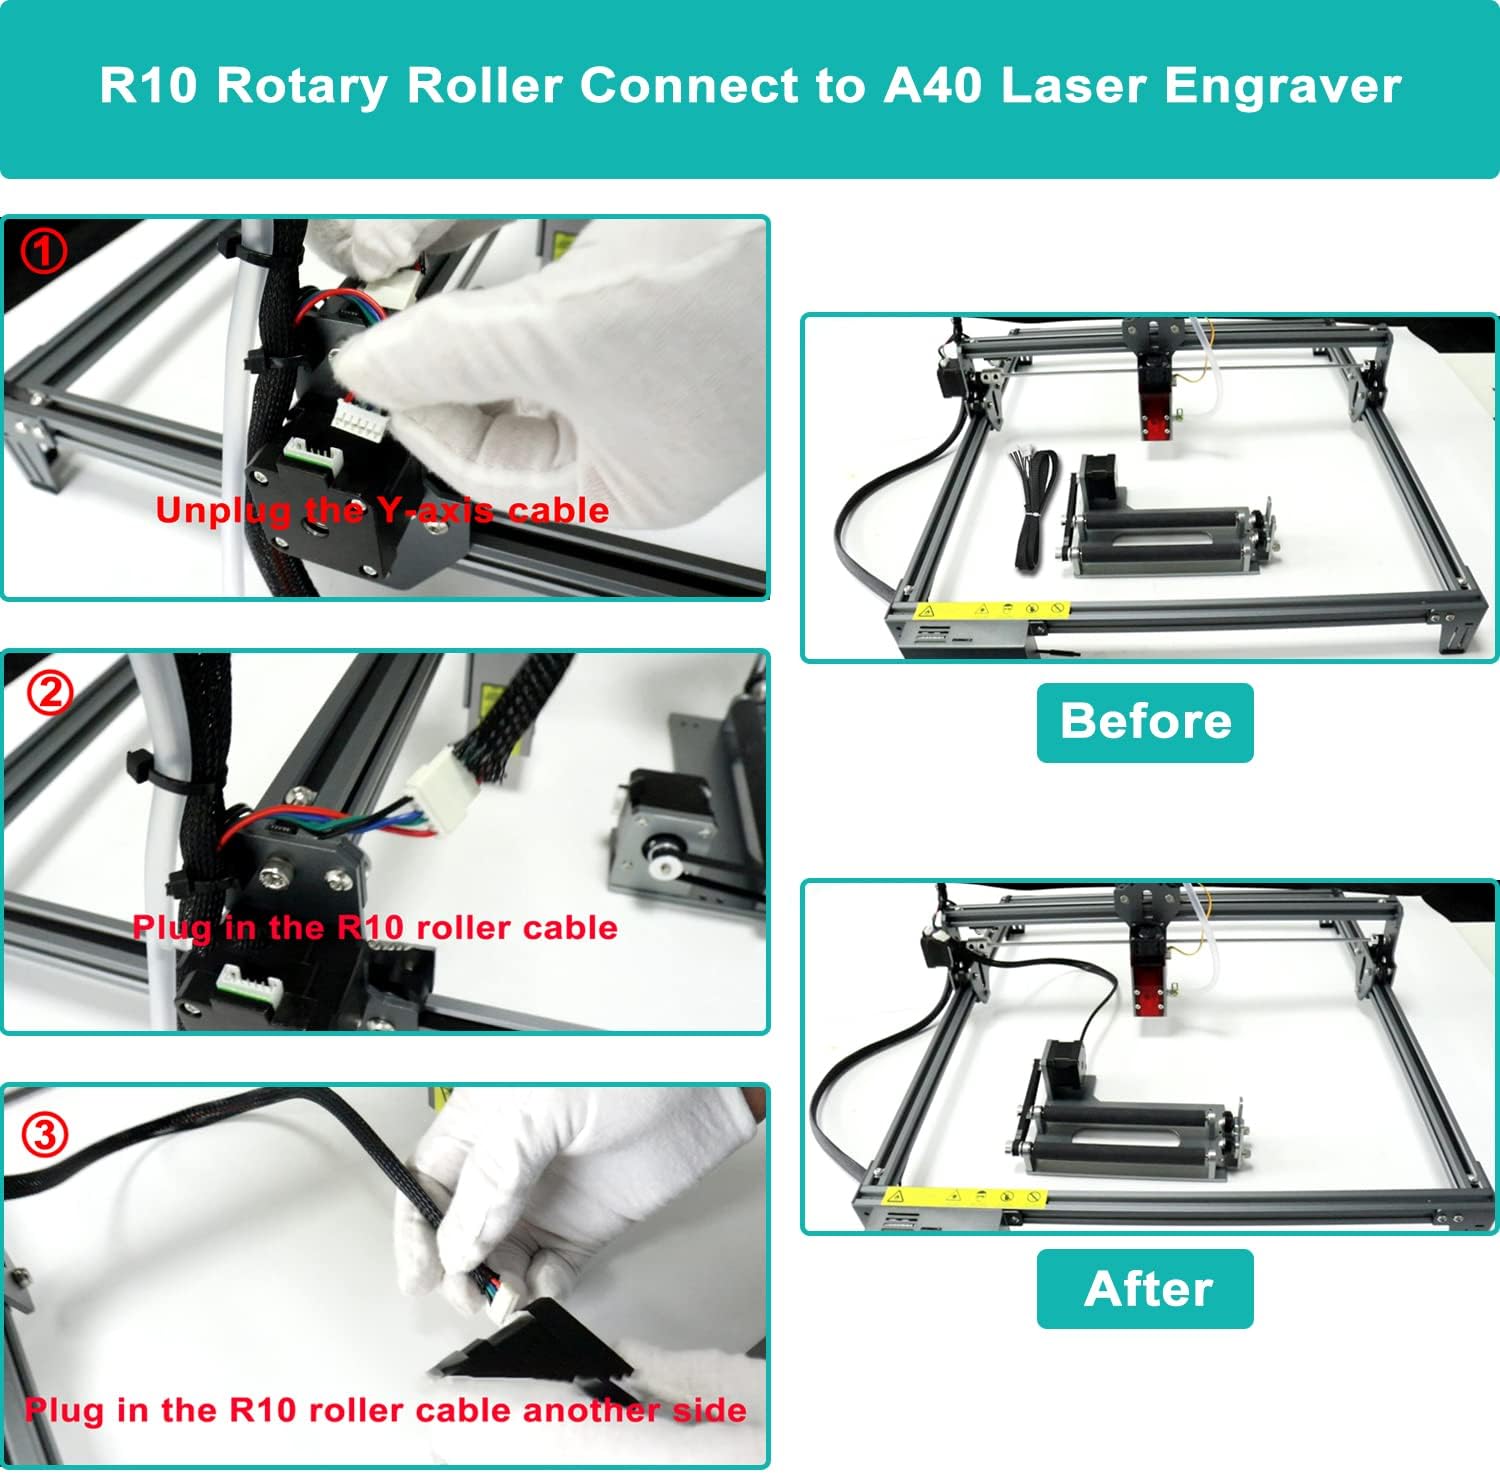
Image 5.2: Connection steps for ZBAITU A40 laser engravers.
6. Operation
Once the R10 Rotary Roller is connected, you can begin preparing for engraving cylindrical objects.
6.1. Placing the Object
- Place the cylindrical object (e.g., cup, bottle) onto the main rollers of the R10 unit.
- Ensure the object rests securely and can rotate freely without obstruction.
6.2. Adjusting Roller Width
The R10 features adjustable roller widths to accommodate various object diameters. To adjust:
- Loosen the screws securing the adjustable roller assembly.
- Slide the assembly to one of the three predefined width settings (3mm, 33mm, or 63mm) that best suits your object.
- Tighten the screws to secure the assembly in place.
6.3. Using the Adjustable Tailstock
For objects that are not uniformly cylindrical (e.g., tapered cups, wine glasses), the adjustable tailstock helps to keep the object level and stable during engraving.
- Position the tailstock at the opposite end of the object from the main rollers.
- Adjust the height of the tailstock until the object is level and supported.
- Ensure the object can still rotate smoothly.

Image 6.1: Rotary roller with a wooden cylinder being engraved, demonstrating the adjustable tailstock.

Image 6.2: ZBAITU laser engraver with the R10 rotary roller in use, engraving a red thermos and a wine glass.
6.4. Software Configuration
Refer to your laser engraver's software manual for specific settings related to rotary engraving. Typically, you will need to enable a 'rotary axis' or 'Y-axis rotary' mode and input the correct diameter or circumference of your object for accurate scaling.
7. Maintenance
Regular maintenance ensures the longevity and optimal performance of your R10 Rotary Roller.
- Cleaning: Periodically clean the rollers and the base unit to remove dust, debris, and engraving residue. Use a soft, dry cloth. Avoid abrasive cleaners or solvents.
- Belt Inspection: Check the drive belt for any signs of wear, cracking, or looseness. A worn or loose belt can affect engraving precision. Replace if necessary.
- Lubrication: The bearings are generally maintenance-free. If you notice any stiffness in rotation, a small amount of light machine oil can be applied to the bearing points, but avoid over-lubrication.
8. Troubleshooting
If you encounter issues with your R10 Rotary Roller, refer to the following common problems and solutions:
| Problem | Possible Cause | Solution |
|---|---|---|
| Rotary roller does not move or rotate. | Incorrect connection; Loose cable; Software not configured for rotary. | Verify all cable connections are secure (refer to Section 5). Check software settings for rotary axis enablement. Ensure the laser engraver is powered on. |
| Engraving is distorted or inconsistent. | Object not stable; Incorrect roller width; Loose drive belt; Incorrect software settings. | Ensure the object is securely placed and level. Adjust roller width and tailstock as needed. Inspect the drive belt for tension and wear. Verify software settings for object diameter/circumference. |
| Rollers are stiff or difficult to turn. | Debris on rollers; Tight belt; Bearing issue. | Clean rollers and surrounding areas. Check belt tension; it should not be excessively tight. If bearings are stiff, apply a small amount of light machine oil. |
9. Specifications
- Model: R10
- Brand: ZBAITU
- Color: Silver
- Product Dimensions: 22.86 x 14.99 x 7.87 cm (9 x 5.9 x 3.1 inches)
- Product Weight: 898 g (1.98 lbs)
- Power Source: No batteries required (powered by laser engraver)
- Adjustable Roller Widths: 3mm, 33mm, 63mm
10. Warranty and Support
ZBAITU is committed to providing quality products and customer satisfaction. While specific warranty details are not provided in this manual, ZBAITU offers pre-sales and after-sales service for its products. For any questions, technical assistance, or warranty claims, please contact ZBAITU customer support through the retailer where the product was purchased or via the official ZBAITU website.
Please retain your proof of purchase for any warranty-related inquiries.