1. Introduction
This manual provides essential information for the safe and effective operation, setup, and maintenance of your TOOLIOM LY500BS Auto Darkening Welding Helmet. Please read this manual thoroughly before using the helmet to ensure proper function and personal safety.

Figure 1: Front view of the TOOLIOM LY500BS Auto Darkening Welding Helmet with a Flaming Skull-N design.
2. Safety Information
Welding operations involve inherent risks. Always adhere to all applicable national and local safety regulations. Failure to follow these instructions may result in serious personal injury or equipment damage.
General Safety Precautions:
- Always wear appropriate personal protective equipment (PPE) in addition to the welding helmet, including safety glasses, gloves, and protective clothing.
- Ensure adequate ventilation in the welding area to avoid inhaling fumes.
- Protect bystanders from arc rays and spatter.
- Do not use the helmet if any part is damaged or appears to be malfunctioning.
- The helmet is designed for welding and grinding applications only. Do not use it for laser welding or overhead welding applications.
- Regularly inspect the helmet for cracks, scratches, or damage to the lens and shell.
3. Product Components and Features
The TOOLIOM LY500BS welding helmet is designed for enhanced visibility and protection during welding tasks.
Key Features:
- Auto Darkening Filter: Equipped with 2 arc sensors, the filter automatically transitions from light to dark within 0.1s to 1.0s upon arc ignition.
- True Color Technology: Provides a clearer and more natural view of the workpiece, reducing eye strain.
- Magnifying Lens/Cheater Lens Compatibility: Designed to easily accommodate magnifying lenses for users requiring vision correction.
- Multifunctional Use: Suitable for TIG, MIG, and MMA (STICK) welding processes.
- Adjustable Headgear: Offers a comfortable and customizable fit for various head sizes and shapes.
- Solar Powered with Battery Backup: Utilizes solar panel technology for power, supplemented by a CR2032 battery.

Figure 2: True Color Technology provides a clearer view compared to traditional lenses.
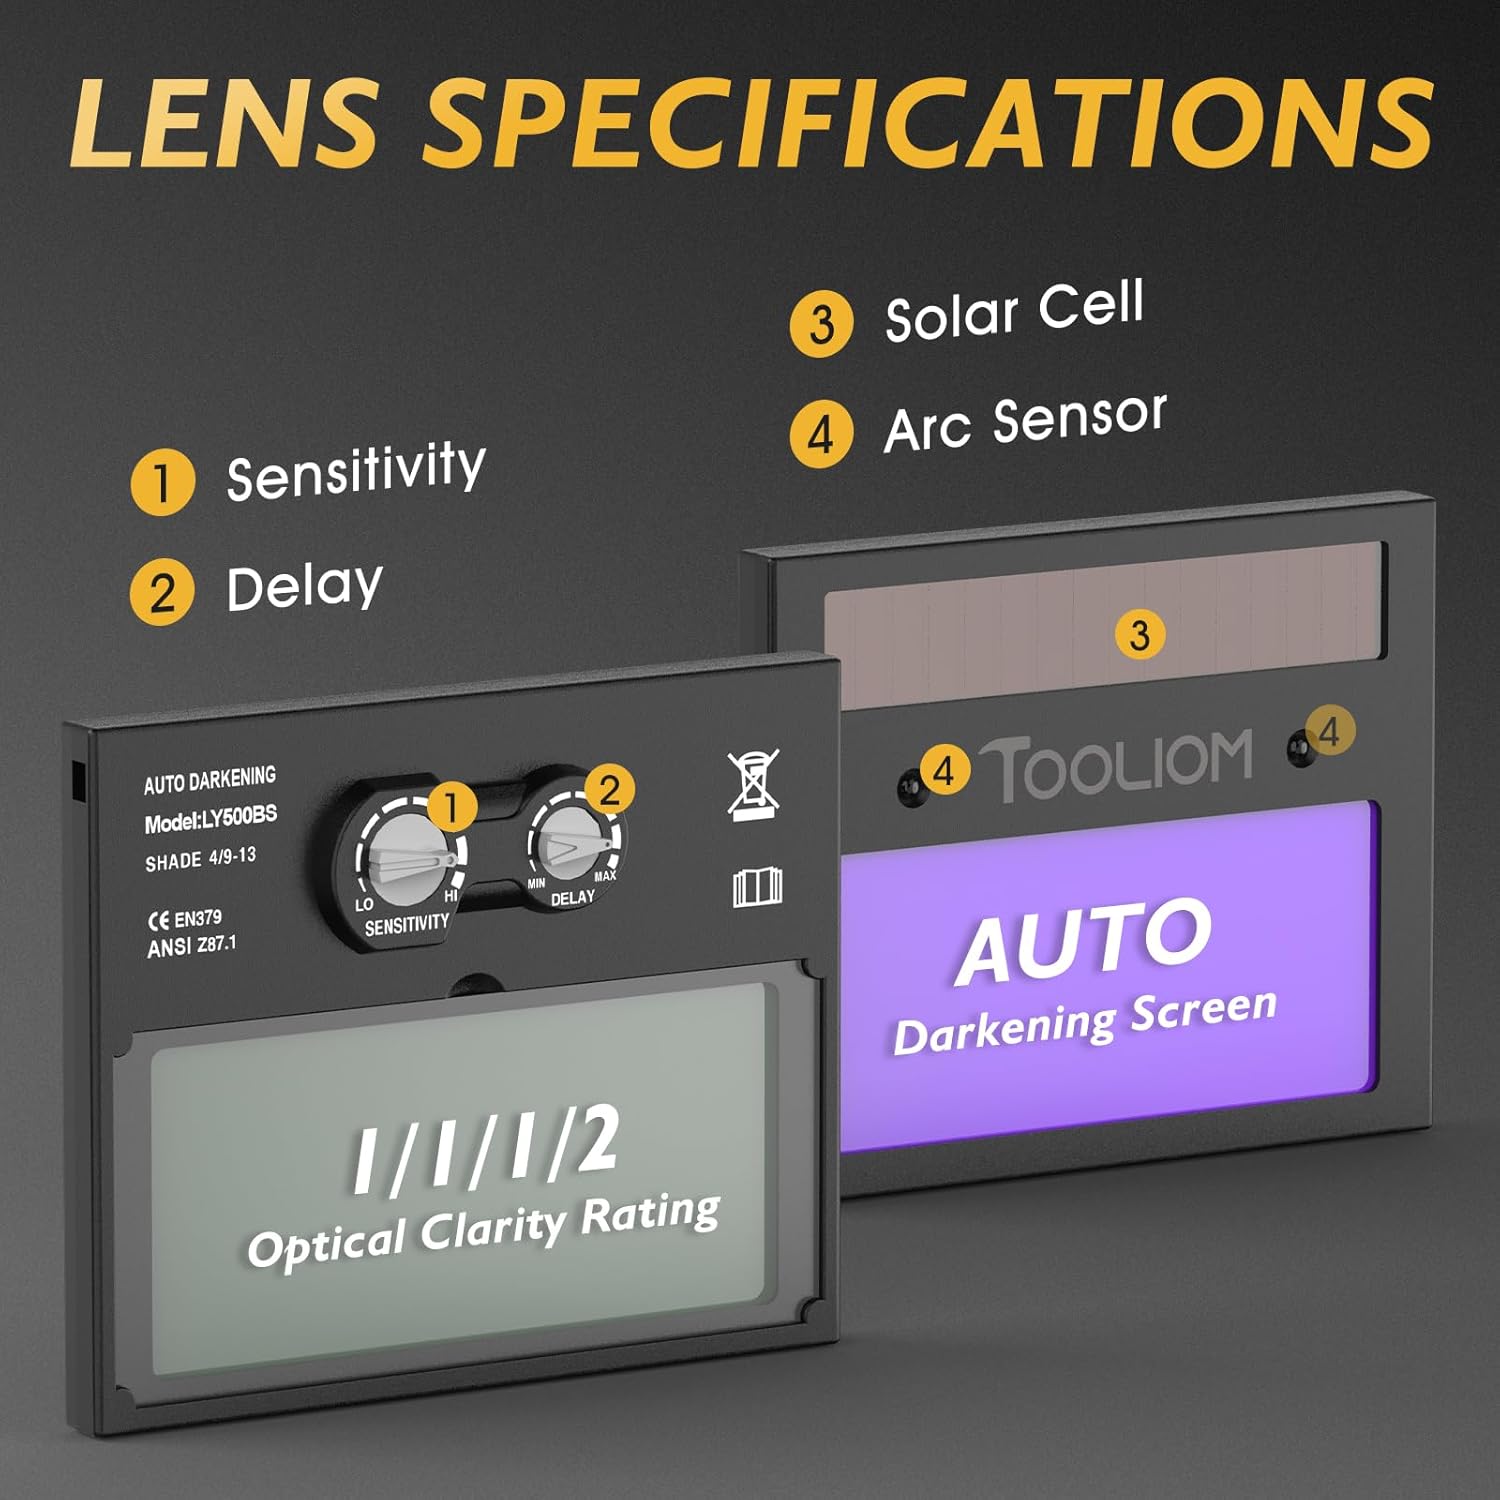
Figure 3: Lens specifications including Sensitivity, Delay, Solar Cell, and Arc Sensor.

Figure 4: Overview of helmet features: True Color, Auto Darkening, UV Protection, and Lightweight.
4. Setup
Before initial use, ensure the helmet is properly assembled and adjusted for your comfort and safety.
4.1 Headgear Adjustment
- Head Circumference: Rotate the knob at the back of the headgear to adjust the fit around your head.
- Top Strap Adjustment: Adjust the top strap to position the helmet correctly on your head, ensuring the viewing area is at eye level.
- Distance and Angle: Use the side knobs to adjust the distance between the helmet and your face, and the angle at which the helmet rests when in the down position.
- Flip Adjustment: Ensure the flip mechanism operates smoothly, allowing the helmet to be raised and lowered easily.

Figure 5: Adjustable headgear components for a customized fit.
4.2 Battery Installation/Check
The helmet comes with a pre-installed CR2032 battery. Verify its proper seating and functionality before use. The solar panel charges the internal battery during operation, extending its life.
5. Operating Instructions
The auto-darkening filter automatically adjusts to protect your eyes from intense arc light.
5.1 Shade Adjustment
The helmet features an adjustable shade range of 4/9-13. Rotate the shade control knob located on the side of the helmet to select the appropriate shade level for your welding process. Refer to welding standards for recommended shade levels based on amperage and material.
5.2 Sensitivity Control
Adjust the sensitivity knob to control how readily the filter reacts to the welding arc. Higher sensitivity is suitable for low-amperage TIG welding, while lower sensitivity is better for high-amperage MIG/MMA welding or in brightly lit environments to prevent false triggering.
5.3 Delay Control
The delay control knob sets the time the filter remains dark after the welding arc ceases. A shorter delay is suitable for tack welding, while a longer delay is recommended for high-amperage welding to protect against afterglow.

Figure 6: Application scenarios for MIG, STICK (MMA), and TIG welding.
6. Maintenance
Proper maintenance ensures the longevity and performance of your welding helmet.
6.1 Cleaning
- Clean the helmet shell with a mild soap and water solution. Avoid harsh solvents.
- Wipe the auto-darkening filter and cover lenses with a soft, lint-free cloth. Do not use abrasive cleaners or materials that could scratch the lens.
6.2 Battery Replacement
When the battery indicator signals low power, replace the CR2032 battery. Ensure correct polarity during installation.
6.3 Storage
Store the helmet in a dry, clean environment, away from direct sunlight and extreme temperatures.
7. Troubleshooting
If you encounter issues with your welding helmet, refer to the following common problems and solutions:
| Problem | Possible Cause | Solution |
|---|---|---|
| Filter does not darken | Low battery; Arc sensors obstructed; Incorrect sensitivity setting; Filter damaged. | Replace battery; Clean sensors; Adjust sensitivity; Contact support for replacement. |
| Poor visibility | Cover lens dirty/scratched; Incorrect shade setting. | Clean or replace cover lens; Adjust shade level. |
| Filter flickers | Low battery; Sensitivity too high; Interference from other light sources. | Replace battery; Reduce sensitivity; Shield from other light sources. |
8. Specifications
| Feature | Detail |
|---|---|
| Model Name | LY500BS |
| Brand | TOOLIOM |
| Optical Clarity Rating | 1/1/1/2 |
| Shade Range | DIN 4/9-13 (Adjustable) |
| Arc Sensors | 2 |
| Switching Time (Light to Dark) | 0.1s - 1.0s (Adjustable) |
| Power Supply | Solar Powered with 1 x CR2032 Battery (included) |
| Material | Plastic |
| Color | Black (Flaming Skull-N Design) |
| Weight | Approximately 830 g |
| Package Dimensions | 30.51 x 25.2 x 19.99 cm |
| UPC | 197644657827 |
9. Warranty and Support
For warranty information or technical support, please refer to the product packaging or contact TOOLIOM customer service directly. Keep your purchase receipt as proof of purchase.


