A8 PRO
Antusi A8 PRO Wireless Anti-Theft Alarm & Bicycle Tail Light User Manual
Model: A8 PRO | Brand: Generic
1. Introduction
Thank you for choosing the Antusi A8 PRO Wireless Anti-Theft Alarm and Bicycle Tail Light. This device combines a powerful anti-theft alarm with a bright LED tail light and an intelligent brake light function, enhancing both your security and visibility while cycling. This manual provides detailed instructions for installation, operation, and maintenance to ensure optimal performance and longevity of your device.
2. Package Contents
Please verify that all components are present in the package:
- Antusi A8 PRO Main Unit (Tail Light & Alarm)
- Wireless Remote Control
- Seat Post Mounting Bracket
- USB Charging Cable
- Zip Ties / Fasteners
- Installation Tools (e.g., Hex Key)
- Adhesive Pads (if applicable)
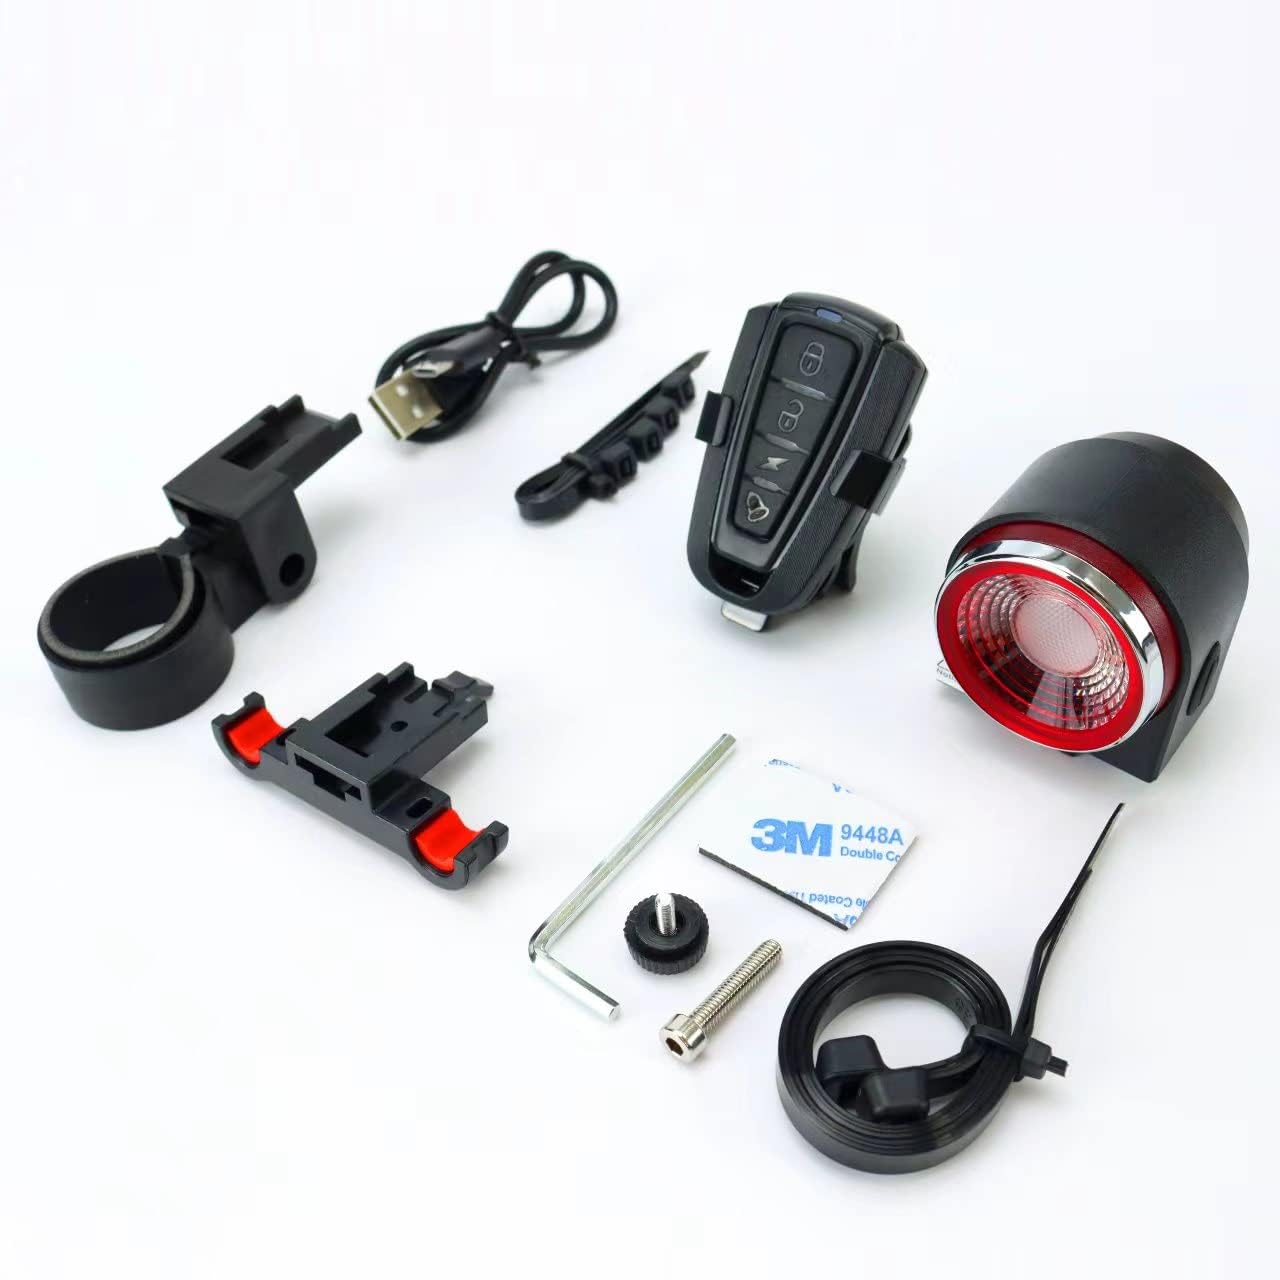
Figure 2.1: All components included with the Antusi A8 PRO. This image displays the main alarm and tail light unit, the wireless remote control, various mounting accessories, a USB charging cable, and small tools for installation.
3. Setup and Installation
3.1 Charging the Device
Before first use, fully charge the Antusi A8 PRO unit. Connect the provided USB charging cable to the charging port on the device and to a standard USB power source (e.g., computer USB port, USB wall adapter). The charging indicator light will show the charging status. A full charge typically takes approximately 3 hours and provides a standby time of up to three months.

Figure 3.1: The Antusi A8 PRO unit being charged via a USB connection. The image highlights the USB charging port and the device's compatibility with various USB power sources.
3.2 Mounting the Main Unit
The main unit is designed to be mounted on the bicycle's seat post. Follow these steps:
- Select a suitable position on your bicycle's seat post, ensuring the tail light is clearly visible from the rear.
- Attach the mounting bracket to the seat post using the provided fasteners or zip ties. Ensure it is securely tightened and does not wobble.
- Slide the Antusi A8 PRO main unit onto the mounting bracket until it clicks into place. Verify that it is firmly attached.

Figure 3.2: The Antusi A8 PRO main unit securely installed on a bicycle's seat post. This image demonstrates the proper mounting position for optimal visibility and function.
4. Operating Instructions
4.1 Remote Control Functions
The wireless remote control allows you to manage the alarm and light functions. Familiarize yourself with the buttons:
- Arm/Lock Button: Activates the anti-theft alarm. A short beep confirms activation. Any movement detected will trigger the alarm.
- Disarm/Unlock Button: Deactivates the anti-theft alarm. A double beep confirms deactivation.
- Light Mode Button: Cycles through different tail light modes (e.g., steady, flashing, pulsating).
- Bell/Find Button: Triggers a loud sound from the unit, useful for locating your bike or as a warning bell.

Figure 4.1: The wireless remote control for the Antusi A8 PRO, showing its various function buttons. The image illustrates the remote's role in controlling the alarm and light features.
4.2 Tail Light and Brake Light
The integrated LED tail light provides excellent visibility. The intelligent brake light feature automatically brightens when deceleration is detected, alerting following traffic. This function operates automatically when the light is active.

Figure 4.2: The Antusi A8 PRO tail light illuminated, demonstrating its brightness and visibility. The image also shows the remote control, emphasizing the integrated system.
5. Maintenance
- Cleaning: Wipe the device with a soft, damp cloth. Do not use abrasive cleaners or solvents.
- Battery Care: Recharge the device regularly, even if not in frequent use, to maintain battery health. Avoid fully depleting the battery for extended periods.
- Storage: Store the device in a cool, dry place when not in use.
- Water Resistance: The device is designed to be water-resistant for outdoor use, but avoid submerging it in water.
6. Troubleshooting
| Problem | Possible Cause | Solution |
|---|---|---|
| Device not turning on. | Low battery. | Charge the device fully. |
| Remote control not responding. | Remote battery low or out of range. | Replace remote battery (if applicable) or move closer to the main unit. Re-pair if necessary (refer to pairing instructions, if provided separately). |
| Alarm triggers too easily/not at all. | Sensitivity setting. | Check if there are sensitivity adjustment options (refer to advanced settings, if available). Ensure proper mounting. |
| Brake light not activating. | Light not active or insufficient deceleration. | Ensure the tail light is turned on. The brake light activates with significant deceleration. |
7. Product Specifications
| Feature | Detail |
|---|---|
| Model Number | A8 PRO |
| Certification | CE |
| Power Source | Rechargeable Battery |
| Charging Time | Approx. 3 hours |
| Standby Time | Up to 3 months |
| Installation Location | Bicycle Seat Post |
| Features | Anti-theft Alarm, LED Tail Light, Intelligent Brake Light, Wireless Remote Control |
| Origin | Mainland China |
8. Warranty and Support
The product comes with a 12-month warranty. If you encounter any product quality issues, please do not hesitate to contact us. We are committed to providing 100% customer satisfaction and will offer a full refund or a new replacement product.
For customer service inquiries, please contact us through the seller page on the platform where you purchased the product. We aim to provide a quick response and detailed explanation to all your questions.
Ask a question about this manual
Ask about setup, troubleshooting, compatibility, parts, safety, or missing instructions. Manuals+ will review the question and use this page’s manual context to help answer it.