Introduction
This manual provides comprehensive instructions for the assembly, operation, and maintenance of your Homieasy Printer Stand with Charging Station. Designed for versatility and durability, this stand offers organized storage for printers, 3D printer filaments, and other office or workshop essentials, enhancing your workspace efficiency.

Image: The Homieasy Printer Stand in use, showcasing its capacity for multiple printers and organized storage.
Product Features
- Large Capacity: The spacious wooden top (29.1"L x 22.8"W) accommodates various 3D printers. The middle shelf supports one standard printer, enabling simultaneous operation. The lower tube rack organizes multiple filament spools, eliminating desk clutter.
- Robust Construction: Crafted with a heavy-duty steel frame and premium particleboard coated with heat-resistant paint, this printer stand resists rust and wear, supporting up to 300 lbs. The solid structure prevents printer vibration during operation.
- High-Capacity Filament Storage: Measuring 29.1"L x 22.8"W x 60"H, this stand stores over 60 spools with an adjustable upper tube for quick access to 10 spools, reinforced lower shelves for bulk filament storage.
- Stability and Mobility: Engineered for versatility, this printer table cart includes adjustable leveling feet and caster wheels. Install the feet for enhanced stability on uneven surfaces or attach the wheels for smooth mobility.
- Integrated Charging Station: Features 2 AC outlets (120V/5A) and 3 USB ports (5V/2A) with a 6.5ft power cord for convenient device charging.

Image: The printer stand configured for 3D printing, highlighting the filament storage and printer placement.
Assembly Instructions
Please follow the detailed illustrated instructions included in your package for the most accurate assembly guidance. The following steps provide a general overview:
- Unpack Components: Carefully remove all parts from the packaging. Verify that all components and hardware listed in the included parts list are present.
- Review Illustrated Instructions: Refer to the detailed illustrated instructions provided in the package. These diagrams will guide you through each step of the assembly process.
- Assemble Frame: Begin by assembling the main steel frame components according to the diagrams. Ensure all screws are finger-tightened initially.
- Attach Shelves: Secure the particleboard shelves to the frame. Pay attention to the orientation of each shelf, especially the top shelf with the integrated charging station.
- Install Filament Holder: Attach the adjustable filament holder to the upper frame as shown in the instructions.
- Choose Base Option:
- For Stability: Install the adjustable leveling feet to ensure the stand is stable on uneven surfaces, which is recommended for precision 3D printing to minimize vibration.
- For Mobility: Attach the caster wheels for easy movement of the stand. Ensure the locking mechanisms on the wheels are engaged when the stand is in a stationary position.
- Final Tightening: Once all components are in place, systematically tighten all screws using the provided tools. Do not overtighten.

Image: Visual representation of the stand's dimensions and the two base options: adjustable leveling feet for stability and caster wheels for mobility.
Operating Instructions
- Charging Station Usage: The integrated charging station features 2 AC outlets (120V/5A) and 3 USB ports (5V/2A). Connect the stand's power cord to a functional wall outlet, then plug your devices into the available ports for power.
- Filament Holder Adjustment: The upper filament holder is adjustable. Position it to conveniently access up to 10 spools of filament for your 3D printer.
- Printer Placement: Place your primary printer on the spacious top surface. Utilize the middle shelf for a secondary standard printer or other accessories.
- Mobility and Stability: If using casters, unlock them to move the stand. Lock them when the stand is in its desired position to prevent accidental movement. If using leveling feet, adjust them to ensure the stand is level and stable.
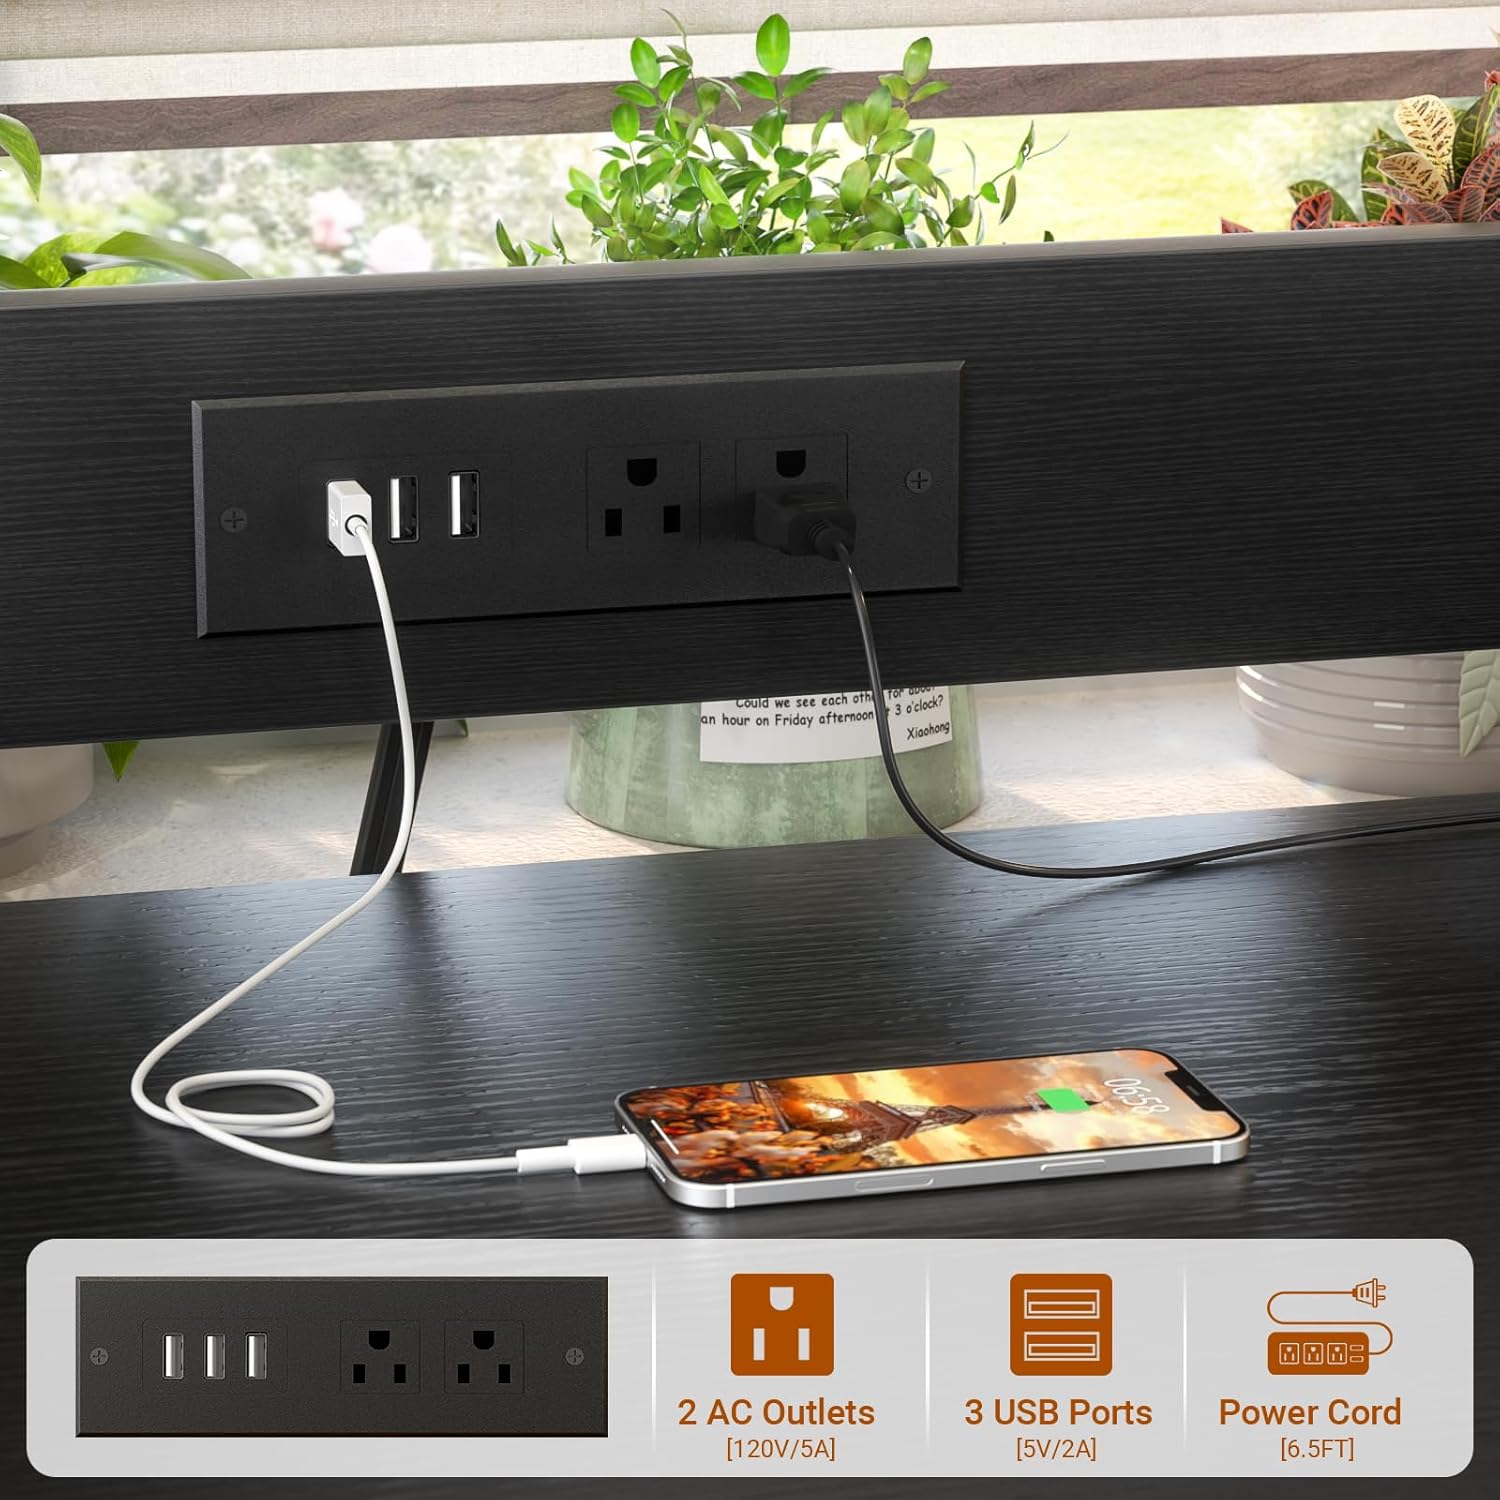
Image: The integrated charging station with AC outlets and USB ports, demonstrating its functionality.
Maintenance
- Cleaning: Wipe surfaces with a soft, damp cloth. Avoid abrasive cleaners or harsh chemicals that could damage the finish.
- Hardware Check: Periodically check all screws and connections to ensure they remain tight. Tighten if necessary to maintain structural integrity.
- Filament Storage: Keep filament spools organized on the designated racks to prevent tangling and maintain material quality.
Troubleshooting
- Stand Wobbles:
- Ensure all screws are securely tightened.
- If using leveling feet, adjust each foot until the stand is stable on the floor.
- If using casters, ensure they are locked when the stand is stationary. Avoid placing oversized printers that exceed the stand's capacity or recommended dimensions, as this may affect stability.
- Charging Station Not Working:
- Verify the stand's power cord is securely plugged into a functional wall outlet.
- Check if the devices connected to the AC outlets or USB ports are properly plugged in.
- Difficulty Assembling:
- Re-read the illustrated instructions carefully.
- Ensure you are using the correct hardware for each step.
- Do not force parts together; if a part does not fit, re-check the instructions and part orientation.
Specifications
| Dimensions | 29.1"L x 22.8"W x 60"H |
| Top Surface Dimensions | 29.1"L x 22.8"W |
| Weight Capacity | Up to 300 lbs |
| Material | Alloy Steel, Engineered Wood |
| Color | Black |
| Charging Station | 2 AC Outlets (120V/5A), 3 USB Ports (5V/2A), 6.5ft Power Cord |
| Item Weight | Approximately 36 pounds |
| Package Dimensions | 32.25 x 26 x 4.15 inches |

Image: Detailed dimensions of the printer stand, including the adjustable filament holder.
Warranty and Support
Customer Support: For any questions, concerns, or assistance with your Homieasy Printer Stand, please feel free to contact Homieasy customer service. We are committed to providing support and aim to reply to all inquiries within 24 hours.
Protection Plans: Optional protection plans are available for purchase to extend coverage for your product. These may include 3-Year, 4-Year, and Complete Protect options. Please refer to your purchase details or contact customer service for more information on available plans and terms.