1. Introduction
The Walfront K3NG Keyer is an advanced, open-source based CW (Morse Code) keyer designed for amateur radio enthusiasts. It offers extensive features and flexibility, integrating an LCD display, USB keyboard input, a rotary encoder for control, and a CW decoder. This device is built with a compact aluminum alloy enclosure and utilizes a customized open-source code derived from K3NG, allowing for full customization and adaptation to various operational needs.
This manual provides detailed instructions for the setup, operation, maintenance, and troubleshooting of your K3NG Keyer, ensuring you can maximize its capabilities.
2. Safety Information
Please read and understand all safety instructions before operating the device. Failure to follow these instructions may result in electric shock, fire, or damage to the device.
- Do not expose the device to water, moisture, or extreme temperatures.
- Use only the provided USB cable for power and data connection.
- Do not attempt to open or modify the device. Refer all servicing to qualified personnel.
- Ensure proper ventilation around the device during operation.
- Keep the device away from strong magnetic fields.
3. Package Contents
Verify that all items listed below are present in your package:
- 1 x Walfront K3NG Keyer Unit
- 1 x User Manual (this document)
- 1 x USB Cable
- 3 x Electronic Components (for potential future expansion or specific configurations)
4. Product Overview
The K3NG Keyer features a robust aluminum alloy casing with clearly labeled ports and controls for intuitive operation.

Figure 4.1: Front view of the K3NG Keyer, showing the LCD display, rotary encoder, and four red control buttons (M1-M4), along with smaller buttons for TONE, PTT, and TX. Various ports are visible at the top and bottom.
4.1. Front Panel Controls and Indicators
- LCD Display: Shows operational information, settings, and decoded CW messages.
- Rotary Encoder (CMD & WPM): Used for navigating menus, adjusting settings, and controlling Words Per Minute (WPM) speed. Pushing down on the encoder typically switches between Command Mode and WPM adjustment.
- M1-M4 Buttons: Programmable memory buttons for storing and recalling frequently used messages or commands.
- TONE Button: Activates a sidetone for monitoring your CW output.
- PTT Button: Manually controls the Push-To-Talk function for your transceiver.
- TX Button: Initiates transmission.
- Arduino/Winkey Switch: Selects between Arduino mode and Winkey mode for keyer operation.
4.2. Rear and Side Panel Ports

Figure 4.2: Top and rear panel connections, including USB (for Winkey & CLI), USB HOST, PADDLE, PTT, RTS, TX, and TONE IN. This image also highlights the function of the rotary encoder and the Arduino/Winkey switch.
- USB (CLI command only): Main USB port for connecting to a computer for configuration, firmware updates, and Command Line Interface (CLI) commands.
- USB HOST: Allows connection of a USB keyboard for direct text input.
- PADDLE: Input for connecting a CW paddle or key.
- PTT: Output for Push-To-Talk control of a transceiver.
- RTS: Output for controlling the transceiver (CW direct by RTS from PC).
- TX: Transmit output.
- TONE IN: Input for CW decode from an audio source.
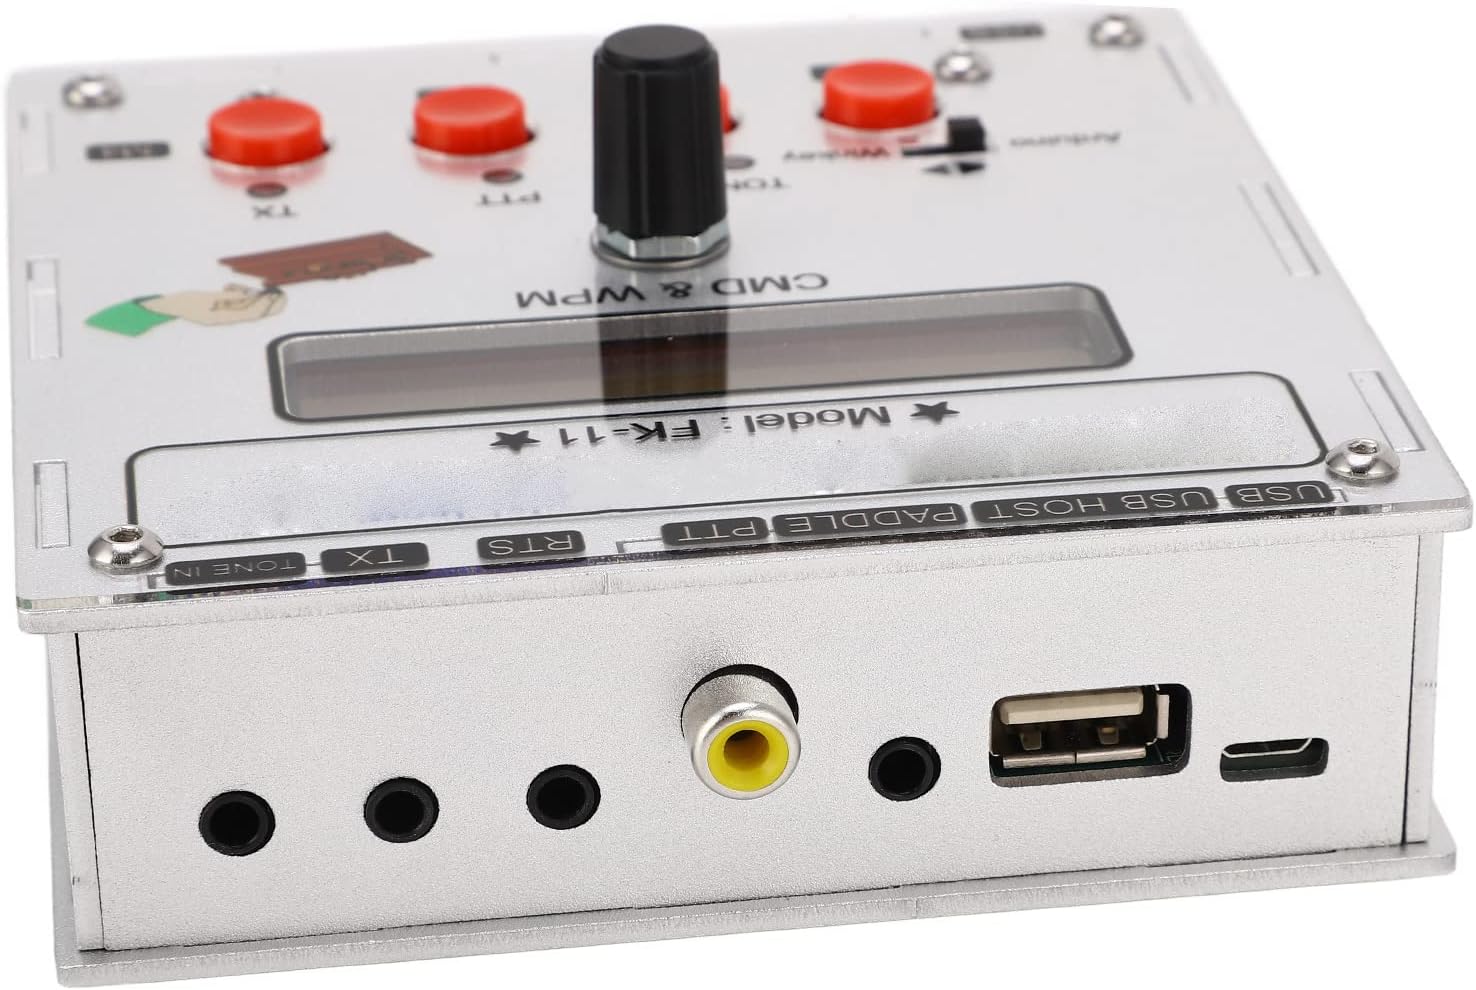
Figure 4.3: Top-down view illustrating the layout of the ports and the LCD display.

Figure 4.4: Top-down view highlighting the control buttons (M1-M4, TONE, PTT, TX) and the central rotary encoder.
5. Setup
Follow these steps to set up your Walfront K3NG Keyer:
- Power Connection: Connect the provided USB cable to the USB port on the keyer and to a suitable USB power source (e.g., computer USB port, USB wall adapter). The device will power on automatically.
- Paddle/Key Connection: Connect your CW paddle or straight key to the "PADDLE" input jack on the keyer.
- Transceiver Connection (Optional):
- For PTT control, connect the "PTT" output to your transceiver's PTT input.
- For direct CW control via RTS from a PC, connect the "RTS" output to your transceiver's appropriate input.
- For transmit output, connect the "TX" output to your transceiver's keying input.
- Audio Input for Decoder (Optional): To utilize the CW decoder, connect an audio output from your receiver or transceiver to the "TONE IN" jack.
- USB Keyboard Connection (Optional): If desired, connect a standard USB keyboard to the "USB HOST" port for direct text input.
Once connected, the LCD display will illuminate, indicating the device is ready for operation.
6. Operating Instructions
The K3NG Keyer offers a wide range of functions. This section covers basic operation.
6.1. Basic Keyer Operation
- Power On: The keyer powers on automatically when connected to a USB power source.
- WPM Adjustment: Rotate the central encoder to adjust the Words Per Minute (WPM) speed. The current WPM will be displayed on the LCD.
- Mode Selection (Arduino/Winkey): Use the small switch near the Arduino/Winkey labels to select the desired operating mode. Refer to the K3NG firmware documentation for detailed differences between these modes.
- Sending CW: Use your connected paddle or key to send Morse code. The keyer will generate the corresponding tones and key your transceiver if connected.
6.2. Advanced Functions
- Command Mode: Press the rotary encoder to enter Command Mode. In this mode, you can navigate through various settings and functions displayed on the LCD. Rotate the encoder to scroll through options and press to select.
- Memory Buttons (M1-M4): These buttons can be programmed to send pre-recorded messages. To program, typically enter Command Mode, navigate to the memory programming section, and follow the on-screen prompts. To send a stored message, simply press the corresponding M button.
- CW Decoder: When an audio signal containing CW is fed into the "TONE IN" port, the keyer's built-in decoder will attempt to display the decoded text on the LCD.
- USB Keyboard Input: Connect a USB keyboard to the "USB HOST" port. You can then type text directly, and the keyer will convert it to CW and transmit it.

Figure 6.1: The K3NG Keyer integrates various features for comprehensive Morse code operation.

Figure 6.2: The open-source nature of the K3NG code allows for extensive customization and learning opportunities.
For detailed information on all available commands and advanced configurations, refer to the official K3NG Keyer firmware documentation, which is publicly available due to its open-source nature.
7. Maintenance
Proper care will ensure the longevity and optimal performance of your K3NG Keyer:
- Cleaning: Use a soft, dry cloth to clean the exterior of the device. Do not use liquid cleaners or abrasive materials.
- Storage: Store the keyer in a cool, dry place away from direct sunlight and extreme temperatures when not in use.
- Firmware Updates: Periodically check the official K3NG Keyer project resources for firmware updates. Updating the firmware can introduce new features, improve performance, or fix bugs. Follow the specific instructions provided with the firmware update.
8. Troubleshooting
If you encounter issues with your K3NG Keyer, try the following steps:
| Problem | Possible Cause | Solution |
|---|---|---|
| Device does not power on. | No power from USB source or faulty USB cable. | Ensure USB cable is securely connected. Try a different USB port or power adapter. Verify the USB cable is not damaged. |
| CW paddle input not recognized. | Incorrect connection or faulty paddle. | Check the connection to the "PADDLE" jack. Test with a known working paddle. |
| CW decoder not displaying text. | No audio input, incorrect audio level, or poor signal quality. | Ensure audio is connected to "TONE IN". Adjust audio output level from your receiver. Ensure the CW signal is clear. |
| USB keyboard not working. | Keyboard not compatible or not properly connected. | Ensure the keyboard is connected to the "USB HOST" port. Try a different USB keyboard. |
If the problem persists after attempting these solutions, please contact Walfront customer support or consult the K3NG Keyer online community for further assistance.
9. Specifications
| Feature | Detail |
|---|---|
| Model Name | WALFRONTg6hzewr8dq |
| Brand | Walfront |
| Material | Aluminum Alloy |
| Connectivity Technology | USB |
| Power Source | USB power |
| Item Weight | 1.01 pounds (approx. 0.46 kg) |
| Package Dimensions | 6.06 x 5.98 x 2.8 inches (approx. 15.4 x 15.2 x 7.1 cm) |
| Compatible Devices | For LCD Display Keyboard (referring to its integrated features) |
| Keyboard Description | Open source CW (Morse code) keyer |
10. Warranty & Support
10.1. Warranty Information
Walfront products are manufactured to high-quality standards. For specific warranty terms and conditions, please refer to the warranty card included with your product or visit the official Walfront website. Keep your purchase receipt as proof of purchase for warranty claims.
10.2. Customer Support
If you require technical assistance, have questions about your K3NG Keyer, or need to report an issue, please contact Walfront customer support through their official channels. Additionally, due to the open-source nature of the K3NG Keyer, a large community of users and developers exists online. These communities can be a valuable resource for advanced configurations, troubleshooting, and sharing ideas.
Please note that this manual is for informational purposes. Specifications and features are subject to change without notice.