Introduction
This manual provides detailed instructions for the setup, operation, and maintenance of your Mrisata Digital Alarm Clock. Please read this manual thoroughly before using the product to ensure proper function and longevity.

Figure 1: Front view of the Mrisata Digital Alarm Clock displaying time.
Product Features
- LED time display integrated into a smooth wooden finish.
- Two display modes: Voice-control mode and Always-bright mode.
- Displays time and temperature (Celsius/Fahrenheit).
- Three independent alarm settings with weekday mode option.
- Adjustable brightness levels for the LED display.
- Compact 2.5-inch cubic design.
- Power options: 3 AAA batteries (not included) or DC 5V/500mA USB power supply.
Package Contents
- 1 x Mrisata Wooden Digital Alarm Clock
- 1 x USB Power Cable
- 1 x User Manual (this document)

Figure 2: Included USB power cable.
Setup
The alarm clock can be powered by either 3 AAA batteries or a DC 5V/500mA USB power supply. For continuous use, USB power is recommended.
1. Powering the Clock
- Battery Installation: Open the battery compartment cover located on the back of the clock. Insert 3 AAA batteries (not included), ensuring correct polarity (+/-). Close the cover securely.
- USB Power: Connect the small end of the provided USB cable to the DC 5V port on the back of the clock. Connect the other end to a USB power adapter (not included) or a powered USB port.

Figure 3: Battery compartment with cover removed.
2. Initial Power On
Once powered, the LED display will illuminate, showing the current time or a default setting. If using batteries, the display may turn off after a short period in Voice-control mode to conserve power.
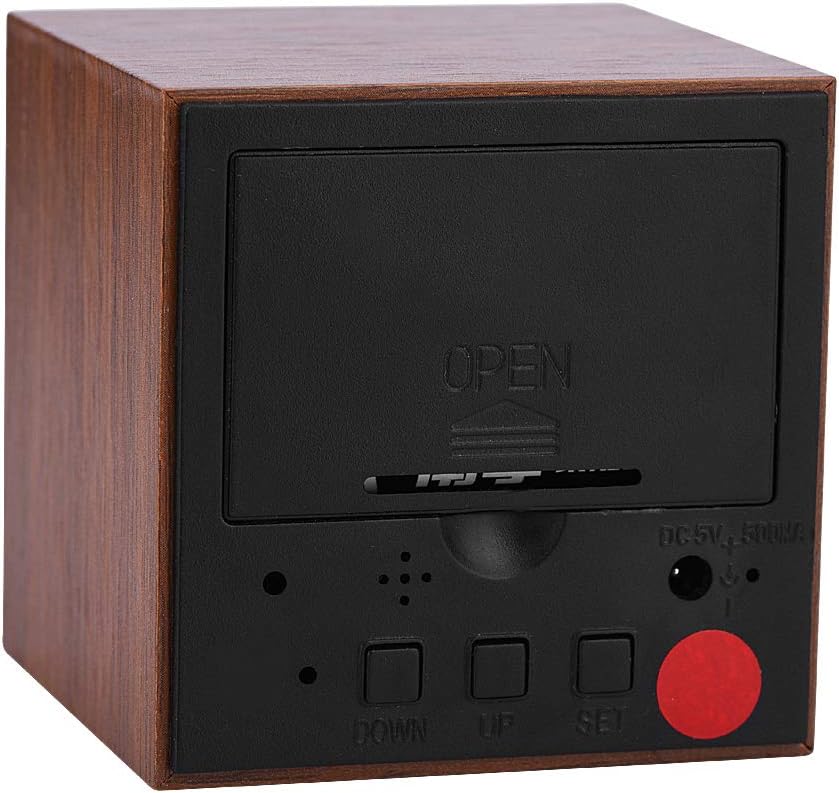
Figure 4: Rear panel with control buttons and power input.
Operating Instructions
The clock features three control buttons on the back: SET, UP, and DOWN.
1. Setting Time
- Press and hold the SET button for approximately 3 seconds to enter time setting mode. The hour digits will flash.
- Use the UP and DOWN buttons to adjust the hour.
- Press SET again to confirm the hour and move to minute setting. The minute digits will flash.
- Use the UP and DOWN buttons to adjust the minutes.
- Press SET again to confirm the minutes and move to 12/24-hour format selection.
- Use the UP and DOWN buttons to select between 12H (12-hour format) or 24H (24-hour format).
- Press SET one last time to exit time setting mode.
2. Setting Alarms (A1, A2, A3)
The clock supports up to three independent alarms.
- From the normal time display, press the SET button once to cycle through A1, A2, A3, and then temperature display.
- When A1, A2, or A3 is displayed, press and hold the SET button for approximately 3 seconds to enter alarm setting mode for that specific alarm. The hour digits will flash.
- Use the UP and DOWN buttons to adjust the alarm hour.
- Press SET again to confirm the hour and move to minute setting. The minute digits will flash.
- Use the UP and DOWN buttons to adjust the alarm minutes.
- Press SET again to confirm the minutes and move to alarm ON/OFF setting.
- Use the UP and DOWN buttons to toggle the alarm ON or OFF.
- Press SET one last time to exit alarm setting mode.
- To activate or deactivate an alarm without entering setting mode, short press SET to select the alarm (A1, A2, or A3), then press UP or DOWN to toggle it on or off.
3. Weekday Alarm Mode
This feature allows alarms to ring only from Monday to Friday.
- After setting an alarm (A1, A2, or A3), press SET until you see 'E' followed by a number (e.g., E.ON or E.OFF). This indicates the weekday alarm setting.
- Use the UP or DOWN buttons to toggle weekday mode ON or OFF.
- Press SET to confirm and exit.
4. Temperature Display
The clock can display temperature in Celsius or Fahrenheit.
- From the normal time display, short press the DOWN button to switch between Celsius (°C) and Fahrenheit (°F) temperature display.
5. Display Modes (Voice-control / Always-bright)
The clock offers two display modes to manage power consumption.
- Voice-control Mode (Power Saving): In this mode, the display turns off after approximately 10 seconds. To activate the display, make a sound (e.g., clap your hands, tap the clock) or touch the clock. This mode is recommended when using battery power.
- Always-bright Mode: The display remains continuously on. This mode is recommended when the clock is powered via USB.
To switch between modes, press the UP button. The display will show 'ON:Sd' for Voice-control mode or '--:Sd' for Always-bright mode.
6. Brightness Adjustment
The LED display brightness can be adjusted.
- Press and hold the UP button for approximately 3 seconds. The display will show 'L1', 'L2', or 'L3' (representing brightness levels).
- Use the UP or DOWN buttons to select the desired brightness level (L1 being the dimmest, L3 the brightest).
- Press SET to confirm and exit.
7. Product Overview Video
For a visual guide on the clock's features and operation, please watch the video below.
Video: A brief demonstration of the Mrisata Digital Alarm Clock's appearance and basic functions.
Maintenance
- Clean the clock with a soft, dry cloth. Do not use abrasive cleaners or solvents.
- Avoid exposing the clock to direct sunlight, extreme temperatures, or high humidity.
- If using batteries, replace them promptly when the display dims or malfunctions to prevent leakage.
- Ensure the USB cable is not bent or damaged to maintain a stable power connection.
Troubleshooting
- Display is off: Check power source. If using batteries, ensure they are fresh and correctly inserted. If using USB, ensure the cable is securely connected and the power adapter is working. The clock might also be in Voice-control mode (ON:Sd) and awaiting activation.
- Clock not keeping accurate time: Ensure the clock is receiving stable power. Reset the time if necessary.
- Alarm not sounding: Verify that the specific alarm (A1, A2, or A3) is set to ON. Check the alarm volume setting (if applicable, though not specified for this model, it's a common troubleshooting step). Ensure weekday mode is not preventing the alarm from sounding on the desired day.
- Buttons unresponsive: Try removing and re-inserting batteries or disconnecting and reconnecting USB power to perform a soft reset.
Specifications
| Feature | Detail |
|---|---|
| Brand | Mrisata |
| Model Number | KLEOADzc7gni52qu-02 |
| Display Type | Digital LED |
| Material | Engineered Wood, Wood |
| Color | Brown wood with Red LED light |
| Product Dimensions | 2.36"W x 2.36"H x 2.36"D (6cm x 6cm x 6cm) |
| Power Source | 3 x AAA Batteries (not included) OR DC 5V/500mA USB Power Supply |
| Special Features | 3 Alarms, Temperature Display (°C/°F), Voice-control Mode, Adjustable Brightness |
| Item Weight | 3.2 ounces |

Figure 5: Product dimensions.
Warranty and Support
Specific warranty information for the Mrisata Digital Alarm Clock is not provided in the product details. For any support inquiries or warranty claims, please refer to the retailer or manufacturer's contact information provided at the point of purchase.