1. Introduction
This manual provides detailed instructions for the setup, operation, and maintenance of your Riworal UHF 4 Channel Wireless Microphone System. This system is designed for various applications including karaoke, speeches, meetings, parties, church events, weddings, DJ performances, and both indoor and outdoor use. It features four wireless handheld microphones and a receiver box with independent volume controls, echo adjustment, and Bluetooth connectivity.

Image: The Riworal UHF 4 Channel Wireless Microphone System, highlighting its ultra-wide range wireless signal of 165ft/50m, 4x50 tunable frequencies, and ability to use 10 sets simultaneously.
2. Package Contents
Please verify that all items listed below are included in your package:
- 4 x Wireless Handheld Microphones
- 1 x Receiver Box
- 4 x Antennas
- 1 x Power Adapter
- 1 x 3.5mm to 3.5mm Audio Cable
- 1 x 3.5mm to RCA R/L Audio Cable
- 1 x 6.35mm to 6.35mm Audio Cable
- 1 x User Manual
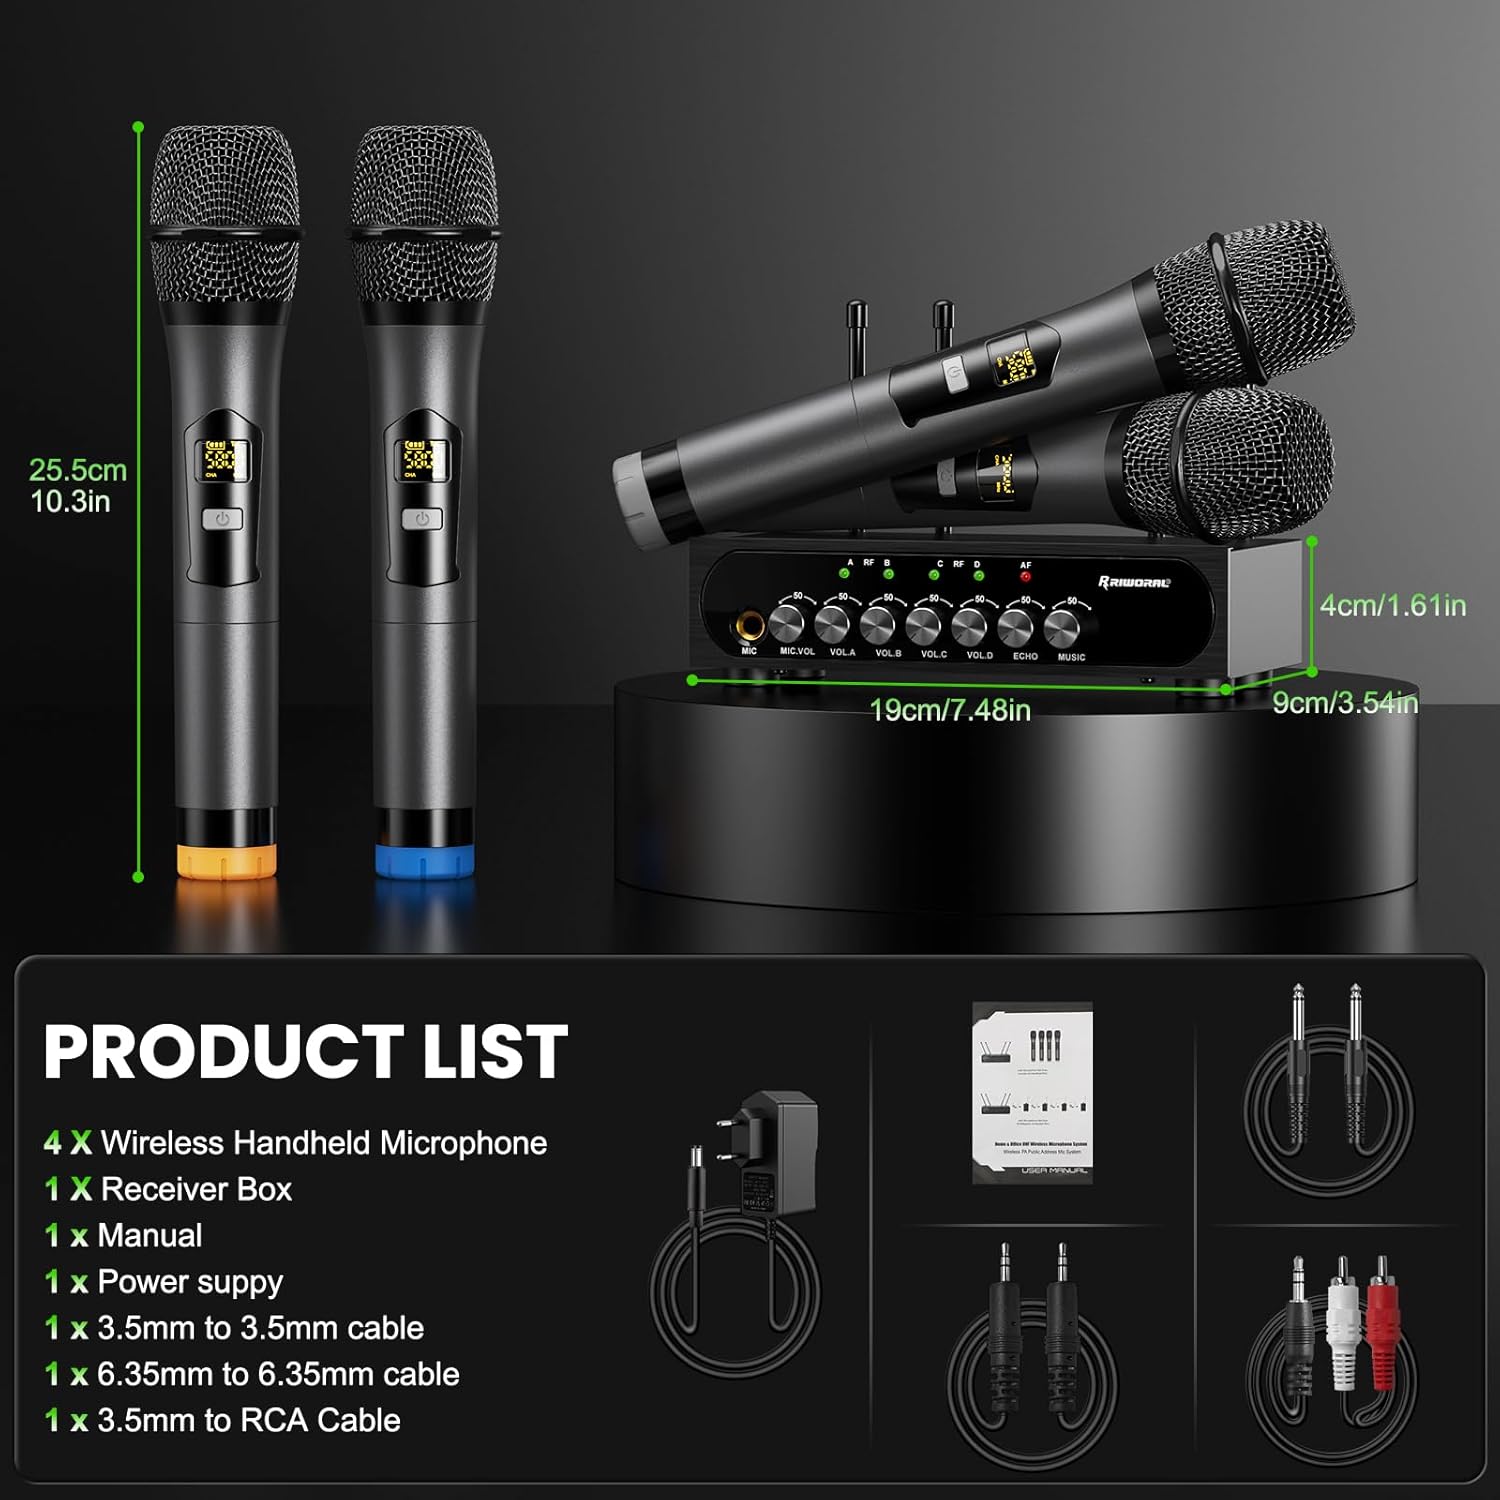
Image: A visual representation of the product package contents, including four microphones, the receiver box, and various cables, along with their dimensions.
3. Setup Instructions
Follow these steps to set up your wireless microphone system:
- Connect Power Supply: Connect the provided power adapter to the DC12V POWER input on the receiver box and plug it into a power outlet.
- Install Antennas: Screw the four antennas into their respective ports (ANT A, ANT B, ANT C, ANT D) on the rear of the receiver box.
- Audio Output Connection: Connect the receiver's audio output to your amplifier, PA system, or active speaker. Use the 6.35mm output jack with the 6.35mm to 6.35mm audio cable, or the R+L OUT 3.5mm jack with the 3.5mm to 3.5mm or 3.5mm to RCA R/L audio cable.
- Audio Input Connection (Optional): To play accompaniment from an external device (TV, computer, mobile phone, set-top box), connect it to the R+L IN 3.5mm input jack on the receiver using a 3.5mm audio cable.
- Microphone Battery Installation: Each wireless handheld microphone requires two AA batteries (not included). Unscrew the bottom part of the microphone to access the battery compartment and insert the batteries, observing polarity.
- Power On: Turn on the power switch on the receiver box. Then, turn on each microphone using its ON/OFF switch.

Image: A four-step diagram illustrating how to connect the power supply, use a 3.5mm cable for accompaniment, connect RCA for home KTV, and turn on the microphone and receiver.

Image: Detailed views of the receiver box, showing the front panel with volume and effect controls, and the rear panel with input/output ports and antenna connections.
Optimum Boot and Shutdown Order:
Optimum Boot Order: Audio Mixer > Audio Amplifier > Speaker > Receiver > Microphone
Optimum Shutdown Order: Microphone > Receiver > Speaker > Audio Amplifier > Audio Mixer
4. Operating Instructions
Microphone Operation
- Power On/Off: Use the power button on the microphone to turn it on or off. The LED display will show battery power and frequency (MHz).
- Frequency Adjustment: The system supports 50 compatible frequencies per channel (4 x 50) within the 500 - 599 MHz UHF range. To change the frequency, open the battery compartment and press the frequency button. This allows multiple sets to be used simultaneously without interference.
- Cardioid Pickup: The microphones feature a cardioid pickup pattern, designed to reduce noise and distortion for clear vocal output.

Image: A detailed view of the wireless microphone, highlighting its metal mesh head, heart-shaped pointing (cardioid pickup), frequency button, and AA battery compartment.
Receiver Controls
The receiver box provides individual controls for optimal sound mixing:
- MIC VOL: Adjusts the volume for a wired microphone connected to the 6.35mm MIC input.
- VOL A, VOL B, VOL C, VOL D: Independent volume controls for each of the four wireless microphones.
- ECHO: Adjusts the echo effect for the microphones.
- MUSIC: Adjusts the volume of the background music input via Bluetooth or the 3.5mm R+L IN jack.

Image: Four people singing with wireless microphones, demonstrating the receiver box with independent volume controls for each microphone, echo, and music.
Bluetooth Connectivity
The receiver box features Bluetooth for wireless audio input:
- Ensure the receiver is powered on.
- On your Bluetooth device (smartphone, PC, smart TV, tablet), enable Bluetooth and search for "X168".
- Select "X168" to pair and connect. The Bluetooth range is approximately 32 feet (10 meters).

Image: The Riworal Wireless Microphone System demonstrating strong compatibility with smart TVs, PCs, and portable devices via Bluetooth, with a range of 32.8ft (10m).
Wireless Transmission Range
The wireless microphone system supports a transmission range of up to 165 feet (50 meters), allowing for flexible placement and movement during use.
Video: An official product video demonstrating the Riworal UHF 4 Channel Wireless Microphone System, showcasing its features and ease of use for karaoke and other events.
5. Maintenance
To ensure the longevity and optimal performance of your Riworal Wireless Microphone System, follow these maintenance guidelines:
- Cleaning: Use a soft, dry cloth to clean the microphones and receiver box. Avoid using liquid cleaners or abrasive materials, which can damage the finish or internal components.
- Battery Replacement: Replace microphone batteries promptly when the low battery indicator appears on the microphone's LED display. Always use fresh AA batteries.
- Storage: When not in use for extended periods, store the system in a cool, dry place away from direct sunlight and extreme temperatures. Remove batteries from the microphones before storage to prevent leakage.
- Handling: Handle microphones and the receiver with care. Avoid dropping them or exposing them to excessive shock, which can cause internal damage.
6. Troubleshooting
If you encounter issues with your Riworal Wireless Microphone System, refer to the following troubleshooting tips:
| Problem | Possible Cause | Solution |
|---|---|---|
| No sound from microphones | Microphones or receiver not powered on; low microphone batteries; incorrect audio cable connection; receiver volume too low. | Ensure all devices are powered on. Replace microphone batteries. Check all audio cable connections to the amplifier/PA system. Increase MIC VOL on the receiver. |
| Interference or poor sound quality | Other wireless devices operating on similar frequencies; distance too far; obstacles between microphone and receiver. | Change the microphone frequency (refer to Operating Instructions). Reduce distance between microphone and receiver. Ensure clear line of sight. Avoid using near strong electromagnetic fields. |
| Bluetooth not connecting | Bluetooth not enabled on device; incorrect pairing name; device out of range; previous pairing issue. | Ensure Bluetooth is enabled on your device. Search for "X168". Move device closer to the receiver. If previously paired, try forgetting the device on your phone and re-pairing. |
| Echo effect not working | ECHO knob on receiver is set too low. | Rotate the ECHO knob clockwise to increase the effect. |
7. Specifications
| Feature | Specification |
|---|---|
| Model Name | Wireless Microphone+Receiver |
| Microphone Form Factor | Handheld |
| Connectivity Technology | UHF |
| Number of Channels | 200 (50 compatible frequencies per channel) |
| Frequency Response | 18 KHz |
| Signal-to-Noise Ratio | 85 dB |
| Audio Sensitivity | 30 Decibels |
| Power Source | Battery Powered (2x AA per microphone) |
| Material | Metal aluminum tube |
| Polar Pattern | Omnidirectional (Note: Product image indicates Cardioid) |
| Item Weight | 4.86 pounds |
| Package Dimensions | 15.91 x 12.05 x 3.31 inches |
| Recommended Uses | Karaoke, Singing, Streaming |
8. Warranty and Support
Riworal products are designed for reliability and performance. For any questions, technical assistance, or warranty inquiries, please contact Riworal customer support through the retailer where the product was purchased or visit the official Riworal website for contact information.
Please retain your proof of purchase for warranty claims.