Introduction
Thank you for choosing the Vansky Indoor Digital Amplified HDTV Antenna. This antenna is designed to provide you with free access to local over-the-air television channels in high definition. With its advanced signal amplification technology and flexible placement options, you can enjoy crystal clear picture quality and a wide range of programming, including news, weather, sports, and entertainment, without the need for monthly cable or satellite subscriptions.
This manual provides detailed instructions for setting up, operating, and maintaining your antenna to ensure optimal performance.
Package Contents
Please verify that all items are present in your package:
- Vansky Indoor Digital Amplified HDTV Antenna
- Detachable Signal Amplifier (USB powered)
- 16.5ft Coaxial Cable (attached to antenna)
- User Manual (this document)
Setup Guide
Follow these steps to set up your Vansky HDTV Antenna:
1. Connect the Antenna
Locate the "ANT IN" or "CABLE IN" port on the back of your television. Connect the coaxial cable from the Vansky antenna directly to this port.

Image: Connecting the antenna coaxial cable to the TV's ANT IN port.
Important Note: Ensure your TV has a built-in HDTV tuner (most TVs manufactured after 2009 do). If your TV does not have an HDTV tuner, you will need an external digital converter box.
2. Power the Signal Amplifier (Optional)
The detachable signal amplifier can boost reception, especially if you are far from broadcast towers.
- Connect the amplifier's coaxial input to the antenna's coaxial cable.
- Connect the amplifier's coaxial output to the "ANT IN" or "CABLE IN" port on your TV.
- Plug the amplifier's USB power cable into an available USB port on your TV or a standard USB wall adapter (5V/1A). The amplifier has an indicator light that will illuminate when powered.
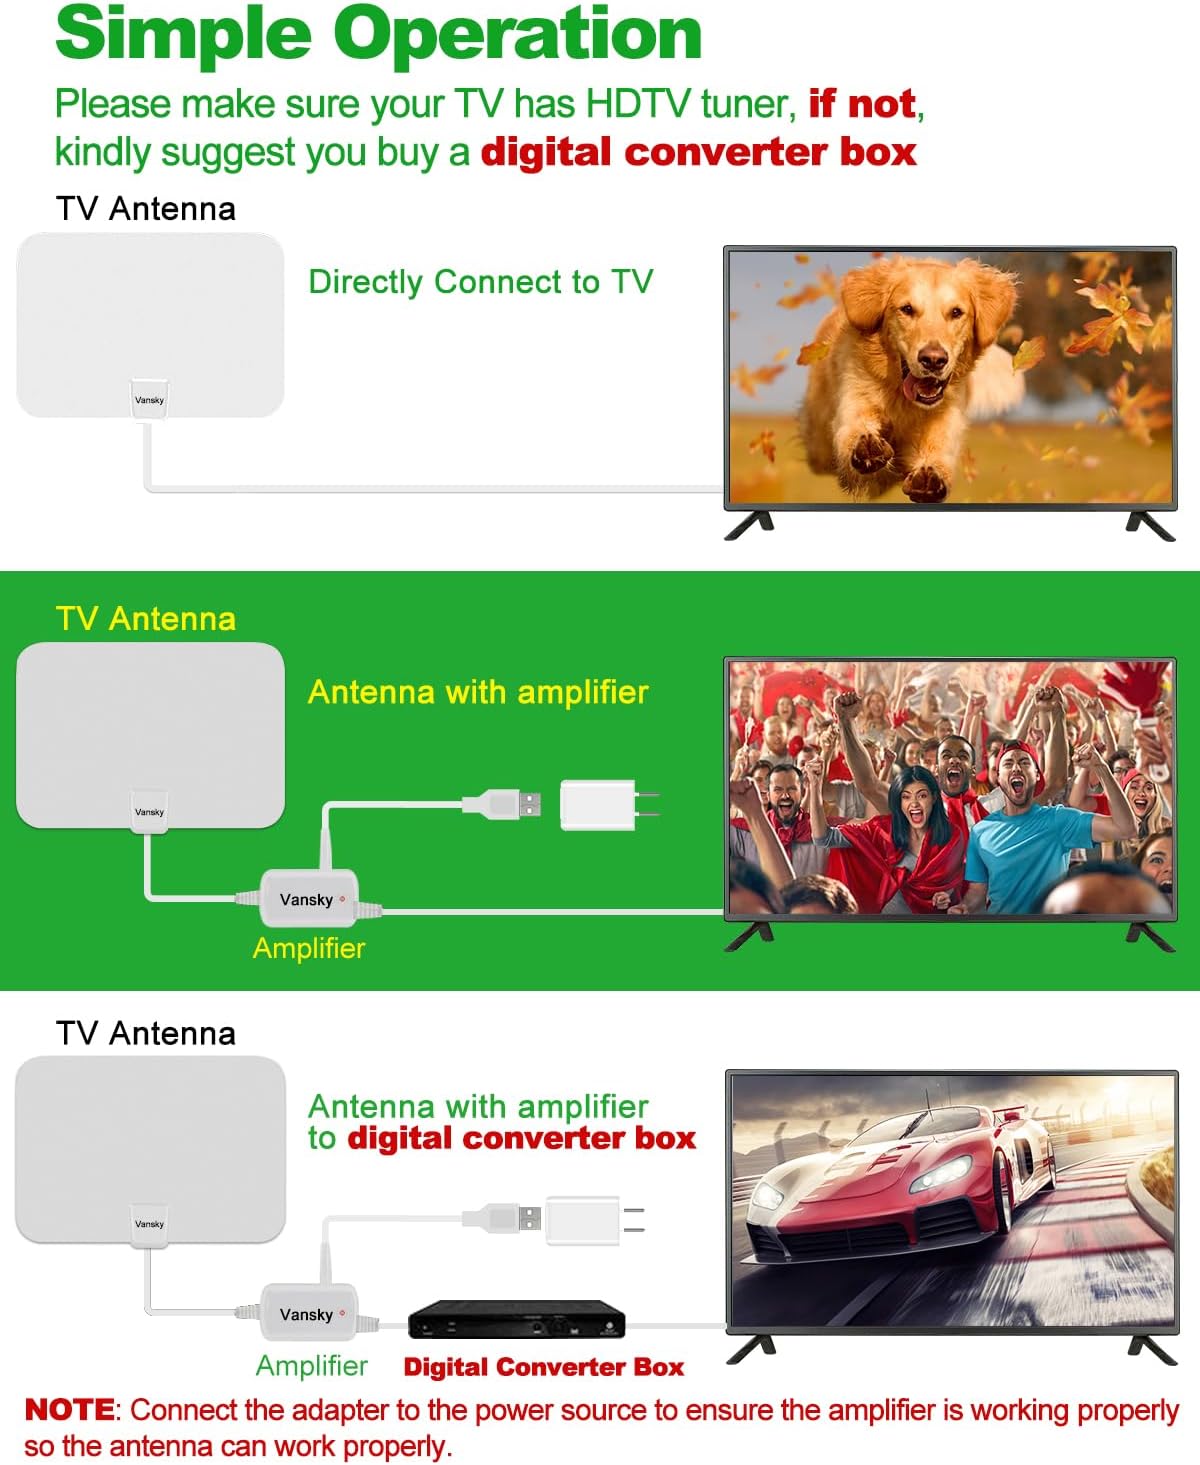
Image: Connection diagrams for the antenna, with and without the amplifier, and with a digital converter box.
Note: If you experience signal issues with the amplifier, try removing it and connecting the antenna directly to the TV. In some cases, if you are very close to broadcast towers, the amplifier can over-amplify the signal, leading to poor reception.
3. Position the Antenna
Optimal antenna placement is crucial for good reception.
- Recommended: Stick the antenna on a window. Windows often provide the clearest line of sight to broadcast towers.
- Stick on a wall.
- Place behind the TV.
- Lay flat on a table.

Image: Various installation methods for the Vansky antenna, including window, wall, behind TV, and flat on a table.
Generally, higher positions and locations closer to windows facing the direction of broadcast towers yield better results.
4. Scan for Channels
After connecting and positioning the antenna, perform a channel scan on your television.
- Turn on your TV and select the correct input source (usually "TV" or "Antenna").
- Access your TV's menu settings.
- Navigate to "Channel Scan," "Auto Program," "Auto Tune," or similar option.
- Select "Antenna" or "Air" as the signal source (not "Cable").
- Start the scan. This process may take several minutes.

Image: Visual guide for connecting the antenna, positioning it, and performing a channel scan on the TV.
Once the scan is complete, your TV will display the available channels.
Operation
After successful setup, operating your Vansky antenna is straightforward. Simply use your TV remote to browse and select channels as you normally would.
Re-scanning Channels
It is recommended to re-scan for channels periodically (e.g., monthly) or if you notice a loss of channels or signal quality. This is especially important if you move the antenna to a new location or if new broadcast towers become active in your area.
Optimizing Reception
To maximize the number and quality of channels you receive:
- Check Local Broadcasts: Before purchasing or for optimal placement, visit dtv.gov/maps or antennaweb.org. Enter your address or ZIP code to see available channels and the direction of broadcast towers in your area.
- Experiment with Placement: Try different locations and orientations for the antenna. Even a few inches can make a difference.
- Minimize Obstacles: Walls, large furniture, and electronic devices can interfere with signals. Position the antenna away from large metal objects, microwaves, refrigerators, and other high-power electrical appliances.

Image: Avoid obstacles like large appliances, trees, and mountains for better signal reception.
- Amplifier Use: Use the amplifier if you are far from broadcast towers. If you are close to towers and experience pixelation or signal loss, try removing the amplifier.
- Weather Conditions: Severe weather (heavy rain, snow, strong winds) can temporarily affect signal quality.
Troubleshooting
| Problem | Solution |
|---|---|
| No Signal or Few Channels |
|
| Pixelated Picture or Signal Drops |
|
| TV Does Not Detect Antenna |
|
Specifications
| Feature | Detail |
|---|---|
| Model Number | VS-TX01 |
| Brand | Vansky |
| Color | White |
| Supported Resolutions | 720p, 1080i, 1080p, 4K (depending on broadcast) |
| Frequency Range | VHF (174-230MHz), UHF (470-862MHz) |
| Maximum Range | Up to 250 Miles (signal strength varies by location) |
| Coaxial Cable Length | 16.5 feet |
| Amplifier Power Source | USB (5V/1A) |
| Dimensions | Approx. 13.54 x 9.96 x 1.38 inches (Package) |
| Item Weight | 14.4 ounces |

Image: Detail of the premium coaxial cable construction, highlighting its durability and signal clarity features.
Care and Maintenance
- Cleaning: Wipe the antenna gently with a soft, dry cloth. Do not use liquid cleaners or abrasive materials.
- Placement: Keep the antenna in a dry indoor environment. Avoid extreme temperatures and direct sunlight.
- Cable Care: Do not bend or crimp the coaxial cable excessively, as this can damage the internal wiring and affect signal quality.
- Lightning Protection: The antenna is designed for indoor use and is lightning protected. However, for added safety during electrical storms, consider disconnecting the antenna from your TV.
Warranty and Support
Vansky products are designed for reliability and performance. For specific warranty information or technical support, please refer to the warranty card included with your product or visit the official Vansky website.
If you encounter any issues not covered in this manual, please contact Vansky customer support for assistance.


