1. Introduction
This manual provides detailed instructions for the installation, operation, and maintenance of the PeakDo Wireless HDMI Transmitter and Receiver P3 S. This device is designed to wirelessly transmit uncompressed 1080P Full HD video and digital audio with zero latency, making it ideal for various applications including gaming, home entertainment, and professional presentations. The P3 S model features a USB-C port on the receiver for compatibility with AR smart glasses and portable monitors, in addition to standard HDMI output.

Figure 1: PeakDo Wireless HDMI Transmitter (left) and Receiver (right).
2. Product Overview
2.1 Key Features
- Wireless AR Smart Glasses Setup: Features a Type-C port on the Receiver for direct connection to AR smart glasses (e.g., XREAL Air, Rokid Max/Air, RayNeo, VITURE One) and portable monitors, enabling cable-free AR experiences.
- Uncompressed FHD Video & Digital Audio: Transmits 1080P Full HD video and digital audio without compression, ensuring high-quality output.
- Zero Latency Transmission: Provides 0 latency for real-time applications such as live sports, synchronized gaming, and interactive meetings.
- Plug and Play Operation: Requires no Wi-Fi connection or app installation for setup.
- Wide Compatibility: Transmitter (TX) connects to PC, Laptop, Xbox, PlayStation, Nintendo Switch, TV Box. Receiver (RX) connects to TVs, monitors, projectors via HDMI, and AR smart glasses/portable monitors via USB-C.
- Transmission Range: Effective wireless transmission up to 100 feet (approximately 30 meters).
2.2 Package Contents
Please verify that all items are present in the package:
- PeakDo Wireless HDMI Transmitter (TX)
- PeakDo Wireless HDMI Receiver (RX)
- USB Power Cable(s)
- User Manual (this document)
3. Setup Instructions
3.1 Connecting the Transmitter (TX)
- Connect the HDMI end of the Transmitter (TX) to the HDMI output port of your source device (e.g., PC, laptop, game console, TV box).
- Connect the USB power cable to the TX unit and plug the other end into a USB power source (e.g., a USB port on your source device, a USB wall adapter). Ensure the TX receives at least 5V 2A power supply.

Figure 2: Compatible input (TX) and output (RX) devices.
3.2 Connecting the Receiver (RX)
- Important: First, connect the USB power cable to the RX unit and plug the other end into a USB power source (e.g., a USB wall adapter). Ensure the RX receives at least 5V 2A power supply. The RX unit requires sufficient power to function correctly.
- For HDMI displays (TV, Monitor, Projector): Connect an HDMI cable from the HDMI output port of the Receiver (RX) to the HDMI input port of your display device.
- For AR Smart Glasses or Portable Monitors: Connect a USB-C cable from the Type-C port on the Receiver (RX) to the USB-C input port of your AR smart glasses or portable monitor.
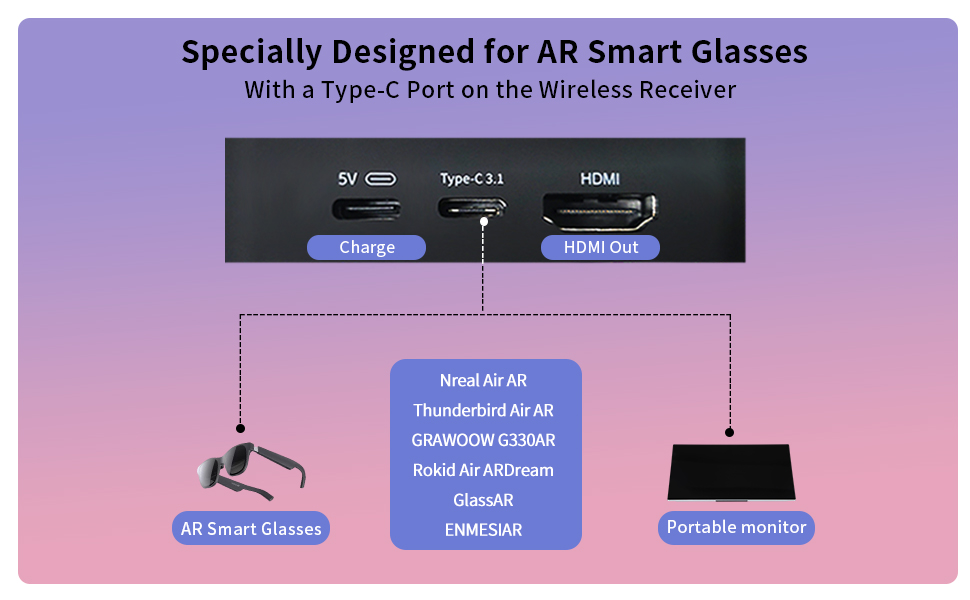
Figure 3: Receiver ports (5V power, Type-C 3.1, HDMI) and AR glasses compatibility.
Note: For certain AR glasses like Nreal, you may need to upgrade their firmware for optimal compatibility. Refer to your AR glasses manufacturer's instructions for firmware updates.
4. Operating Instructions
4.1 Powering On and Pairing
Once both the Transmitter (TX) and Receiver (RX) units are connected to their respective power sources and devices, they will automatically power on and attempt to pair. The system is designed for plug-and-play operation, requiring no manual pairing steps or software installation.

Figure 4: Plug and Play setup in a meeting environment.
4.2 Usage Scenarios
- Gaming: Experience zero-latency gaming on a large screen or through AR glasses.
- Home Entertainment: Stream movies, TV shows, or other media from your PC or TV box to any display.
- Presentations/Meetings: Share content wirelessly from your laptop to a projector or large monitor in a conference room.
- AR Experiences: Connect directly to compatible AR smart glasses for immersive gaming or productivity.
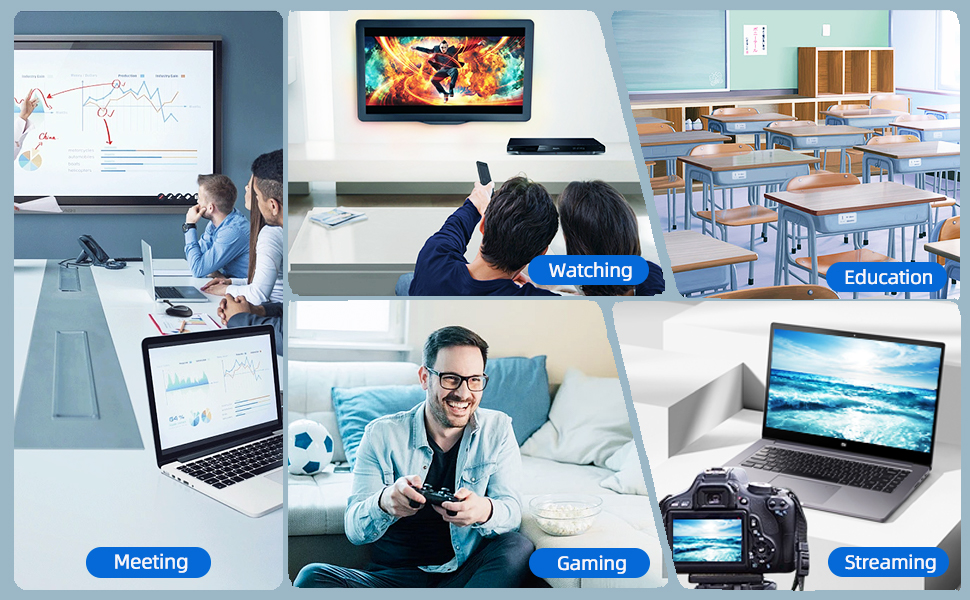
Figure 5: Diverse applications of the PeakDo Wireless HDMI system.

Figure 6: Example of a wireless AR gaming setup.
5. Maintenance
The PeakDo Wireless HDMI Transmitter and Receiver P3 S requires minimal maintenance.
- Cleaning: Use a soft, dry cloth to clean the exterior of the units. Do not use liquid cleaners or aerosols.
- Storage: When not in use for extended periods, store the devices in a cool, dry place away from direct sunlight and extreme temperatures.
- Power Supply: Always ensure both TX and RX units receive adequate power (5V 2A) from a stable power source.
6. Troubleshooting
6.1 No Signal / Black Screen
- Check Power: Ensure both the Transmitter (TX) and Receiver (RX) units are properly powered. The RX unit specifically requires sufficient power (5V 2A) and should be powered first before connecting the HDMI/USB-C cable to the display.
- Cable Connections: Verify that all HDMI and USB-C cables are securely connected to their respective ports on the devices and displays.
- Source Device Output: Confirm that your source device (PC, game console) is outputting video correctly. Try connecting the source device directly to the display with a cable to rule out issues with the source.
- Display Input: Ensure your display (TV, monitor, projector, AR glasses) is set to the correct input source (e.g., HDMI 1, USB-C).
- Restart Devices: Disconnect power from both TX and RX units, then reconnect. Also, restart your source device and display.
6.2 Intermittent Signal / Flickering
- Distance and Obstacles: Reduce the distance between the TX and RX units. Ensure there are no significant physical obstructions (walls, large furniture) between them that could interfere with the wireless signal.
- Interference: Keep the units away from other wireless devices (e.g., Wi-Fi routers, cordless phones, microwave ovens) that operate on similar frequencies.
- Power Supply: Ensure stable and sufficient power supply to both units. Fluctuations in power can affect signal stability.
6.3 No Audio
- Source Audio Settings: Check the audio output settings on your source device to ensure audio is being sent via HDMI.
- Display Audio: Verify that the audio on your display device (TV, monitor, AR glasses) is not muted and the volume is turned up.
- Cable Integrity: Ensure the HDMI or USB-C cable connecting the RX to the display is not damaged.
6.4 AR Glasses Compatibility Issues
- Firmware Update: As mentioned in the setup, some AR glasses (e.g., Nreal) may require a firmware update to work correctly with external video sources. Consult your AR glasses manufacturer's support.
- Power to RX: Ensure the RX unit is adequately powered, especially when connecting to power-hungry AR glasses.
- USB-C Cable: Use a high-quality USB-C cable that supports video transmission.
7. Specifications
| Feature | Description |
|---|---|
| Model Number | P3 S |
| Video Encoding | YUV422 or RGB444 (uncompressed 1080P) |
| Resolution Support | Up to 1080P Full HD |
| Latency | 0 Latency |
| Connectivity Technology | Wireless (Millimeter Wave) |
| Transmission Range | Up to 100 feet (approx. 30 meters) |
| Compatible Transmitter Devices | PC, Laptop, Xbox, PS4, PS5, Switch, PS3, TV Box, etc. |
| Compatible Receiver Devices | TV, Monitor, Projector (via HDMI); AR Smart Glasses, Portable Monitor (via USB-C) |
| Total HDMI Ports | 1 (on Receiver) |
| Connector Type | HDMI, Micro USB (for power), USB-C (on Receiver) |
| Audio Output Mode | Mono (Digital Audio) |
| Surround Sound Channel Configuration | 2.0 |
| Power Supply | 5V 2A (for both TX and RX units) |
| Item Weight | 1.08 pounds (approx. 0.49 kg) |
| Package Dimensions | 6.73 x 5.83 x 2.48 inches (approx. 17.1 x 14.8 x 6.3 cm) |
8. Warranty and Support
For warranty information and technical support, please refer to the official PeakDo website or contact their customer service directly. Keep your purchase receipt for warranty claims.
- Manufacturer: PeakDo
- Date First Available: March 16, 2023
- Customer Reviews: 3.3 out of 5 stars (based on 6 ratings at time of data extraction)


