1. Introduction
Thank you for choosing the Electrolux EAF90 12L Digital Air Fryer Oven. This appliance combines the functionality of an air fryer and an oven, offering a versatile solution for healthy and convenient cooking. With its 12-liter capacity and multiple cooking functions, you can prepare a wide variety of meals with less oil.
Please read this instruction manual thoroughly before using the appliance for the first time to ensure safe and optimal operation. Keep this manual for future reference.

Figure 1.1: Front view of the Electrolux EAF90 12L Digital Air Fryer Oven.
2. Safety Instructions
2.1 General Safety
- Always place the appliance on a stable, heat-resistant surface, away from walls or other appliances to allow for proper ventilation.
- Do not immerse the appliance, cord, or plug in water or any other liquid.
- Keep children and pets away from the appliance during operation.
- Do not touch hot surfaces. Use oven mitts or handles.
- Unplug the appliance from the outlet when not in use and before cleaning.
- Do not operate the appliance if the cord or plug is damaged, or if the appliance malfunctions or has been damaged in any way.
2.2 Electrical Safety
- Ensure the voltage indicated on the appliance matches your local power supply before connecting. This model operates at 220 Volts.
- Do not let the power cord hang over the edge of a table or counter, or touch hot surfaces.
- Avoid using extension cords unless absolutely necessary and ensure they are rated for the appliance's power consumption (1700W).
3. Product Components
The Electrolux EAF90 comes with several components designed for versatile cooking:
- Main Unit: The primary appliance housing the heating element, fan, and control panel.
- Digital Control Panel: Touch-sensitive interface for setting temperature, time, and selecting functions.
- Viewing Window: Transparent door for monitoring cooking progress.
- Internal Light: Illuminates the interior for better visibility.
- Air Fryer Baskets/Grids (2): Perforated trays for air frying and dehydrating.
- Rotisserie Spit and Forks: For roasting whole chickens or larger cuts of meat.
- Rotisserie Handle: For safely inserting and removing the rotisserie spit.
- Drip Tray: Collects excess oil and food particles, placed at the bottom of the oven.
- Internal Basket (3.5L): A smaller basket for specific air frying needs.
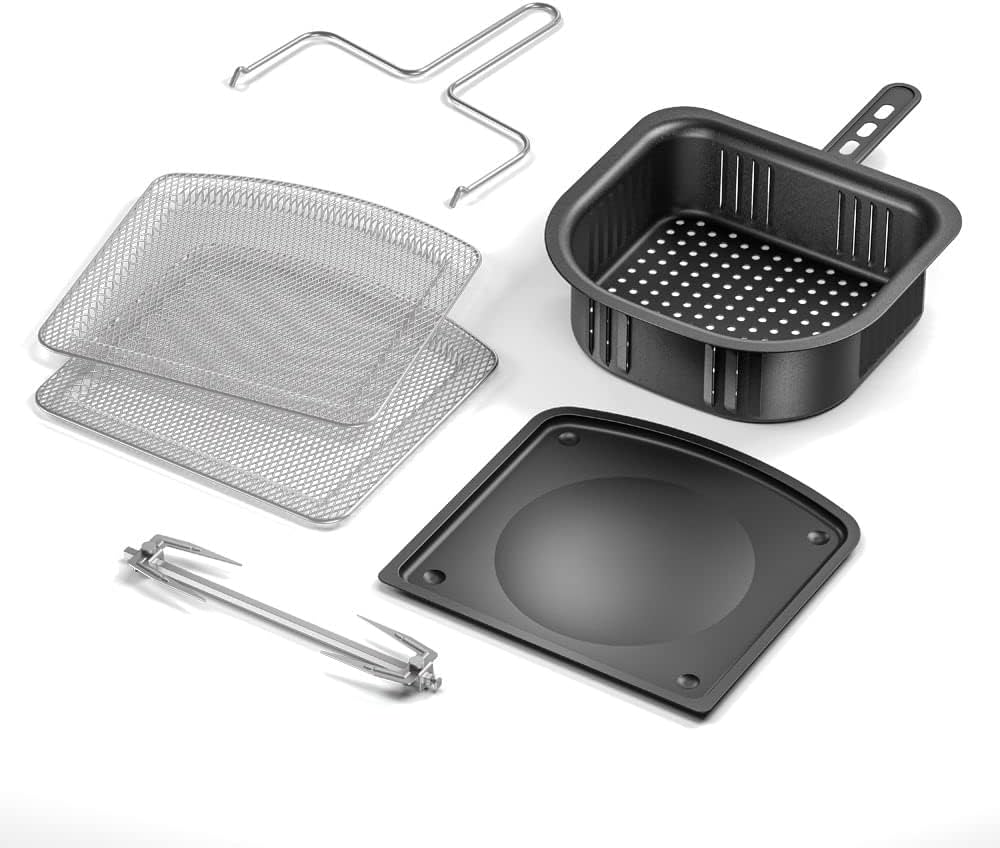
Figure 3.1: Included accessories for the Electrolux EAF90 Air Fryer Oven.
4. Setup
4.1 Unpacking and Initial Cleaning
- Remove all packaging materials, stickers, and labels from the appliance.
- Wash all removable parts (grids, rotisserie spit, drip tray, internal basket) in warm, soapy water. Rinse thoroughly and dry completely.
- Wipe the interior and exterior of the main unit with a damp cloth. Do not use abrasive cleaners.
4.2 Placement
- Place the appliance on a flat, stable, and heat-resistant surface.
- Ensure there is at least 10 cm (4 inches) of clear space around the back and sides of the appliance, and 20 cm (8 inches) above, for adequate air circulation.
- Do not place the appliance near flammable materials or heat sources.
4.3 First Use
Before cooking food, run the appliance for approximately 15 minutes at 200°C (400°F) to burn off any manufacturing residues. A slight odor or smoke may be present; this is normal. Ensure the area is well-ventilated during this process.

Figure 4.1: Dimensions of the Electrolux EAF90 Air Fryer Oven.
5. Operating Instructions
The Electrolux EAF90 features a digital control panel with various functions and pre-programmed settings.
5.1 Digital Control Panel Overview
- Power Button: Turns the appliance on/off.
- Temperature Control: Adjusts temperature from 60°C to 200°C.
- Time Control: Sets cooking time.
- Function Selection: Icons for Air Fry, Gratinate, Reheat, Dehydrate, Rotisserie, and pre-programmed recipes.
- Pre-heat Function: Indicates when the desired temperature is reached.
- Turn Function: Provides an audible and visual alert to turn or shake food for even cooking.

Figure 5.1: Digital control panel with 10 programmed functions.
5.2 Cooking Functions
The EAF90 offers 5 primary cooking modes:
- Air Fry: For crispy results with minimal oil. Ideal for fries, chicken, and snacks.
- Gratinate: Adds a crispy top layer to dishes like stuffed potatoes or casseroles.
- Reheat: Warms up leftovers while maintaining texture, suitable for bread and pizza.
- Dehydrate: Prepares fruit and vegetable chips with adjustable temperature and time (2-24 hours).
- Rotisserie: Rotates food for even cooking, perfect for whole chickens or roasts.

Figure 5.2: The EAF90 offers 5-in-1 cooking versatility.
5.3 Using Pre-programmed Recipes
The digital panel includes 7 pre-selected recipes for common dishes such as meat, chicken, fish, vegetables, potatoes, cheese bread, and cake. Simply select the desired icon, and the appliance will set the optimal temperature and time.

Figure 5.3: Multiple dishes can be cooked simultaneously using the two trays.
5.4 Rotisserie Function
- Prepare your food (e.g., a whole chicken) and secure it onto the rotisserie spit using the forks.
- Insert the rotisserie spit into the designated slots inside the oven.
- Select the Rotisserie function on the digital panel and set the desired temperature and time.
- Monitor cooking through the viewing window.

Figure 5.4: The rotisserie function ensures even cooking for roasted items.
5.5 Temperature and Timer Settings
- Temperature: Adjustable from 60°C to 200°C (140°F to 400°F).
- Timer: Set cooking time up to 90 minutes. For dehydration, time can be set from 2 to 24 hours.
- The appliance will beep and turn off automatically once the timer expires.

Figure 5.5: The automatic shut-off feature enhances safety and convenience.
6. Maintenance and Cleaning
6.1 Cleaning the Appliance
- Always unplug the appliance and allow it to cool completely before cleaning.
- Wipe the exterior with a damp cloth. Do not use harsh chemicals or abrasive materials.
- Clean the interior with a soft, damp cloth and mild detergent. For stubborn stains, a non-abrasive sponge can be used.
- The drip tray, grids, rotisserie spit, and internal basket are dishwasher safe or can be washed by hand with warm, soapy water.
- Ensure all parts are completely dry before reassembling and storing the appliance.
6.2 Storage
Store the appliance in a cool, dry place, away from direct sunlight and out of reach of children.
7. Troubleshooting
| Problem | Possible Cause | Solution |
|---|---|---|
| Appliance does not turn on | Not plugged in; power outlet malfunction; appliance malfunction. | Check power cord connection; test outlet with another appliance; contact customer support. |
| Food not cooked evenly | Overcrowding; incorrect temperature/time; food not turned. | Do not overcrowd baskets; adjust temperature/time; use the 'Turn' function alert. |
| White smoke from appliance | Fat/oil residue; food with high fat content. | Clean the appliance and drip tray thoroughly; reduce fat content or use less oil. |
| Appliance emits unusual noise | Loose component; fan obstruction. | Unplug and check for loose parts; ensure no food obstructs the fan. If noise persists, contact support. |
8. Specifications
| Feature | Detail |
|---|---|
| Brand | Electrolux |
| Model | EAF90 |
| Capacity | 12 Liters |
| Power (Watts) | 1700W |
| Voltage | 220 Volts |
| Temperature Range | 60°C - 200°C |
| Timer | Up to 90 minutes (2-24 hours for Dehydrate) |
| Dimensions (DxWxH) | 37.6 cm x 32.2 cm x 40.9 cm |
| Weight | 6.8 kg |
| Material | Metal, Plastic |
| Special Features | Temperature control, Automatic shut-off, Programmable, Stain resistant, Timer |
9. Warranty and Support
The Electrolux EAF90 Air Fryer Oven comes with a 1-year warranty against manufacturing defects. Please retain your proof of purchase for warranty claims.
For technical assistance, spare parts, or any questions not covered in this manual, please contact Electrolux Customer Support. Visit the official Electrolux website for contact information specific to your region.
Online Resources: For additional recipes and tips, visit the Electrolux Brand Store on Amazon.