1. Introduction
This manual provides detailed instructions for the installation, operation, and maintenance of your darkFlash Aquarius Mesh Computer Case. Please read this manual thoroughly before beginning installation to ensure proper setup and safe use of your new computer chassis.
2. Safety Information
Always observe the following safety precautions:
- Disconnect all power sources before installing or removing any components.
- Wear an anti-static wrist strap to prevent electrostatic discharge (ESD) damage to components.
- Handle components carefully to avoid physical damage.
- Keep small parts and tools away from children.
- Ensure proper ventilation around the computer case.
3. Package Contents
Verify that all items are present in your package:
- darkFlash Aquarius Mesh Computer Case
- Accessory Box (screws, standoffs, cable ties, etc.)
- User Manual (this document)
4. Setup and Installation
Follow these steps for proper component installation.
4.1. Preparing the Case
Before installing components, remove the side panels. The Aquarius Mesh case typically features a tempered glass side panel and a solid metal panel.
- Locate the thumbscrews on the rear of the case securing the side panels.
- Unscrew the thumbscrews and carefully slide the panels backward, then lift them off.

Figure 1: Front and side view of the darkFlash Aquarius Mesh case. Note the mesh front panel and tempered glass side panel.

Figure 2: Rear view of the darkFlash Aquarius Mesh case, showing expansion slots and rear fan mount.
4.2. Motherboard Installation
The Aquarius Mesh supports ATX, Micro-ATX, and Mini-ITX motherboards.
- Install the I/O shield into the cutout at the rear of the case.
- Align your motherboard with the pre-installed standoffs. Ensure the I/O ports align with the I/O shield.
- Secure the motherboard with the appropriate screws from the accessory box.
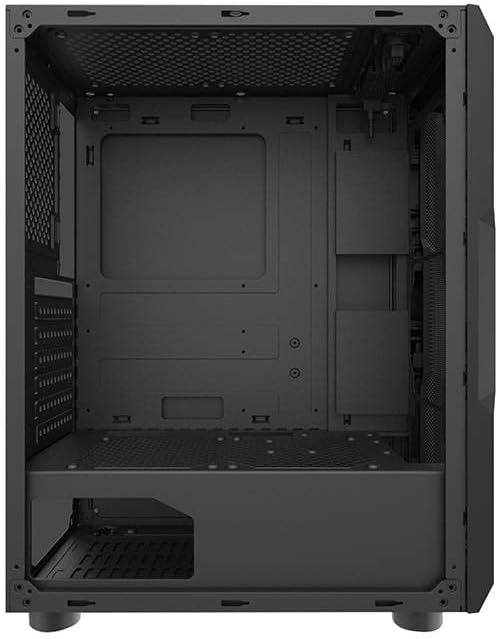
Figure 3: Interior view of the darkFlash Aquarius Mesh case, highlighting the motherboard tray and cable routing options.
4.3. Power Supply Unit (PSU) Installation
The PSU mounts at the bottom rear of the case.
- Slide the PSU into its designated compartment from the rear of the case.
- Align the screw holes and secure the PSU with screws.
4.4. Storage Drive Installation
The case provides mounting options for 3.5-inch HDDs and 2.5-inch SSDs.
- 3.5" HDDs: Locate the drive cage usually beneath the PSU shroud or behind the motherboard tray. Slide the HDD into the bay and secure it with screws.
- 2.5" SSDs: Mount SSDs to dedicated brackets behind the motherboard tray or on the PSU shroud. Secure with screws.

Figure 4: Rear interior view of the darkFlash Aquarius Mesh case, showing the motherboard cutout and potential SSD mounting points.
4.5. Expansion Card Installation (e.g., GPU)
- Remove the necessary expansion slot covers from the rear of the case.
- Insert the expansion card into the appropriate PCIe slot on the motherboard.
- Secure the card with the provided screws or retention clips.
4.6. Cable Management
Utilize the cable routing cutouts and tie-down points behind the motherboard tray to organize cables. This improves airflow and aesthetics.
4.7. Reassembling the Case
Once all components are installed and cables are managed:
- Carefully reattach the side panels, ensuring they slide into place correctly.
- Secure the side panels with the thumbscrews.
5. Operating Instructions
After assembly, connect your peripherals and power cable.
- Connect your monitor, keyboard, mouse, and other peripherals to the motherboard's I/O ports.
- Connect the power cable to the PSU and a wall outlet.
- Press the power button located on the top panel of the case to start your computer.

Figure 5: Top view of the darkFlash Aquarius Mesh case, showing the front I/O panel with power button, reset button, USB ports, and audio jacks.
6. Maintenance
Regular maintenance helps ensure optimal performance and longevity of your computer components.
- Dust Filters: The Aquarius Mesh case features removable dust filters (e.g., on the front, top, and bottom). Regularly remove and clean these filters with water and mild soap, or by vacuuming, to maintain good airflow. Ensure they are completely dry before reinstallation.
- Interior Cleaning: Periodically open the case and use compressed air to remove dust buildup from fans, heatsinks, and other components.
- Exterior Cleaning: Wipe the exterior surfaces with a soft, damp cloth. Avoid harsh chemicals.
7. Troubleshooting
If you encounter issues, consider the following common solutions:
- No Power:
- Ensure the PSU switch is in the 'ON' position.
- Check all power connections to the motherboard and components.
- Verify the power cable is securely plugged into the wall outlet and PSU.
- Fans Not Spinning:
- Check fan connections to the motherboard or fan controller.
- Ensure fans are not obstructed by cables or dust.
- Front Panel I/O Not Working:
- Verify that the front panel connectors (USB, audio, power/reset switches) are correctly connected to the motherboard headers. Refer to your motherboard manual for header locations.
8. Specifications
| Feature | Detail |
|---|---|
| Brand | darkFlash |
| Model Number | Aquarius Mesh |
| Case Type | Mid-Tower |
| Material | Alloy Steel |
| Color | Black |
| Cooling Method | Air |
| Recommended Use | Computer |
| Hard Drive Form Factor | 3.5 Inches |
9. Warranty and Support
For warranty information or technical support, please refer to the official darkFlash website or contact their customer service. Keep your proof of purchase for warranty claims.
For further assistance, you may visit the darkFlash official website.