1. Introduction
This manual provides detailed instructions for the LUCORB Portable Gym Timer, model B0BYH9SP13. This device is designed to assist with various fitness activities by providing accurate timekeeping for interval training, countdowns, count-ups, and stopwatch functions. Please read this manual thoroughly before using the product to ensure proper operation and to maximize its lifespan.
2. Safety Information
- Read all instructions carefully before operating the device.
- Keep the timer away from water and excessive moisture to prevent damage.
- Do not attempt to disassemble or modify the device. This will void the warranty.
- Use only the provided USB charging cable or a certified equivalent for charging.
- Avoid exposing the timer to extreme temperatures or direct sunlight for prolonged periods.
3. Product Overview
The LUCORB Portable Gym Timer is a compact and versatile device designed for various workout needs. It features a clear LED display, multiple timing modes, and a magnetic back for convenient placement.
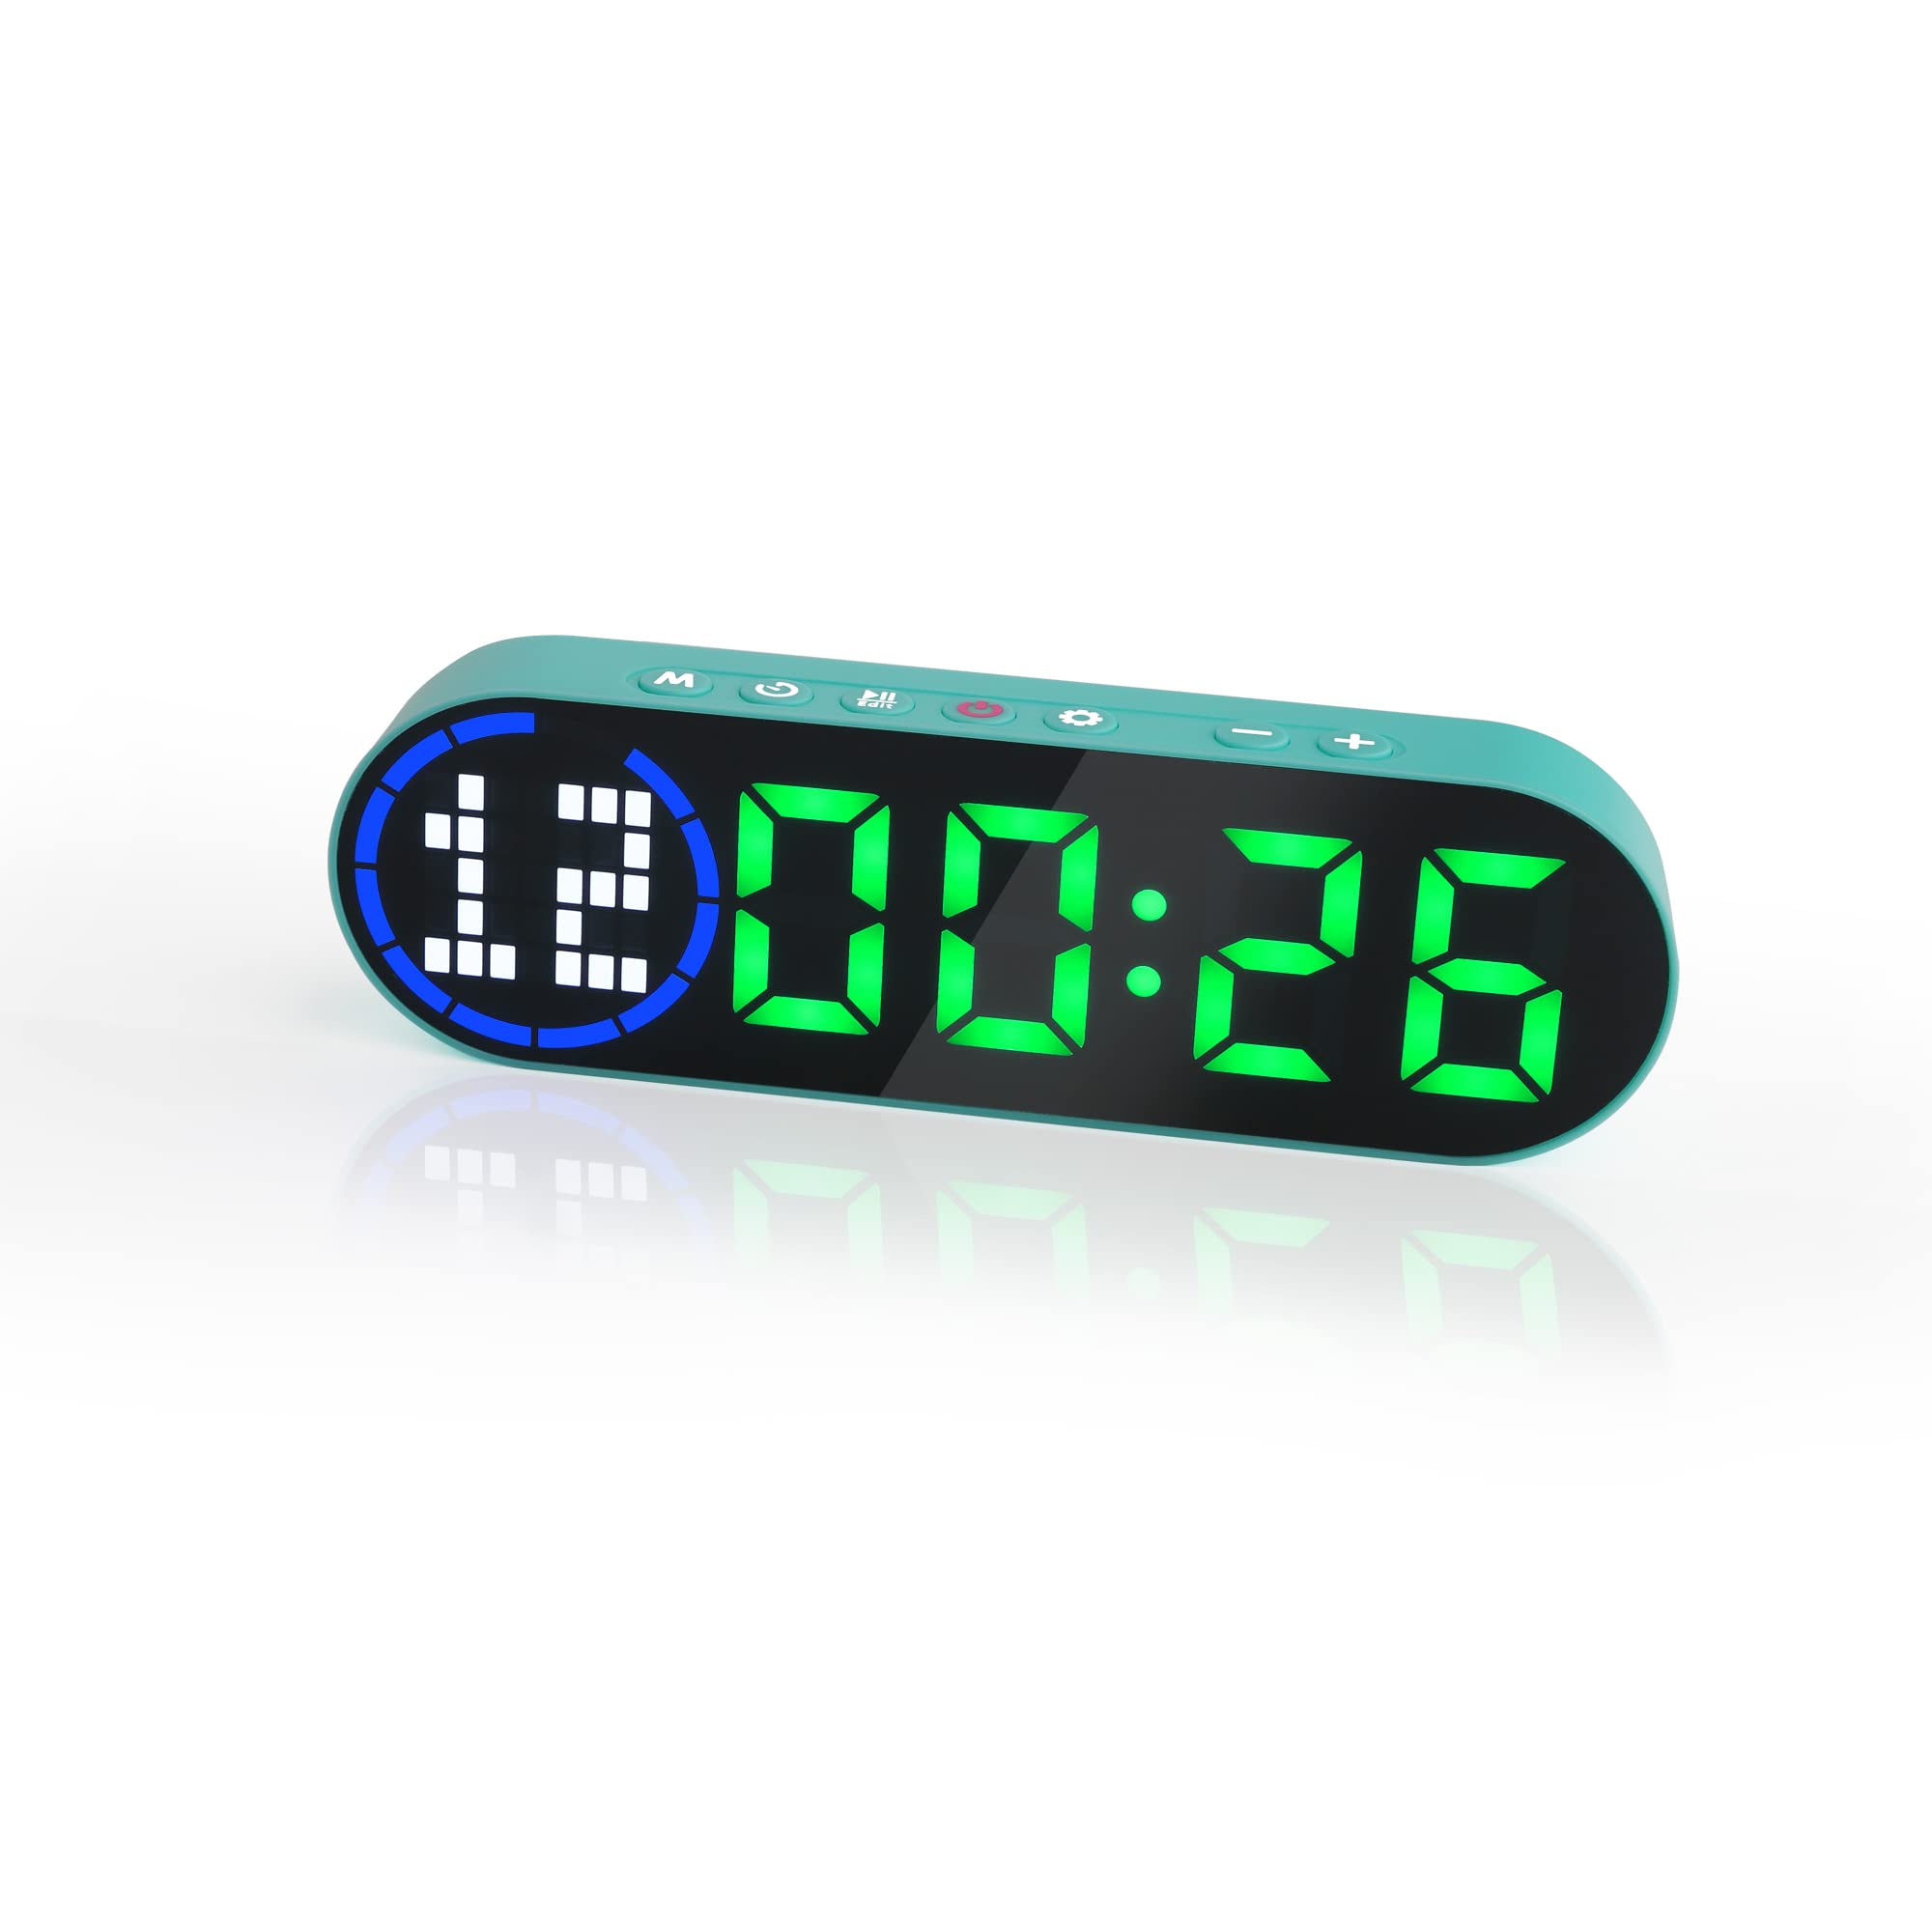
Image 3.1: The LUCORB Portable Gym Timer, highlighting its compact and portable dimensions (approximately 6.3 inches long, 2 inches wide, and 0.9 inches thick). The image also indicates it is rechargeable and battery-powered.
Key Features:
- Compact and Portable Design: Easy to carry and use anywhere.
- Magnetic Back: Allows for secure attachment to metal surfaces.
- Rechargeable Battery: Provides long-lasting power for workouts.
- Multiple Timing Modes: Includes Interval Timer, Countdown, Count Up, and Stopwatch.
- Time Progress Bar: Visual indicator for workout progress.
- Adjustable Sound and Countdown: Customizable settings for personalized use.
4. Package Contents
Please check the package for the following items:
- LUCORB Portable Gym Timer (1)
- USB Charging Cable (1)
- User Manual (1)
5. Setup
5.1 Charging the Timer
Before first use, fully charge the timer. Connect the provided USB charging cable to the timer's charging port and plug the other end into a standard USB power adapter (not included) or a computer's USB port. The display will indicate charging status. A full charge typically takes 2-3 hours.
5.2 Power On/Off
- To Power On: Press and hold the Power Button (usually located on the side or top) for 3 seconds until the display lights up.
- To Power Off: Press and hold the Power Button for 3 seconds until the display turns off.
5.3 Placement
The LUCORB Gym Timer features a strong magnetic back, allowing it to be securely attached to any metal surface, such as gym equipment, racks, or whiteboards. Ensure the surface is clean and stable before attaching.
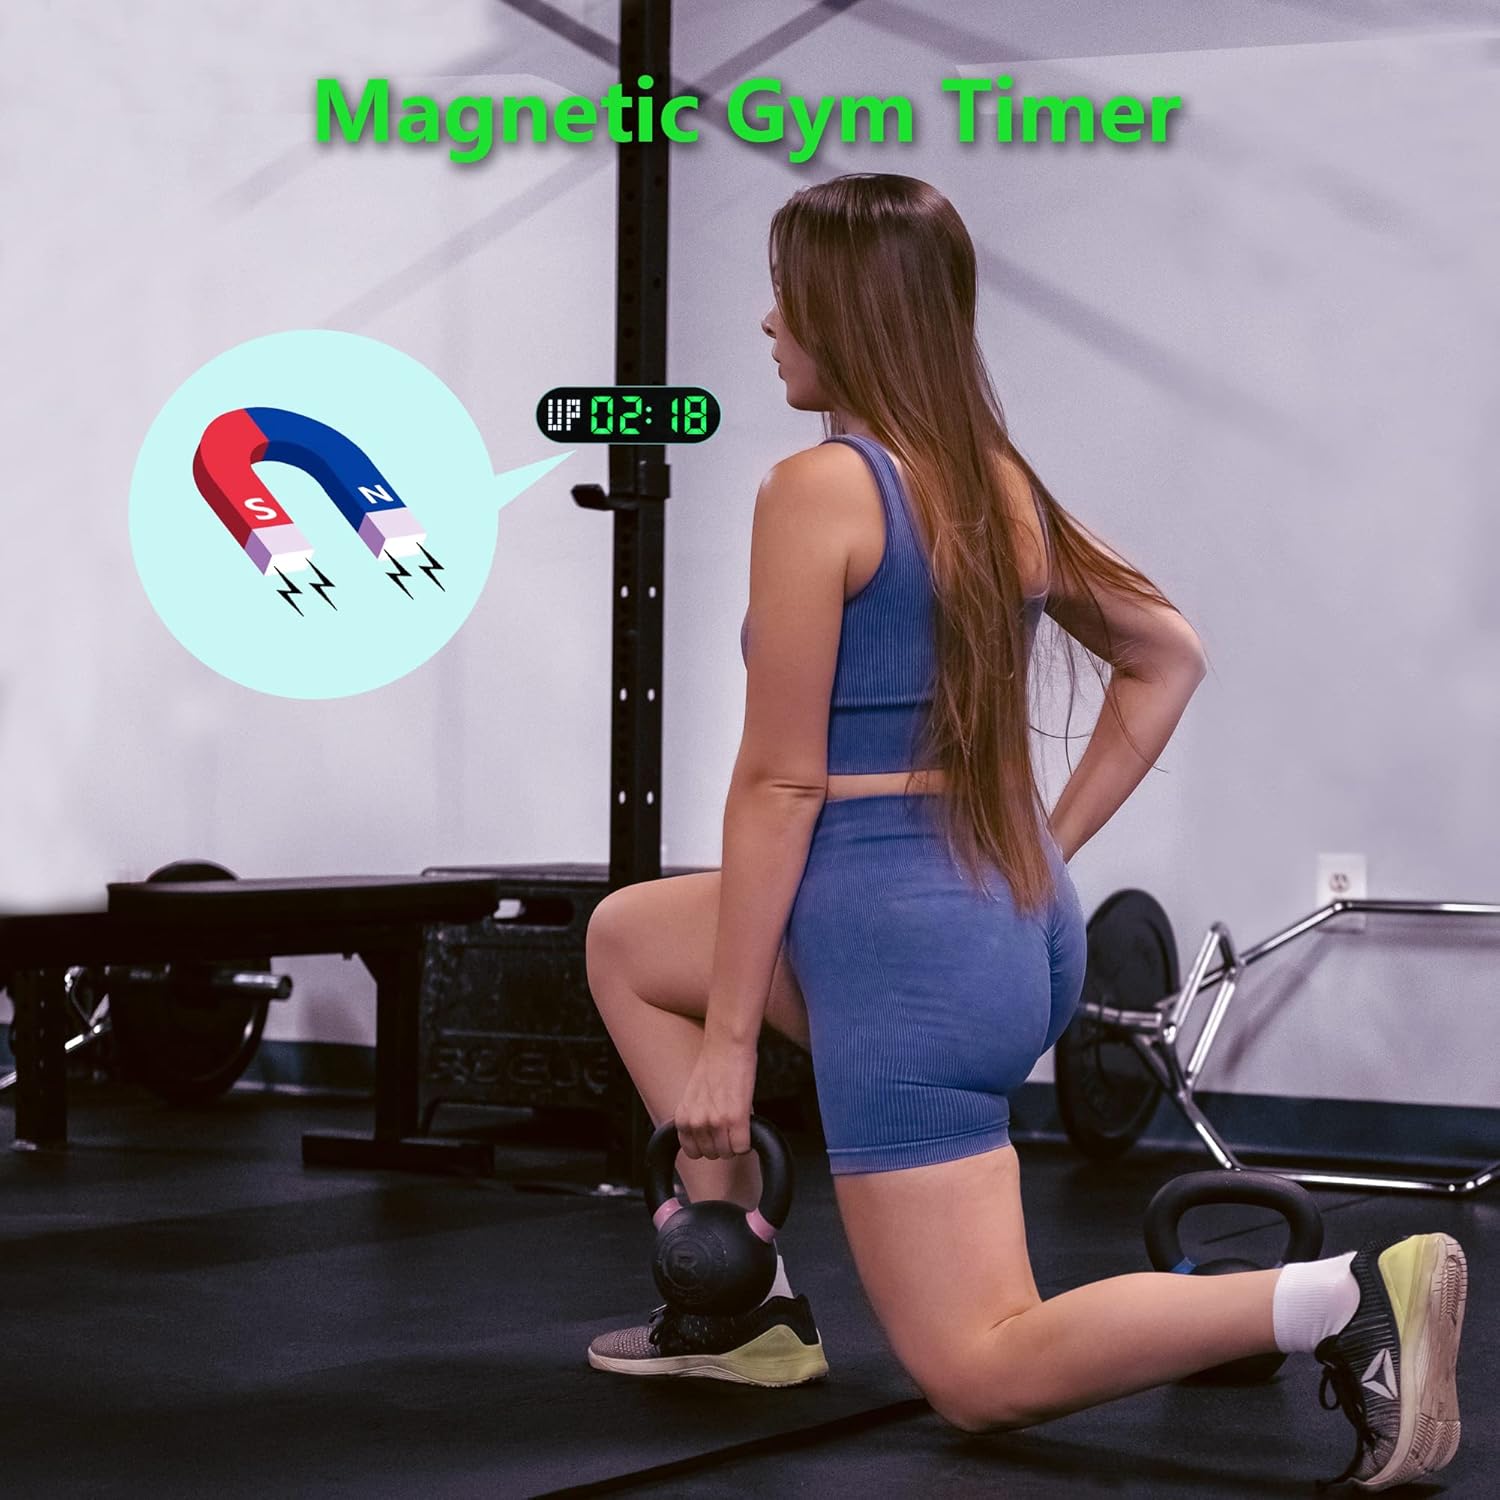
Image 5.1: The timer demonstrating its magnetic attachment capability to a metal gym rack, providing convenient visibility during workouts.
6. Operating Instructions
The timer has several buttons for navigation and settings. Refer to the diagram below for button identification (buttons are typically located on the top edge of the device).
- MODE Button: Cycles through different timing modes (Interval, Countdown, Count Up, Stopwatch).
- SET Button: Enters setting mode for the current timing program.
- START/PAUSE Button: Starts or pauses the current timer.
- +/- Buttons: Adjusts values when in setting mode.
6.1 Understanding the Display
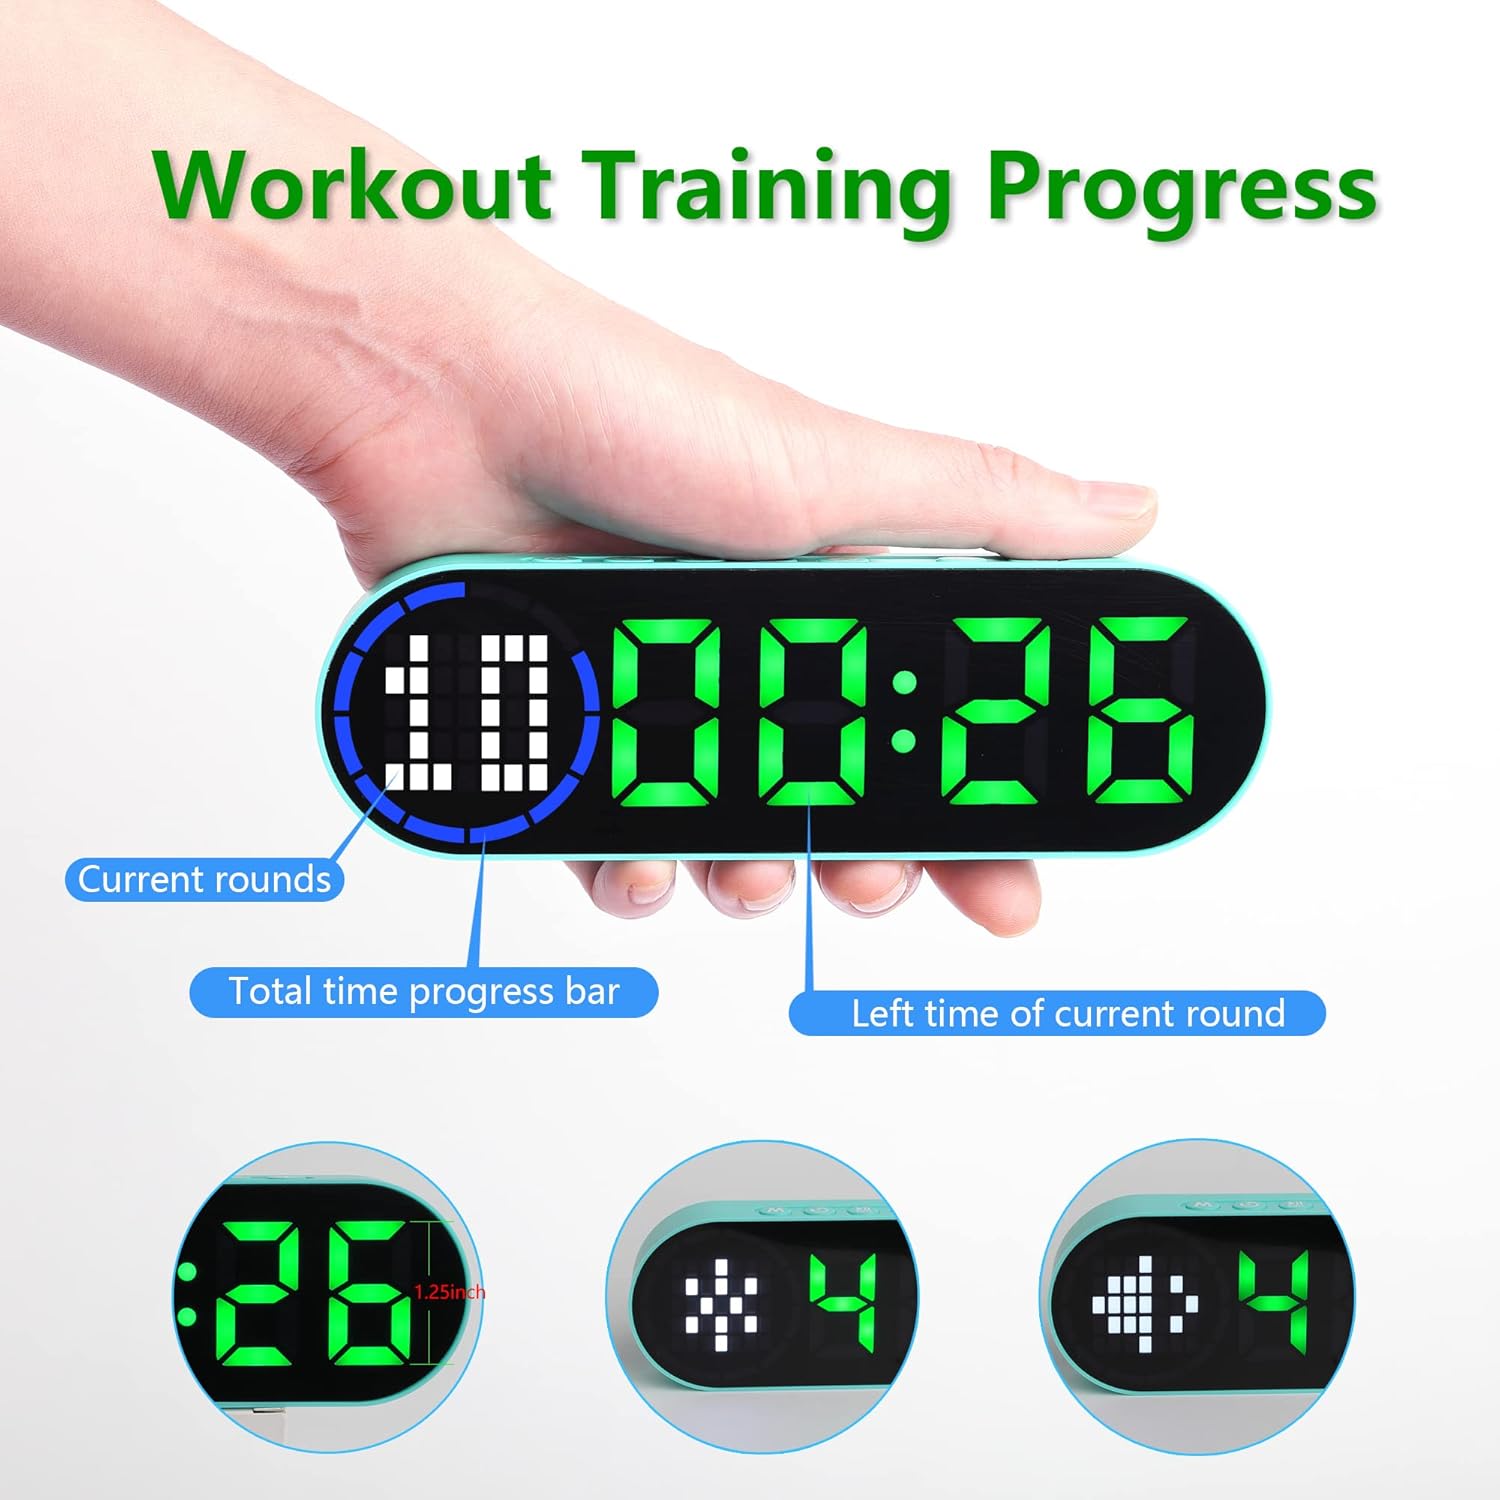
Image 6.1: The timer display indicating "Current rounds" (left), "Total time progress bar" (top segment), and "Left time of current round" (right). This visual feedback helps track workout progress.
6.2 Timing Modes
Press the MODE Button to cycle through the available timing modes:

Image 6.2: The timer displaying examples of its four main modes: Interval Timer, Count Down, Count Up, and Stopwatch, each with distinct visual indicators.
6.2.1 Interval Timer (e.g., HIIT, Tabata)
- Press MODE until "F" (Work) and "C" (Rest) indicators appear.
- Press SET to enter setting mode. The time for the first interval (Work) will flash.
- Use +/- Buttons to adjust minutes and seconds for the Work period. Press SET to confirm and move to the Rest period.
- Adjust minutes and seconds for the Rest period using +/- Buttons. Press SET to confirm and move to the number of rounds.
- Adjust the number of rounds. Press SET to save settings and exit.
- Press START/PAUSE to begin the interval workout. The timer will count down the Work period, then the Rest period, for the set number of rounds.
6.2.2 Countdown Timer
- Press MODE until "dn" or a countdown format (e.g., 00:00) is displayed.
- Press SET to enter setting mode. The time will flash.
- Use +/- Buttons to set the desired countdown time (minutes and seconds). Press SET to confirm each segment.
- Press START/PAUSE to begin the countdown.
6.2.3 Count Up Timer
- Press MODE until "UP" or a count-up format (e.g., 00:00) is displayed.
- The timer will typically start from 00:00.
- Press START/PAUSE to begin counting up. Press again to pause.
- To reset, press and hold the START/PAUSE button or a dedicated RESET button (if available) while paused.
6.2.4 Stopwatch
- Press MODE until "ST" or a stopwatch format (e.g., 00:00:00) is displayed.
- Press START/PAUSE to begin counting. Press again to pause.
- To reset the stopwatch to zero, press and hold the START/PAUSE button or a dedicated RESET button (if available) while paused.
6.3 Adjustable Settings
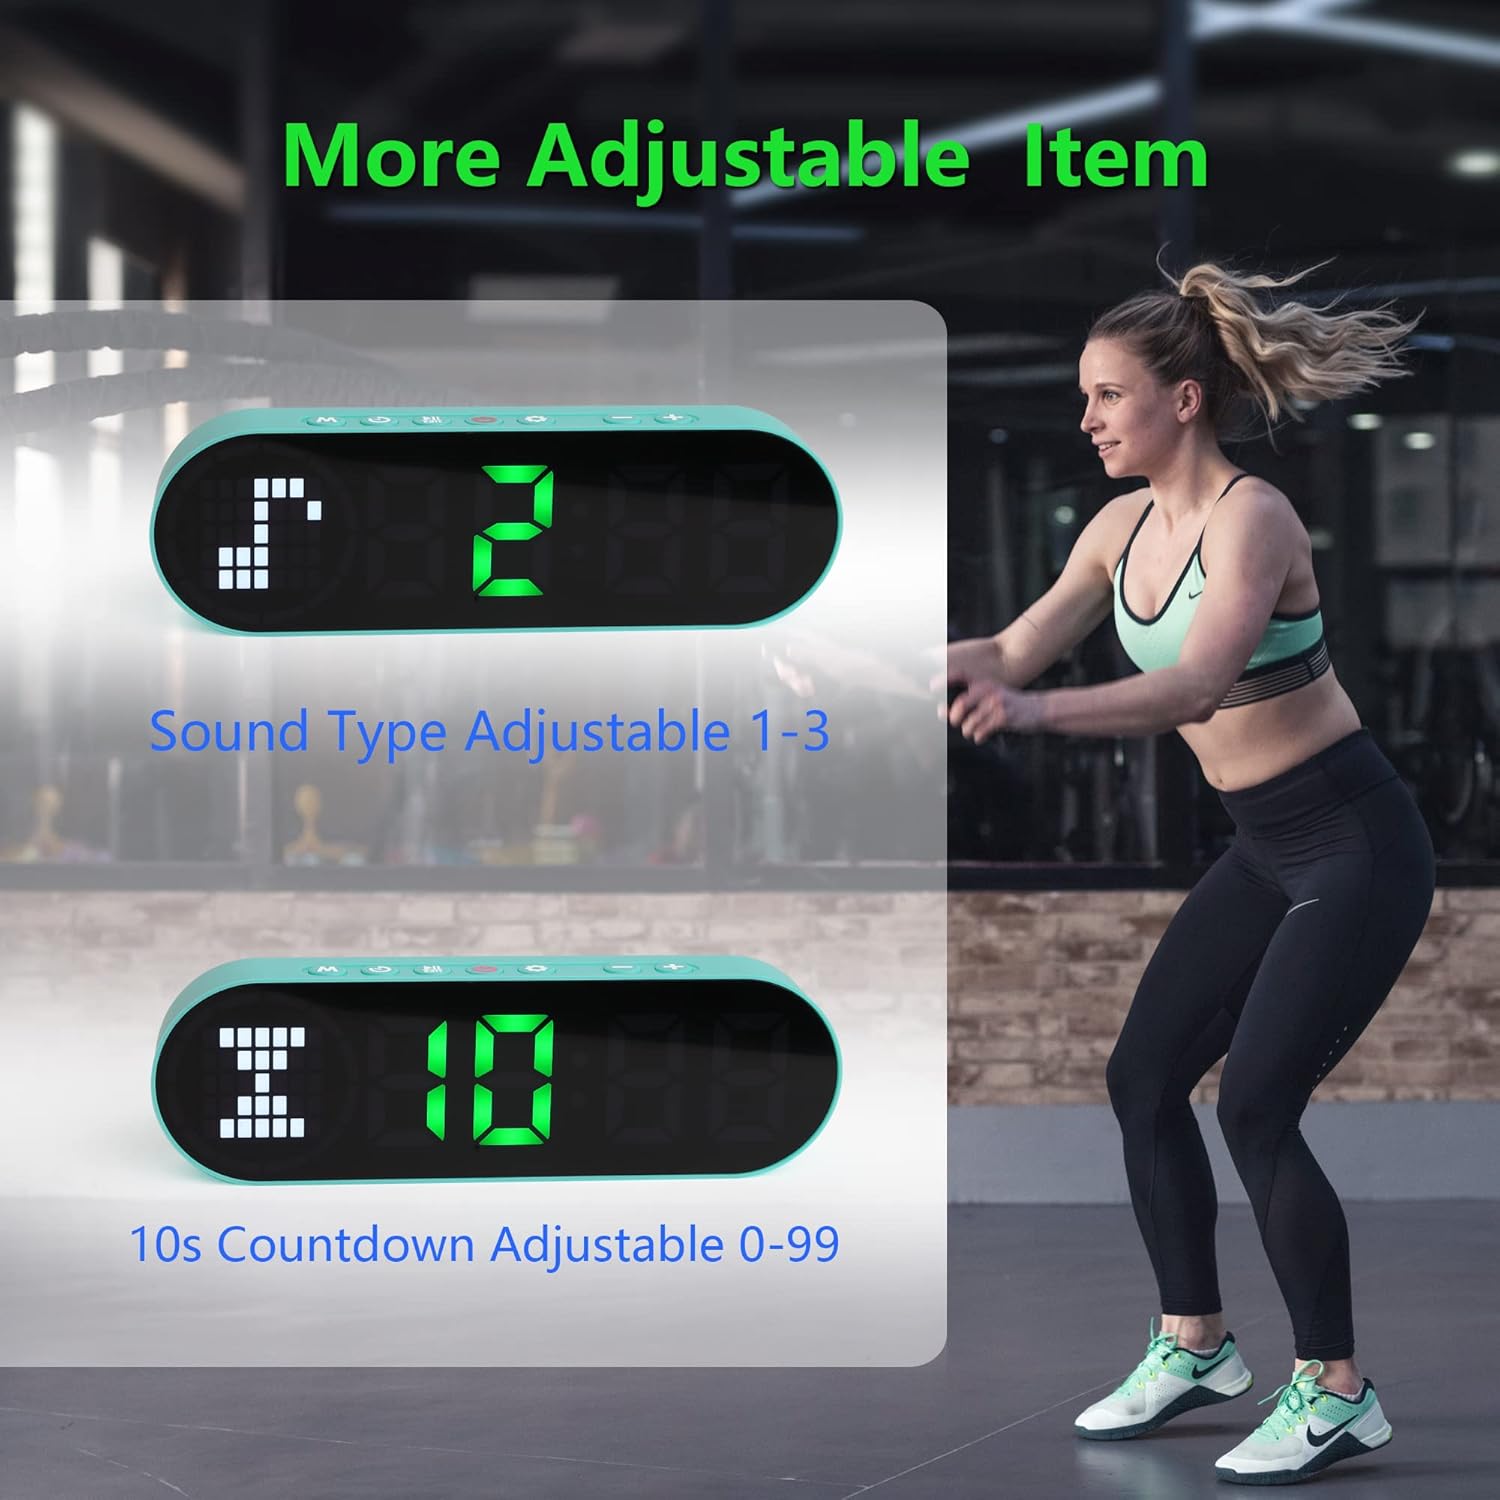
Image 6.3: The timer illustrating adjustable features, including Sound Type (1-3) and a customizable 10-second countdown (0-99 seconds) before a program starts.
6.3.1 Sound Type Adjustment
Some modes allow adjustment of the sound type or volume. While in a setting mode (e.g., Interval Timer setup), look for an option to adjust "Sound Type" (often indicated by a speaker icon or "SND"). Use the +/- Buttons to cycle through available sound options (e.g., 1, 2, 3 for different tones or volumes). Press SET to confirm.
6.3.2 Initial Countdown Adjustment
Before starting a timed program (like Interval or Countdown), the timer may offer an initial preparation countdown (e.g., 10 seconds). This can often be adjusted from 0 to 99 seconds. While in a setting mode, look for a "10s Countdown" or "PREP" setting. Use the +/- Buttons to set the desired pre-countdown duration. Press SET to confirm.
7. Maintenance
7.1 Cleaning
To clean the timer, gently wipe the surface with a dry, soft cloth. Do not use abrasive cleaners, solvents, or harsh chemicals, as these can damage the display or casing.
7.2 Storage
When not in use for extended periods, store the timer in a cool, dry place, away from direct sunlight and extreme temperatures. Ensure the battery is partially charged before storing to maintain battery health.
8. Troubleshooting
- Timer not turning on:
- Ensure the battery is charged. Connect the timer to a power source using the USB cable.
- Press and hold the Power Button for 3 seconds.
- Display is dim or unresponsive:
- Recharge the battery.
- Try turning the device off and on again.
- Buttons are unresponsive:
- Restart the timer by powering it off and then on.
- Ensure your fingers are dry and clean when pressing buttons.
- Timer not holding a charge:
- Ensure the charging cable is securely connected.
- Try a different USB power adapter or port.
- If the issue persists, contact customer support.
9. Specifications
| Brand | LUCORB |
| Model Number (ASIN) | B0BYH9SP13 |
| Item Weight | 127 g |
| Item Dimensions (LxWxH) | 160 x 50 x 23 Millimeters |
| Colour | Light Green |
| Power Source | Battery Powered (Rechargeable via USB) |
10. Warranty and Support
For warranty information, technical support, or any inquiries regarding your LUCORB Portable Gym Timer, please refer to the product packaging or contact LUCORB customer service through the retailer where the product was purchased. Please have your model number (B0BYH9SP13) and purchase date available when contacting support.
