1. Introduction
Thank you for choosing the AISITESY High-Sensitivity Eyeglass Centering Tool. This device is designed to provide accurate and fast positioning for eyeglass lenses, particularly bifocal lenses. Its high-definition display ensures parallax-free and undistorted measurements, enhancing efficiency and precision in optical work. This manual provides detailed instructions for proper setup, operation, and maintenance to ensure optimal performance and longevity of your device.
2. Safety Information
- Always operate the device on a stable, level surface.
- Keep the device away from water and excessive moisture to prevent electrical hazards.
- Do not attempt to disassemble or repair the device yourself. Refer to qualified service personnel.
- Ensure the power supply matches the device's requirements before plugging it in.
- Keep hands and loose clothing away from moving parts during operation.
- Store the device in a clean, dry environment when not in use.
3. Product Overview
The AISITESY Eyeglass Centering Tool features a robust design with intuitive controls for precise lens measurement and positioning. Key components include:
- Measurement Platform: The area where the lens is placed for analysis.
- Centering Mechanism: Adjustable components for aligning the lens.
- Display Screen: High-definition screen for viewing measurement results.
- Control Knobs: For fine-tuning adjustments.
- Power Switch: To turn the device on and off.
- Suction Cup Heads: Two optional heads for securing lenses.

Figure 3.1: Front-side view of the AISITESY Eyeglass Centering Tool. This image shows the overall design, including the main body, control knobs, and the display area.

Figure 3.2: Front view of the AISITESY Eyeglass Centering Tool. This perspective highlights the display screen and the power switch.
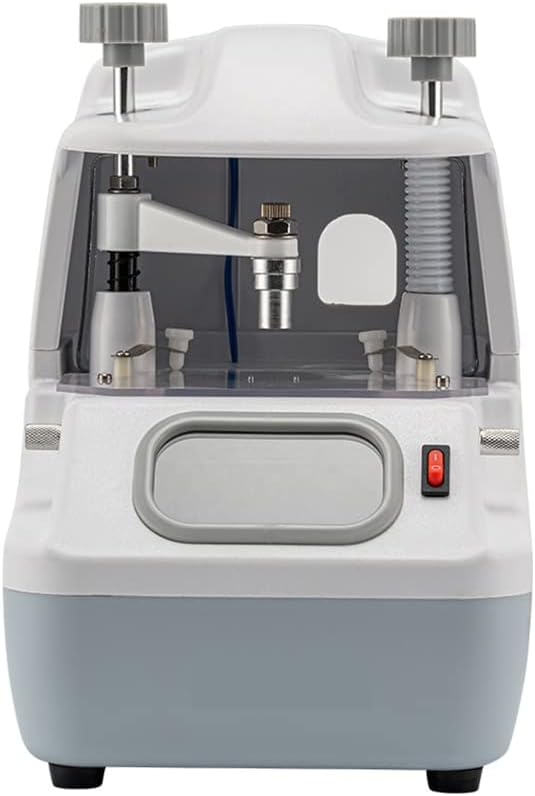
Figure 3.3: Close-up view of the measurement platform with the centering mechanism. This image details the transparent platform and the adjustable components for lens placement.
4. Setup
Follow these steps to set up your AISITESY Eyeglass Centering Tool:
- Unpacking: Carefully remove the device from its packaging. Inspect for any signs of damage during transit.
- Placement: Place the device on a stable, flat, and clean workbench. Ensure there is adequate space around the device for operation.
- Power Connection: Connect the power cord to the device and then to a suitable electrical outlet. Verify that the voltage matches the device's requirements.
- Initial Power On: Flip the power switch to the 'ON' position. The display screen should illuminate.
- Suction Cup Attachment (Optional): If using the suction cup heads, select the appropriate size and attach it securely to the centering mechanism as needed for your specific lens type.
5. Operating Instructions
This section guides you through the process of using the centering tool for accurate lens measurements.
5.1 Lens Placement
- Ensure the device is powered on and the display is active.
- Gently place the eyeglass lens onto the measurement platform. If using, secure it with the suction cup head.
- Adjust the centering mechanism using the control knobs until the lens is stable and positioned correctly for measurement.

Figure 5.1: Detailed view of the measurement platform, showing the circular guide for lens placement and the central alignment point.
5.2 Measurement and Adjustment
- Observe the high-definition display. The screen will show the current alignment and measurement data without parallax or distortion.
- Use the fine-adjustment knobs (visible on the top of the device) to precisely align the lens according to the desired specifications.
- For bifocal lenses, utilize the dual focal length lens feature to quickly adjust and measure both focal points accurately.
- Confirm the final measurements on the display.

Figure 5.2: Top view of the device, highlighting the two main control knobs used for adjustments during the centering process.

Figure 5.3: Detailed view of the centering mechanism, showing the precise scale and alignment components for accurate lens positioning.
6. Maintenance
Proper maintenance ensures the longevity and accuracy of your centering tool.
- Cleaning: Regularly wipe the exterior of the device with a soft, dry cloth. For the display screen and measurement platform, use a lint-free cloth and a mild, non-abrasive cleaning solution specifically designed for optical surfaces.
- Dust Protection: When not in use, cover the device with a dust cover to prevent dust and debris from accumulating on sensitive components.
- Storage: Store the device in a cool, dry place, away from direct sunlight and extreme temperatures.
- Inspection: Periodically inspect the power cord for any signs of damage. Check that all knobs and moving parts operate smoothly.
7. Troubleshooting
| Problem | Possible Cause | Solution |
|---|---|---|
| Device does not power on. | Power cord not connected; power outlet faulty; power switch off. | Ensure power cord is securely connected. Test outlet with another device. Flip power switch to 'ON'. |
| Display screen is blank or distorted. | Loose internal connection; software error. | Turn off the device, wait 30 seconds, then turn it back on. If problem persists, contact support. |
| Inaccurate measurements. | Lens not properly seated; measurement platform dirty; device not calibrated. | Ensure lens is securely placed. Clean the measurement platform. If issues continue, contact support for calibration guidance. |
| Suction cup not holding lens. | Suction cup dirty or worn; lens surface not clean. | Clean the suction cup and lens surface. Replace suction cup if worn. |
8. Specifications
- Model: High-Sensitivity Eyeglass Centering Tool
- Brand: AISITESY
- ASIN: B0BYDJDC47
- Manufacturer: AISITESY
- Display: High-definition, parallax-free, no deformation
- Lens Type: Suitable for various eyeglass lenses, including bifocal
- Features: Dual focal length lens adjustment, quick positioning, two optional suction cup heads
- Date First Available: March 14, 2023
9. Warranty and Support
For warranty information or technical support, please contact AISITESY customer service. Refer to your purchase documentation for specific warranty terms and conditions. You can also visit the official AISITESY store on Amazon for more information and contact options: