1. Product Overview
The Locksworth 1.0 Cubic Feet Digital Electronic Security Safe (Model AZ4304-Black) is designed to provide secure storage for your valuable belongings such as cash, jewelry, documents, and passports. This compact safe features a robust alloy steel construction with a sleek matte finish, offering both security and discreet integration into your home or office environment. It incorporates advanced locking mechanisms and an alarm system for enhanced protection.
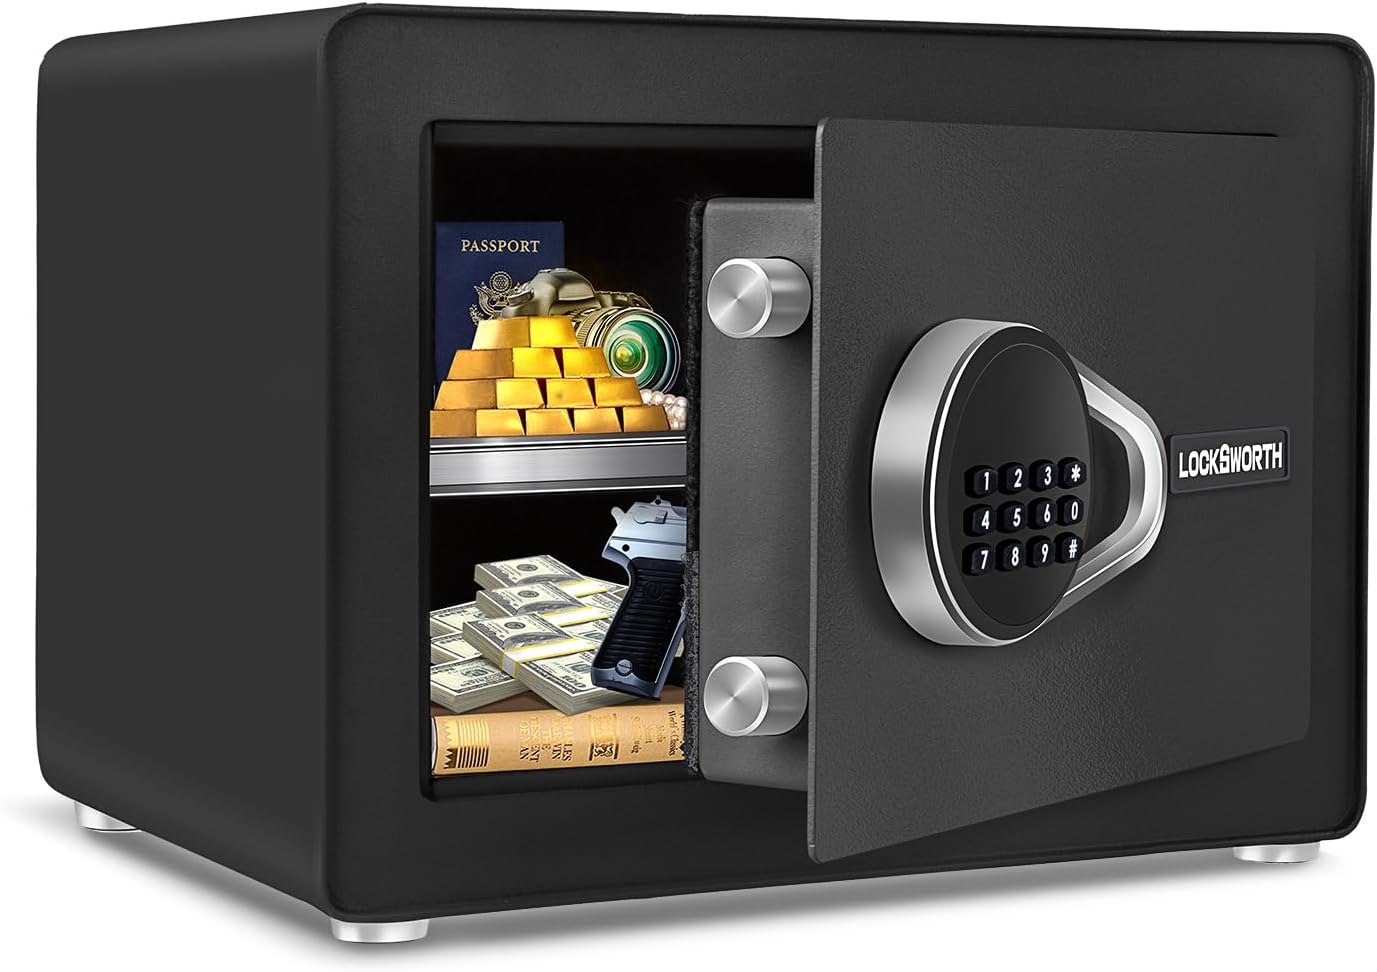
Figure 1.1: The Locksworth safe with its door open, revealing a spacious interior with a removable shelf, suitable for storing various valuables.
Key Features:
- Tactical Design: Sleek matte finish on steel body and panels for superior camouflage and deterrence. Features special bolt locking holders on the inner door for enhanced durability and anti-pry mechanism.
- Convenient Storage: 1.0 cubic feet capacity for cash, jewelry, documents, and more. Compact design suitable for residential and commercial use.
- Flexible Partitioning: Includes a removable shelf for organized storage. Interior lined with anti-moisture fabric to protect items from scratches.
- Advanced Locking Mechanism: Digital code lock with multiple access options (code + knob, emergency keys).
- Dual Alarm System: Triggers an audible alarm (≥70dB) upon violent vibration or three incorrect passcode attempts.
- Easy Setup & Installation: Pre-drilled mounting holes at the back with included expansion screws for wall or floor installation.
- Internal Light: An interior light illuminates when the door is opened, providing visibility in low-light conditions.
2. Setup Guide
2.1 Unpacking and Initial Inspection
Carefully remove the safe from its packaging. Inspect the safe for any signs of damage during transit. Ensure all included components are present: the safe unit, 2 emergency keys, 2 sets of expansion bolts, 4 AA batteries, and the user manual.

Figure 2.1: Product dimensions and included accessories. The package includes the safe, two emergency keys, two mounting bolts, four floor protectors, and four AA batteries.
2.2 Battery Installation
- Locate the battery compartment on the inside of the safe door.
- Open the battery compartment cover.
- Insert the 4 AA batteries provided, ensuring correct polarity (+/-).
- Close the battery compartment cover securely.
2.3 Setting Your Personal Passcode
Upon first use, or after a factory reset, you will need to set your personal passcode. Refer to the "Operation" section for detailed instructions on setting and changing the passcode.
2.4 Mounting the Safe (Optional but Recommended)
For maximum security, it is highly recommended to mount the safe to a wall or floor using the provided expansion bolts. The safe features pre-drilled holes on the back for this purpose.
- Choose a suitable location for mounting, ensuring the surface is sturdy enough to support the safe's weight and contents.
- Mark the drilling points on the wall or floor using the safe's pre-drilled holes as a template.
- Drill holes at the marked points using an appropriate drill bit for your wall/floor material.
- Align the safe with the drilled holes and insert the expansion bolts through the safe's back panel into the wall/floor.
- Tighten the expansion bolts securely to fix the safe in place.

Figure 2.2: Illustration of the safe's security features and the three-step process for easy installation on a wall or floor.
3. Operation
3.1 Opening the Safe
Using Digital Passcode:
- Enter your 1 to 8 digit personal passcode on the keypad.
- Press the "#" key to confirm.
- Within 5 seconds, turn the knob clockwise to open the safe door.
Using Emergency Keys:
In case of forgotten passcode or dead batteries, the safe can be opened using the emergency keys.
- Locate the emergency keyhole, usually hidden behind a removable cover on the keypad panel.
- Insert the emergency key and turn it counter-clockwise.
- While holding the key turned, turn the knob clockwise to open the safe door.
- Remove the key once the door is open.
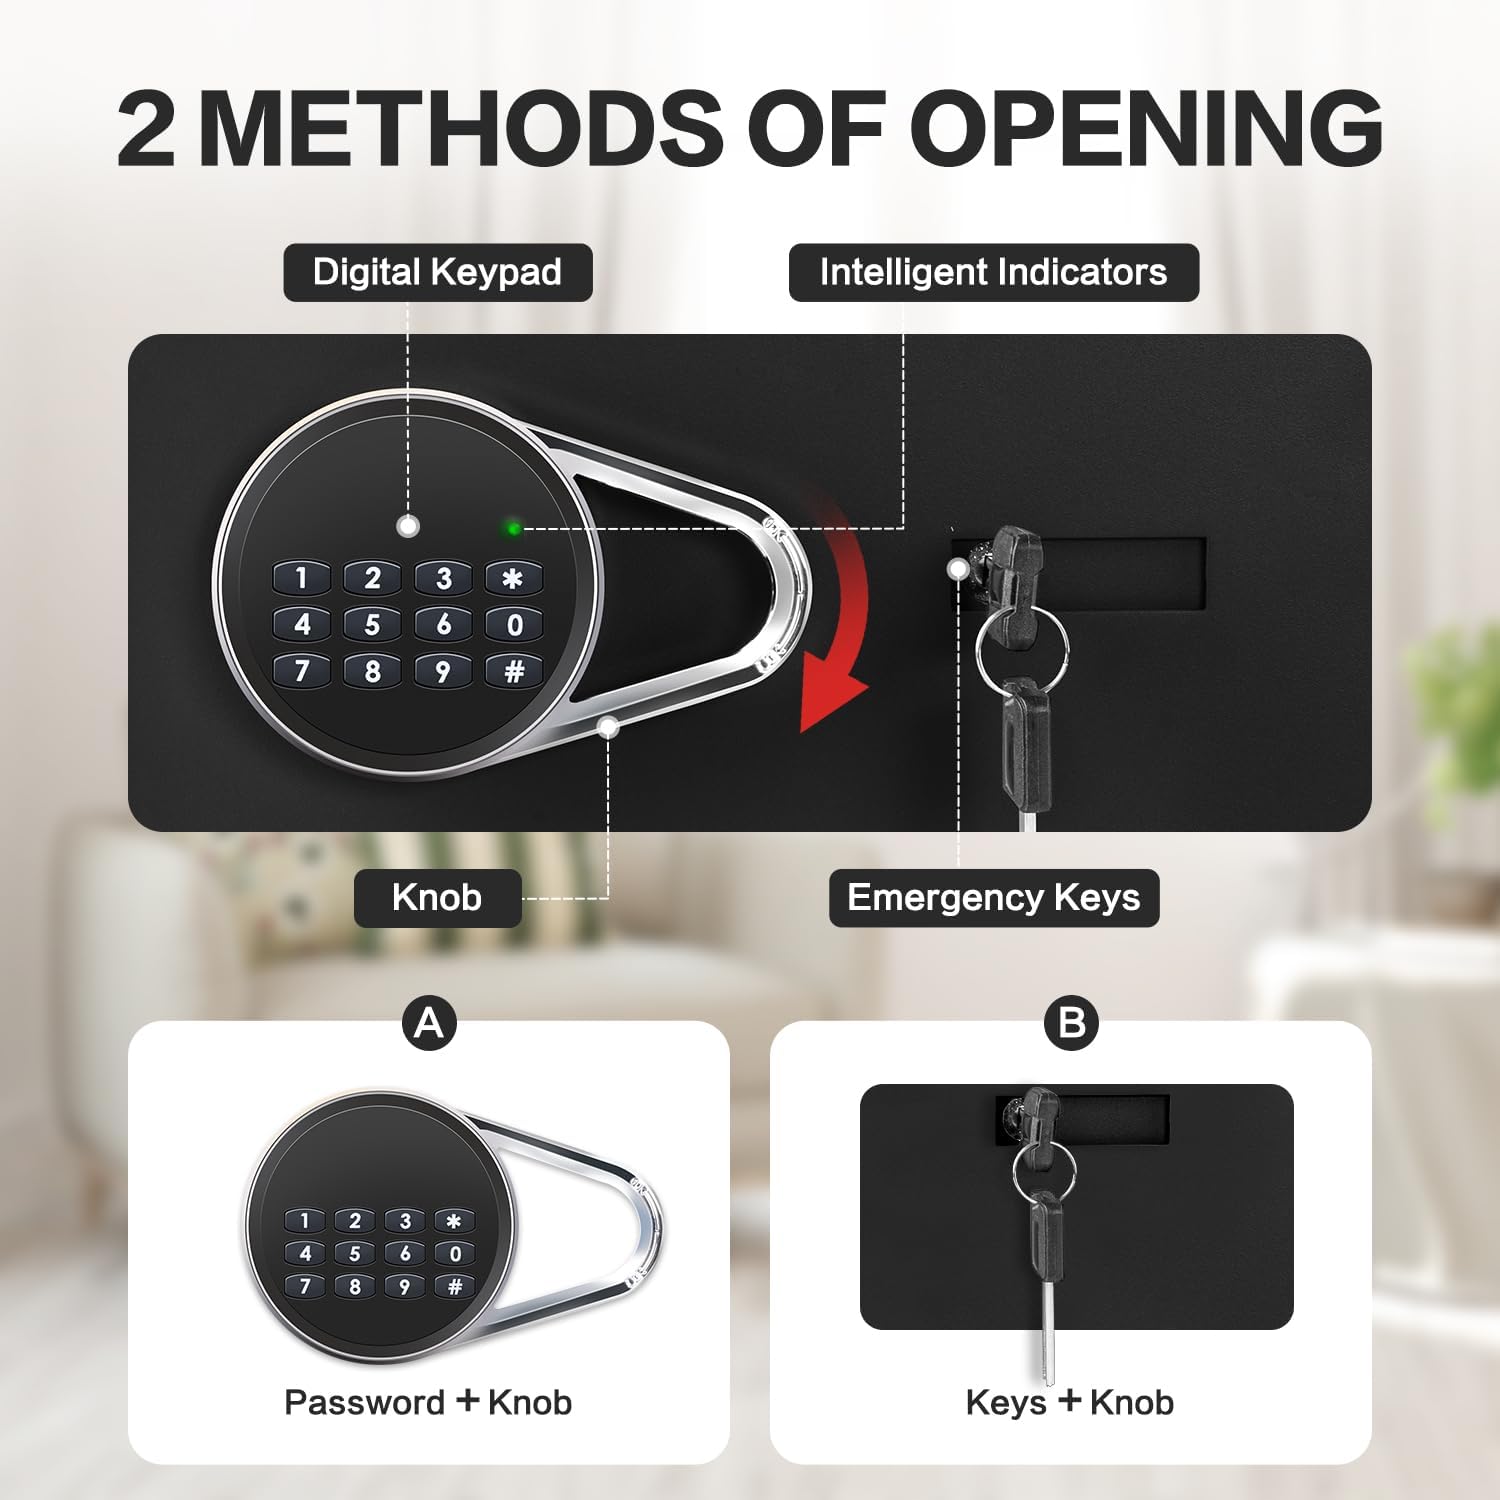
Figure 3.1: The two primary methods for opening the Locksworth safe: digital passcode and emergency keys.
3.2 Closing and Locking the Safe
Close the safe door and turn the knob counter-clockwise until it clicks into the locked position. The safe will automatically lock.
3.3 Changing the Passcode
- With the safe door open, locate the reset button on the inside of the door (often a small red button).
- Press the reset button. The indicator light on the keypad will flash.
- Enter your new 1 to 8 digit passcode on the keypad.
- Press the "#" key to confirm. The indicator light will stop flashing, confirming the new passcode is set.
- Test the new passcode with the door open before closing it.
3.4 Alarm System
The safe is equipped with a dual alarm system that activates under specific conditions:
- Incorrect Passcode Attempts: If an incorrect passcode is entered three consecutive times, the alarm will sound for a short period.
- Violent Vibration/Movement: If the safe detects significant violent vibration or unauthorized movement, the alarm will activate.
To silence the alarm, enter the correct passcode or use the emergency key to open the safe.
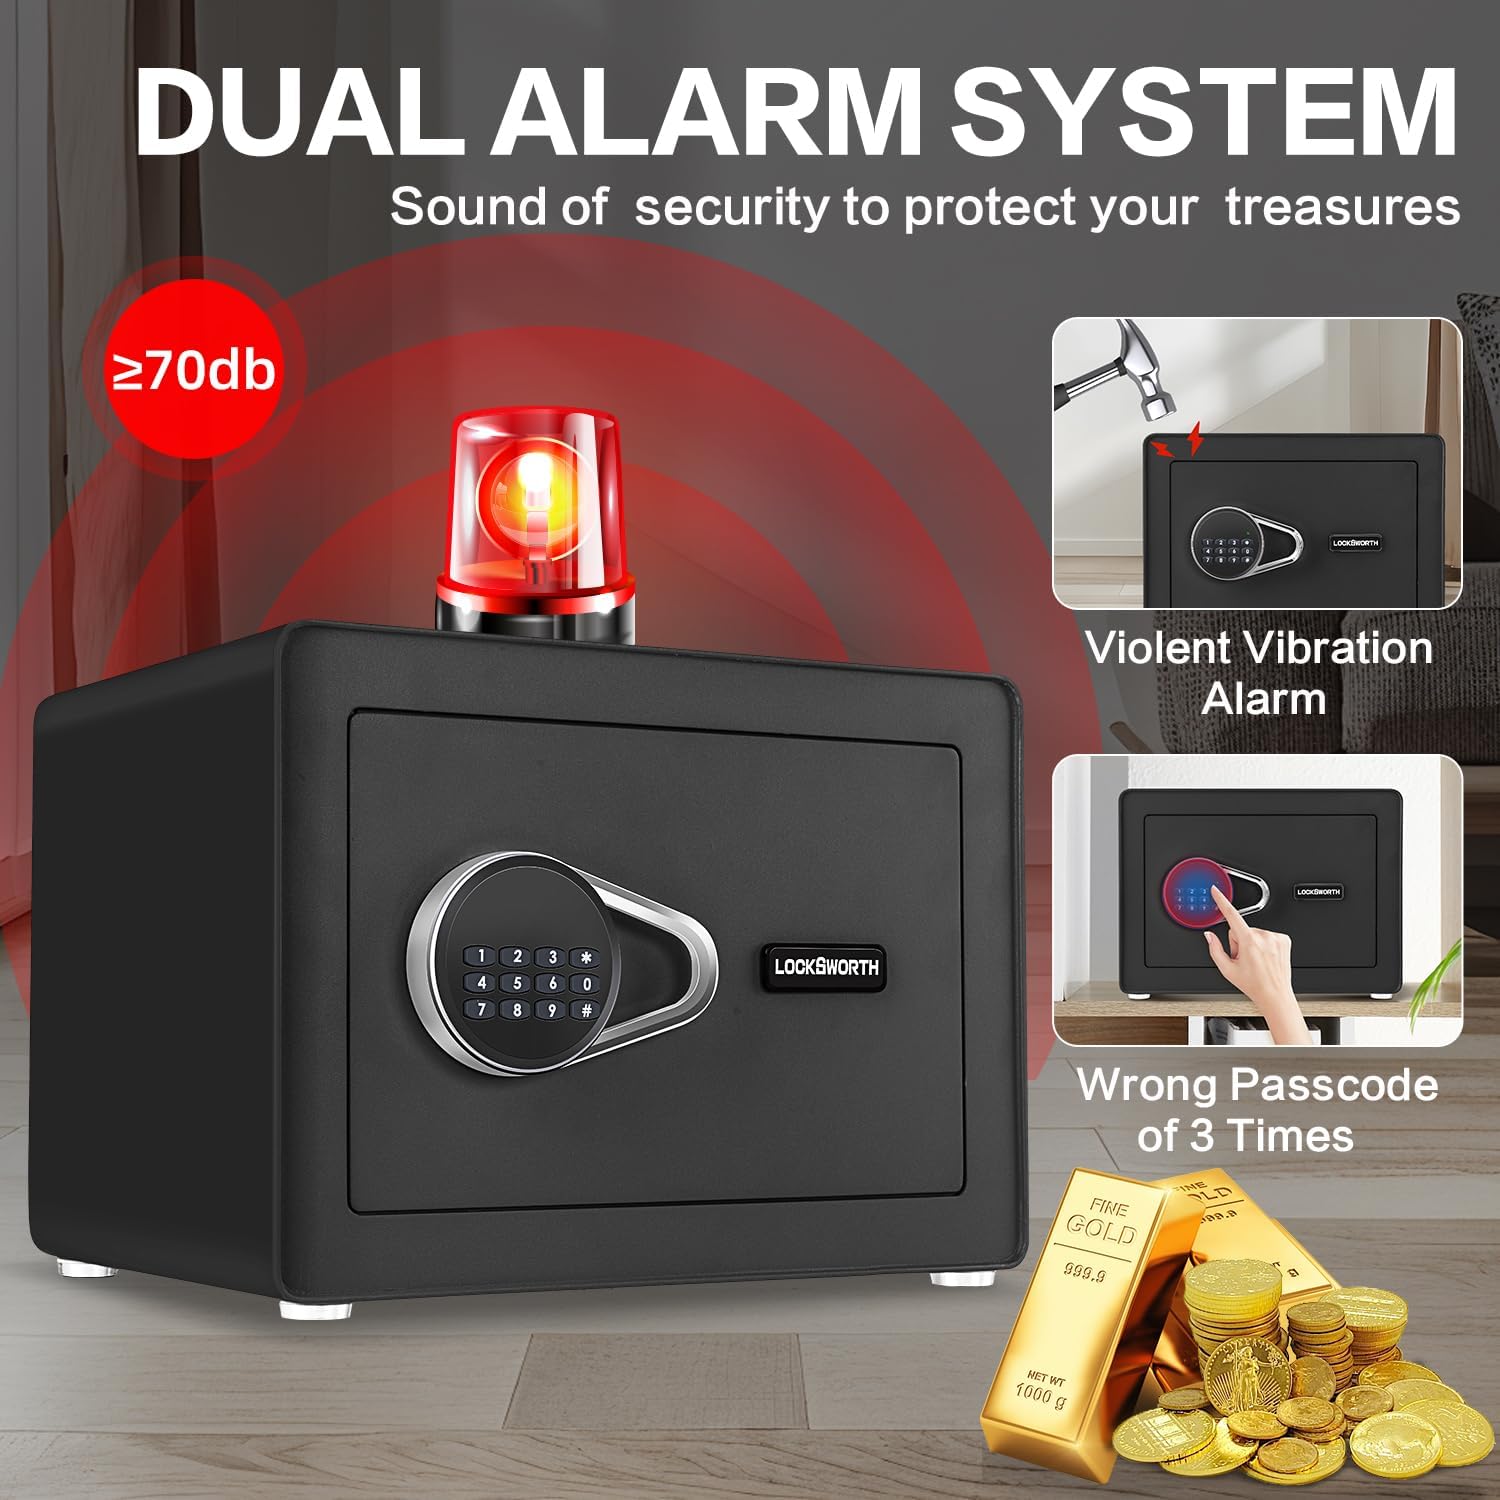
Figure 3.2: The dual alarm system, indicating activation upon violent vibration or multiple incorrect passcode entries.
4. Maintenance
4.1 Battery Replacement
When the batteries are low, the keypad indicator light may dim or the safe may not respond as quickly. Replace all 4 AA batteries promptly to ensure continuous operation. Follow the battery installation steps in Section 2.2.
Note: If batteries completely die, use the emergency keys to open the safe and replace them.
4.2 Cleaning
Clean the exterior of the safe with a soft, damp cloth. Avoid using abrasive cleaners or solvents that could damage the finish. For the interior, gently wipe the anti-moisture fabric with a dry cloth if needed.
4.3 Shelf Management
The removable shelf can be adjusted or removed to accommodate items of different sizes. Ensure the shelf is properly seated in its supports when in use to prevent items from falling.

Figure 4.1: The safe's versatile storage solutions, highlighting the use of the removable shelf.
5. Troubleshooting
| Problem | Possible Cause | Solution |
|---|---|---|
| Safe does not open with passcode. | Incorrect passcode entered; Low batteries; Passcode not set correctly. | Re-enter passcode carefully. Replace batteries. Reset passcode (refer to Section 3.3) using emergency key access if necessary. |
| Keypad is unresponsive. | Dead batteries. | Use emergency keys to open the safe and replace all 4 AA batteries. |
| Alarm sounds unexpectedly. | Multiple incorrect passcode attempts; Safe was moved or vibrated violently. | Enter the correct passcode or use the emergency key to silence the alarm. Ensure the safe is securely mounted if applicable. |
| Door does not close or lock properly. | Obstruction in the door frame; Locking bolts are not retracting/extending fully. | Check for any items blocking the door. Ensure the knob is turned fully counter-clockwise to engage the lock. |
6. Product Specifications
| Feature | Detail |
|---|---|
| Brand | Locksworth |
| Model Number | AZ4304-Black |
| Product Dimensions (D x W x H) | 9.84"D x 13.78"W x 9.84"H |
| Capacity | 1.0 Cubic Feet (Note: Product specifications in source data also list 0.6 cubic feet. Please verify actual capacity upon receipt.) |
| Color | Black |
| Material | Alloy Steel |
| Lock Type | Electronic Combination Lock, Key |
| Special Features | Alarm System, Anti-Theft, Combination Lock, Removable Shelf, Sensor Light |
| Mounting Type | Under Counter Mount, Wall Mount, Floor Mount |
| Item Weight | 18.7 pounds (8.5 Kilograms) |
| Water Resistance Level | Water Resistant |
| Batteries | 4 x AA (Included) |
7. Warranty & Support
Locksworth is committed to providing high-quality products. Specific warranty details, including duration and coverage, are typically provided with your product purchase documentation. Please refer to the warranty card or leaflet included in your product packaging for comprehensive information.
For technical support, troubleshooting assistance beyond this manual, or warranty claims, please contact Locksworth customer service through the contact information provided in your product documentation or visit the official Locksworth brand store on Amazon:
Locksworth Official Store on Amazon
Please have your model number (AZ4304-Black) and purchase date ready when contacting support.