U.S. Solid Continuous Bag Band Sealer 110V/60HZ
U.S. Solid Continuous Bag Band Sealer Sealing Machine User Manual
Model: Continuous Bag Band Sealer 110V/60HZ
Brand: U.S. Solid
Introduction
This manual provides essential information for the safe and efficient operation of your U.S. Solid Continuous Bag Band Sealer. Please read this manual thoroughly before operating the machine and retain it for future reference. This machine is designed for continuous sealing of various plastic films and bags, featuring digital temperature control, a counter function, and printing capabilities.

Figure 1: U.S. Solid Continuous Bag Band Sealer with included accessories, including a screwdriver, type wheel, and spare belts.
Safety Instructions
- Ensure the machine is placed on a stable, level surface.
- Verify the power supply matches the machine's requirements (110V/60HZ).
- Keep hands and loose clothing away from moving parts and the heating elements during operation.
- Do not operate the machine with wet hands or in damp environments.
- In case of emergency, immediately press the emergency stop button.
- Unplug the machine from the power outlet before cleaning or maintenance.
- Do not attempt to modify or repair the machine yourself. Contact qualified personnel for service.
Setup
1. Installing the Transfer Plate
The transfer plate guides the bags smoothly through the sealing mechanism. Secure it in place using the provided screwdriver.
Video 1: Installation of the transfer plate. This video demonstrates how to correctly attach the transfer plate to the machine using a screwdriver, ensuring proper alignment for bag feeding.
2. Adjusting Machine Width
The machine's width can be adjusted to accommodate different bag sizes. Rotate the two knobs located below the machine to extend or retract the conveyor belt to the desired width.
Video 2: Adjusting the machine width. This video illustrates how to adjust the conveyor belt width by rotating the knobs underneath the machine, allowing for various bag sizes.
3. Initial Power-On
Before using the machine for the first time, ensure the emergency stop switch is disengaged. Rotate the red emergency stop button upwards to release it, then press the power button to start the machine.
Video 3: Initial power-on procedure. This video demonstrates how to disengage the emergency stop button by rotating it upwards and then pressing the power button to initiate machine operation.
Operating Instructions
1. Control Panel Overview
The control panel provides access to all operational settings. It includes the Power Switch, Heat Seal Switch, Fan Switch, Photoelectric Counter, Emergency Stop Button, Speed Knob, and Temperature Controller.
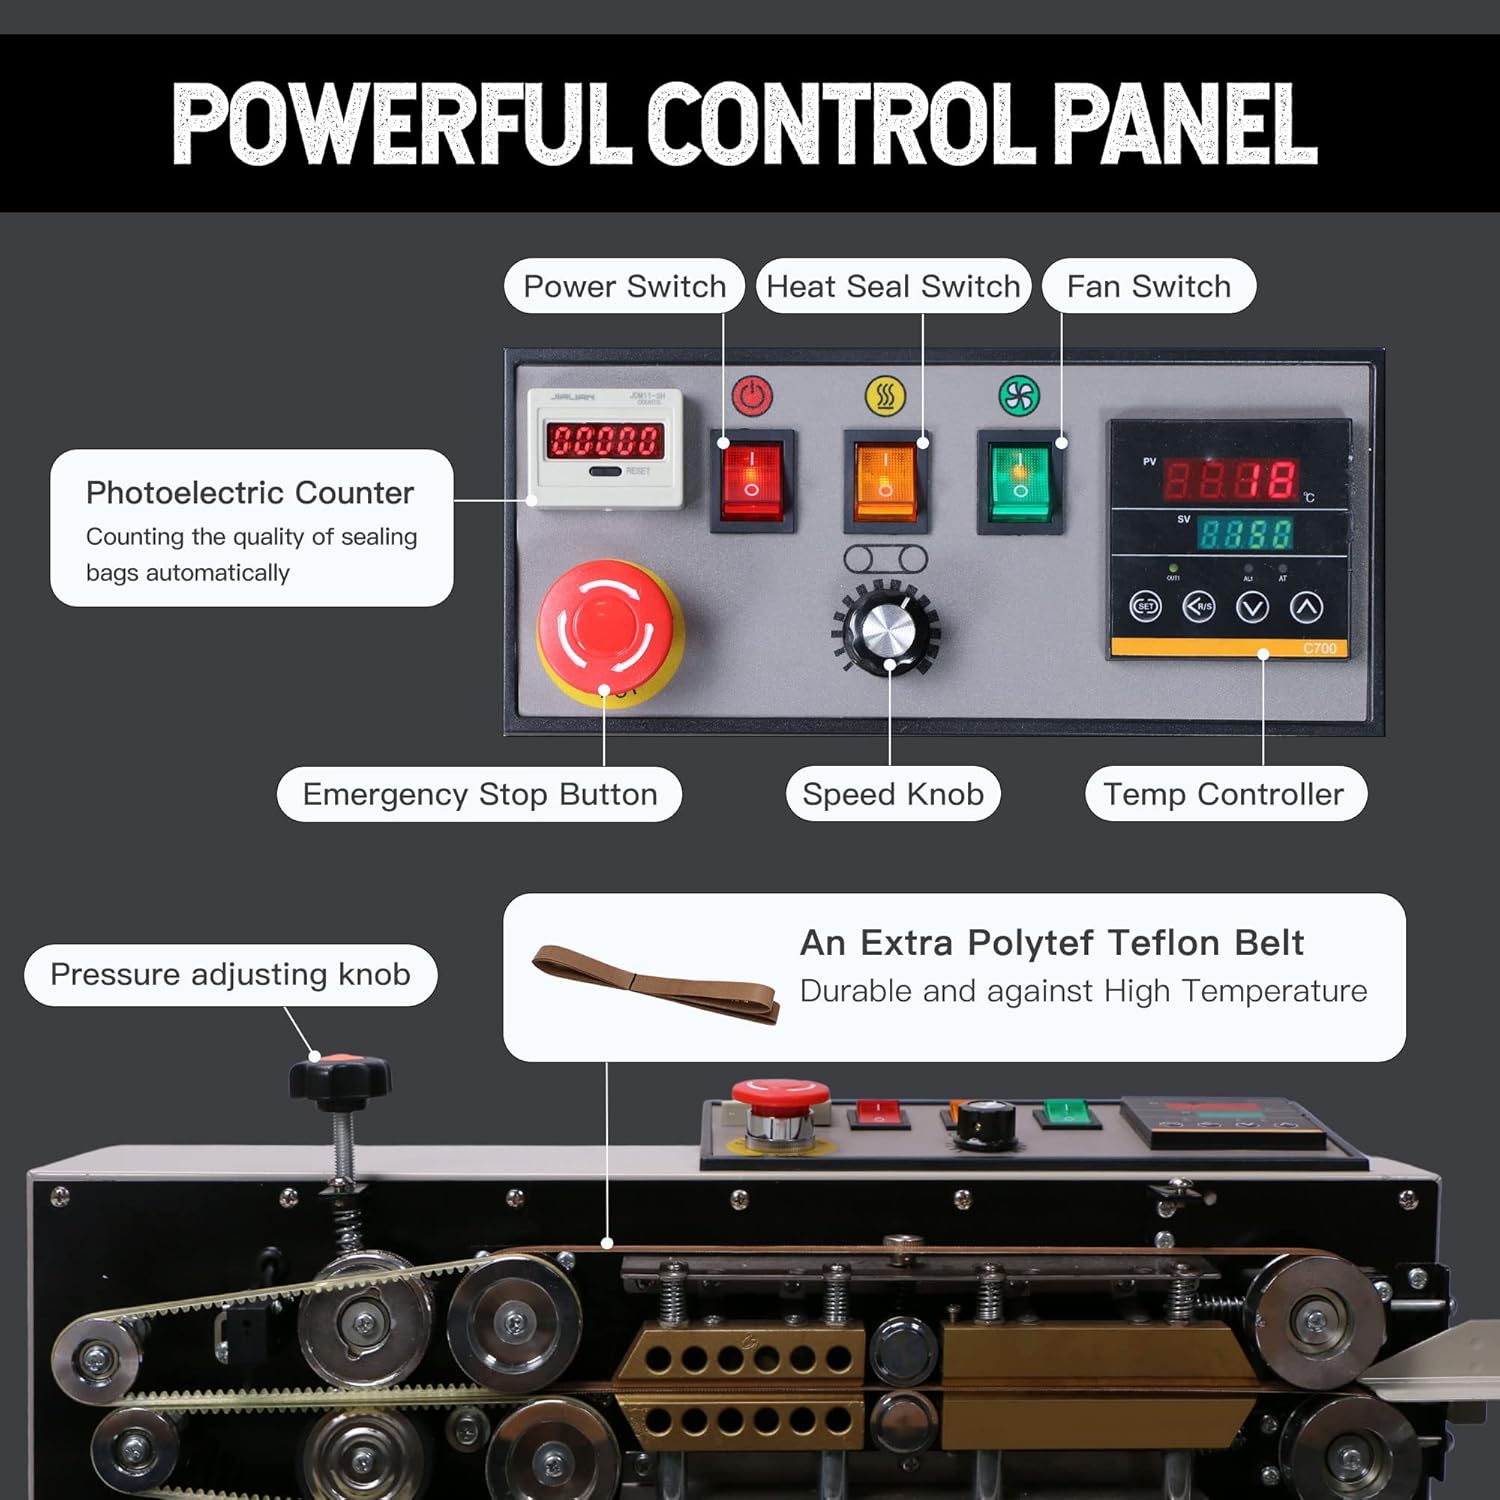
Figure 2: Detailed view of the control panel, highlighting the Power Switch, Heat Seal Switch, Fan Switch, Photoelectric Counter, Emergency Stop Button, Speed Knob, and Temperature Controller.
2. Setting Temperature and Activating Sealing
Turn on the Power Switch, then activate the Heat Seal Switch and Fan Switch in sequence. Use the Temperature Controller to set the desired sealing temperature. The machine will heat up to the set temperature, and the fan will assist in cooling the sealed area.
Video 4: Setting temperature and activating sealing. This video demonstrates the process of turning on the machine, activating heating and cooling, and setting the desired temperature for sealing bags.
3. Adjusting Conveyor Speed and Sealing Bags
The black knob on the control panel adjusts the speed of the conveyor belt, allowing you to control the sealing rate. Feed the bags into the machine, ensuring the opening is aligned with the sealing mechanism. The machine will automatically seal and convey the bags.
Video 5: Adjusting conveyor speed and sealing bags. This video shows how to use the black knob to adjust the conveyor speed and demonstrates the process of feeding bags into the machine for sealing.
4. Counter Function
The integrated photoelectric counter automatically tracks the number of bags sealed, improving efficiency in packing operations.

Figure 3: Bags moving along the conveyor belt, illustrating the continuous sealing process and the integrated counter.
5. Printing Function
The machine is equipped with an embossing wheel and a type wheel, allowing for simultaneous printing of dates, comments, or logos during the sealing process. This feature enhances product traceability and branding.
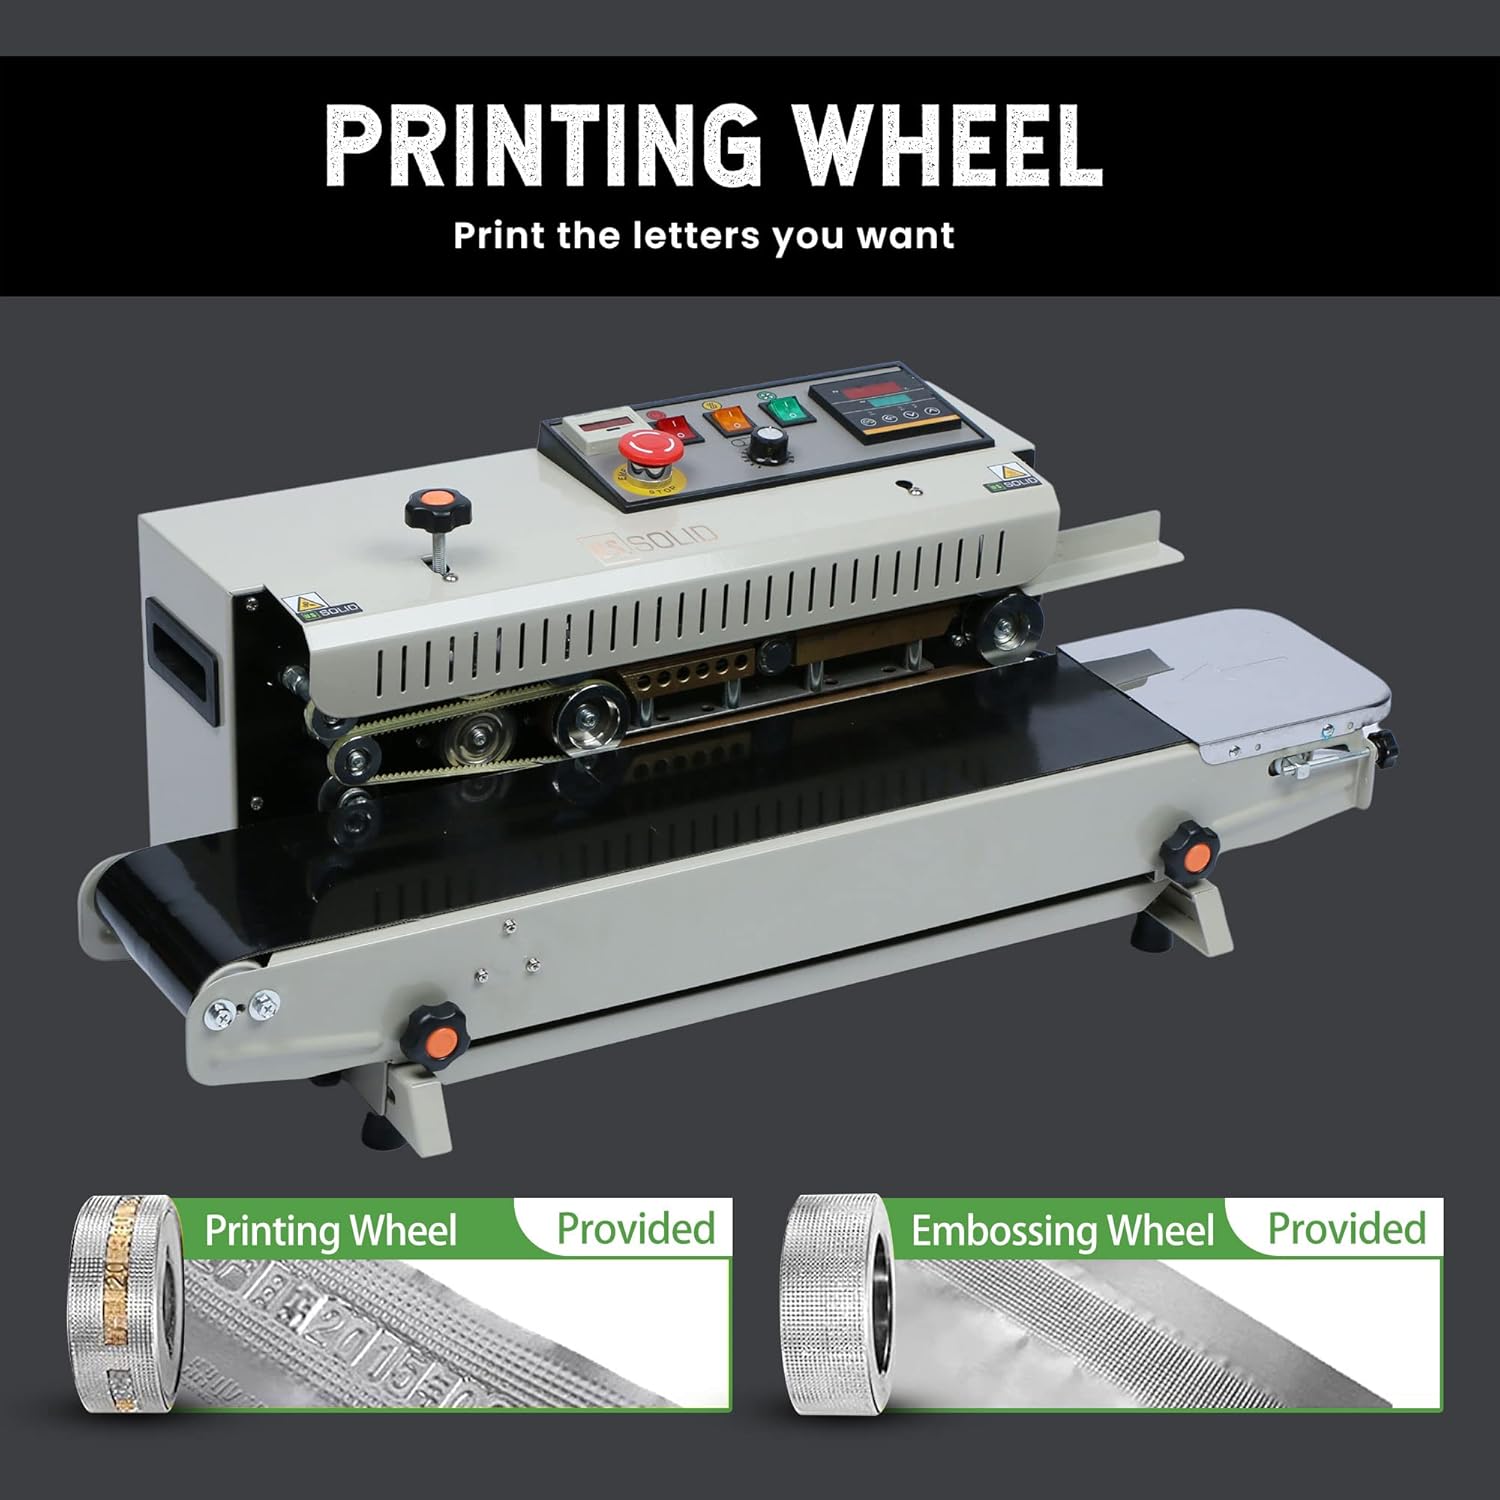
Figure 4: Close-up view of the printing wheel and embossing wheel, which are used for adding dates, comments, or logos to sealed bags.

Figure 5: A detailed view of the type wheel and an example of a sealed bag with printed information, demonstrating the machine's coding capability.
Maintenance
- Regularly inspect the conveyor belt for wear and tear. Replace if necessary.
- Clean the sealing jaws and heating elements periodically to prevent residue buildup, which can affect seal quality. Ensure the machine is unplugged and cooled before cleaning.
- Check all electrical connections for tightness and signs of damage.
- Lubricate moving parts as recommended in the full product manual (if applicable, general advice).
- Store the machine in a dry, clean environment when not in use.
Troubleshooting
| Problem | Possible Cause | Solution |
|---|---|---|
| Machine does not power on. | Power cord unplugged, emergency stop engaged, power switch off. | Check power connection, disengage emergency stop button, turn on power switch. |
| Poor seal quality (incomplete or weak seals). | Incorrect temperature setting, worn sealing belt, improper bag alignment. | Adjust temperature, inspect and replace sealing belt if worn, ensure bags are properly aligned. |
| Conveyor belt not moving. | Speed knob set too low, motor issue. | Increase speed using the black knob. If issue persists, contact support. |
Specifications
| Feature | Detail |
|---|---|
| Brand | U.S. Solid |
| Material | Metal, Copper |
| Color | White |
| Product Dimensions | 33.46"L x 15.75"W x 12"H |
| Item Weight | 36.7 Pounds |
| Power Source | AC |
| Operation Mode | Automatic |
| Wattage | 300 watts |
| Voltage | 110 Volts (AC) |
| Seal Width | 12mm (0.47in) |
| Seal Length | Unlimited |
| Speed | 0-12 M/Min |
| Maximum Bag Thickness | 0.02-0.8 mm (0.03in) |
| Temperature Range | 0-300℃ (572℉) |
| Load-Bearing Object Weight | 0-3kg |

Figure 6: Visual representation of the machine's dimensions.

Figure 7: An example of a sealed bag, highlighting the 0.47-inch seal width.

Figure 8: A comprehensive table detailing the technical specifications of the U.S. Solid Continuous Bag Band Sealer.
Applications
The U.S. Solid Continuous Bag Band Sealer is versatile and suitable for various environments requiring efficient bag sealing.


Figure 9: Examples of various environments where the continuous bag band sealer can be effectively utilized, including household, storehouse, factory, and supermarket settings.
Ask a question about this manual
Ask about setup, troubleshooting, compatibility, parts, safety, or missing instructions. Manuals+ will review the question and use this page’s manual context to help answer it.