1. Introduction
This manual provides comprehensive instructions for the installation, operation, and maintenance of your EEEONE Replacement Optical Pickup Unit, specifically designed for the Kenwood RXD-M32 CD Player. This unit is a high-quality replacement laser lens assembly intended to restore optimal CD playback functionality to your device. Please read this manual carefully before proceeding with installation or use.
2. Safety Information
Important Safety Precautions:
- Always disconnect the Kenwood RXD-M32 CD Player from the power source before attempting any installation or maintenance.
- This product contains sensitive electronic components. Handle with extreme care to avoid damage from electrostatic discharge (ESD). It is recommended to use an anti-static wrist strap during installation.
- Installation should ideally be performed by a qualified technician. Incorrect installation can damage the optical pickup unit or the CD player.
- Do not touch the laser lens surface directly with your fingers. Oils and dirt can impair performance.
- The laser diode emits invisible laser radiation. Avoid direct exposure to the beam.
3. Package Contents
Please verify that all items are present in your package:
- 1 x EEEONE Replacement Optical Pickup Unit (Laser Lens Assembly) for Kenwood RXD-M32
- (Note: Additional tools or accessories required for installation are not included.)
4. Setup and Installation
The installation of an optical pickup unit requires technical expertise and careful handling. If you are not comfortable with electronic repairs, it is highly recommended to seek professional assistance.
- Preparation:
- Ensure the Kenwood RXD-M32 CD Player is unplugged from all power sources.
- Work on a clean, static-free surface. Use an anti-static wrist strap to prevent ESD damage.
- Gather necessary tools: small Phillips head screwdrivers, soldering iron, desoldering wick/pump, tweezers.
- Accessing the CD Mechanism:
- Carefully open the casing of your Kenwood RXD-M32 CD Player according to its service manual (not provided).
- Locate the existing optical pickup unit within the CD mechanism.
- Removing the Old Unit:
- Disconnect the ribbon cable and any other connectors attached to the old optical pickup unit.
- Unscrew and carefully remove the old unit from the CD mechanism.
- Removing the Anti-Static Solder Point:
Crucial Step: Many new optical pickup units come with a protective anti-static solder point (often a small blob of solder connecting two traces or pins) to prevent ESD damage during shipping and handling. This solder point MUST be removed before installation. Failure to do so will prevent the unit from functioning correctly.
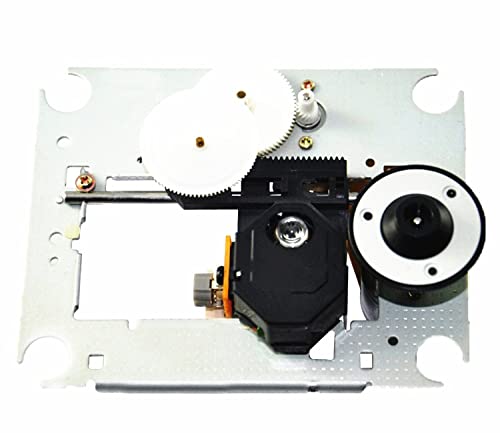
Image: EEEONE Replacement Optical Pickup Unit. This image shows the general appearance of the optical pickup unit. A small solder bridge, typically located on the flexible PCB or near the laser diode, must be carefully desoldered and removed before installation to enable proper functionality. Consult the specific unit for exact location.
- Identify the anti-static solder point. It is usually a small solder bridge on the flexible PCB or near the laser diode.
- Using a fine-tipped soldering iron and desoldering wick/pump, carefully remove this solder bridge. Ensure no solder residue remains that could short other components.
- Installing the New Unit:
- Carefully place the new EEEONE optical pickup unit into the CD mechanism.
- Secure it with the screws removed earlier.
- Reconnect the ribbon cable and any other connectors, ensuring they are seated correctly and securely.
- Reassembly and Testing:
- Before fully reassembling the CD player's casing, perform an initial test.
- Connect the CD player to power and insert a known good audio CD.
- Observe if the disc spins, the laser moves, and if the CD player can read the disc and play audio.
- If successful, disconnect power and fully reassemble the CD player.
5. Operating the Optical Pickup Unit
Once installed, the EEEONE Replacement Optical Pickup Unit operates automatically as part of your Kenwood RXD-M32 CD Player's normal functions. Its primary role is to read the data from audio CDs. No direct user interaction with the optical unit itself is required beyond the standard operation of your CD player.
- Insert an audio CD into the CD tray.
- Close the tray. The optical pickup unit will automatically seek and read the disc's table of contents.
- Use your CD player's controls to play, pause, skip tracks, etc.
6. Maintenance
The EEEONE Optical Pickup Unit is designed for long-term reliability with minimal maintenance. However, proper care can extend its lifespan and ensure optimal performance:
- Keep the CD Player Clean: Dust and debris can accumulate inside the CD player, potentially affecting the optical lens. Periodically clean the interior of the CD player with compressed air, ensuring the power is disconnected.
- Lens Cleaning (If Necessary): If you experience persistent reading errors after installation, and suspect dust on the lens, you may carefully clean the lens. Use a specialized CD/DVD lens cleaning kit or a soft, lint-free cloth lightly dampened with isopropyl alcohol. Do not use abrasive materials or excessive force.
- Handle CDs Carefully: Always handle CDs by their edges to avoid fingerprints and scratches, which can cause reading errors and strain the optical pickup unit.
7. Troubleshooting
If you encounter issues after installing the EEEONE Replacement Optical Pickup Unit, consider the following:
| Problem | Possible Cause | Solution |
|---|---|---|
| CD player does not recognize discs or shows "NO DISC". |
|
|
| Disc skips or audio stutters. |
|
|
| CD player makes unusual noises. |
|
|
If problems persist after attempting these solutions, it may indicate a more complex issue with the CD player itself or an incorrect installation. Consider consulting a professional repair service.
8. Specifications
- Product Type: Replacement Optical Pickup Unit / Laser Lens Assembly
- Compatibility: Kenwood RXD-M32 CD Player
- Brand: EEEONE
- Model: RXD-M32
- Item Weight: 233 Grams
- Manufacturer: Gomost
9. Warranty and Support
For warranty information and technical support regarding your EEEONE Replacement Optical Pickup Unit, please refer to the seller or manufacturer's specific policies at the point of purchase. Keep your purchase receipt as proof of purchase.
If you require further assistance with installation or troubleshooting that is not covered in this manual, please contact the seller or a qualified electronics repair technician.