Philips DST7511/80
Philips DST7511/80 Steam Iron User Manual
Model: DST7511/80
1. Introduction
Thank you for choosing the Philips DST7511/80 Steam Iron. This manual provides essential information for the safe and effective use, maintenance, and troubleshooting of your appliance. Please read these instructions carefully before first use and retain them for future reference.
2. Important Safety Information
Always follow basic safety precautions when using electrical appliances to reduce the risk of fire, electric shock, and personal injury.
- Ensure the voltage indicated on the iron corresponds to your local mains voltage before connecting.
- Do not leave the iron unattended while it is connected to the mains or while it is still hot.
- Keep the iron and its cord out of reach of children.
- Never immerse the iron in water or any other liquid.
- Do not use the iron if the plug, the mains cord, or the iron itself shows visible damage, or if the iron has been dropped.
- Always place the iron on a stable, heat-resistant surface when resting.
- Unplug the iron from the electrical outlet before filling with water, emptying, cleaning, or when not in use.
- Use the iron only for its intended household purpose.
3. Product Overview
Familiarize yourself with the components of your Philips DST7511/80 Steam Iron.

Figure 1: Side view of the Philips DST7511/80 Steam Iron, showcasing its ergonomic design and water tank.
- A. Water Spray Nozzle: For moistening stubborn creases.
- B. Water Filling Inlet: Where water is added to the tank.
- C. Steam Control Slider: Adjusts steam output or selects dry ironing.
- D. Spray Button: Activates the water spray function.
- E. Steam Boost Button: Delivers an extra burst of steam.
- F. Temperature Dial: Selects the appropriate temperature for different fabrics.
- G. Indicator Light: Illuminates when the iron is heating up and turns off when the set temperature is reached.
- H. 360° Swivel Cord: Provides flexibility and prevents tangling during use.
- I. Soleplate: The heated surface that glides over fabrics. This model features a Philips SteamGlide Elite soleplate.
- J. Water Tank: Holds water for steam generation, with a 300 ml capacity.

Figure 2: Top view of the iron, highlighting the control buttons and temperature dial.
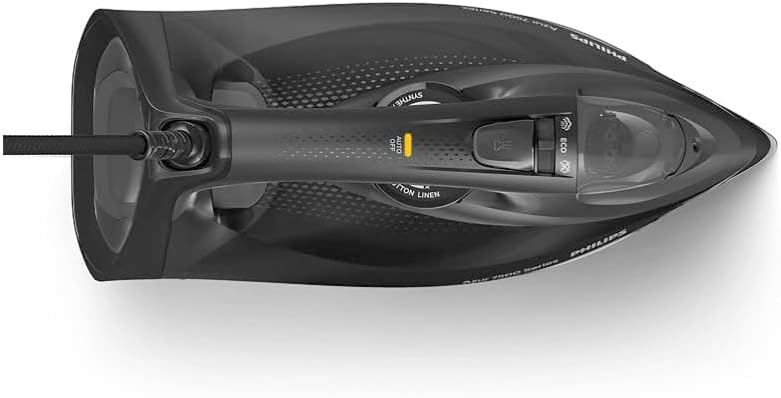
Figure 3: The Philips SteamGlide Elite soleplate, designed for smooth gliding and efficient steam distribution.
4. Setup
4.1 Before First Use
Remove any stickers or protective foil from the soleplate. It is recommended to iron an old piece of fabric first to remove any manufacturing residues from the soleplate.
4.2 Filling the Water Tank
Always unplug the iron before filling the water tank.
- Ensure the steam control slider is set to the 'Dry Ironing' position (no steam).
- Open the water filling inlet cover.
- Hold the iron in a slightly tilted position and fill the water tank with tap water up to the 'MAX' indication. Do not overfill.
- Close the water filling inlet cover securely.

Figure 4: Demonstrating the correct method for filling the water tank of the iron.

Figure 5: A closer view of the water filling inlet, showing the 'MAX' fill line.
5. Operating the Iron
5.1 Powering On and Temperature Selection
- Place the iron on its heel rest on a stable, heat-resistant surface.
- Plug the mains cord into a grounded wall socket. The indicator light will illuminate.
- Turn the temperature dial to the setting appropriate for your fabric type. Refer to the garment care label.
- Wait for the indicator light to turn off, indicating the iron has reached the selected temperature.
5.2 Steam Ironing
Steam ironing is suitable for garments that can withstand high temperatures. Ensure the water tank is filled.

Figure 6: Illustrative diagram showing the internal steam generation process within the iron.
- Set the temperature dial to the steam ironing range (typically 3 dots or 'MAX').
- Once the indicator light turns off, slide the steam control slider to the desired steam setting. The iron provides a continuous steam output of 55 g/min.
- For stubborn creases, press the steam boost button for an extra powerful burst of steam.
5.3 Dry Ironing
For delicate fabrics or when steam is not desired:
- Ensure the water tank is empty or the steam control slider is set to the 'Dry Ironing' position.
- Set the temperature dial according to the fabric type.
- Proceed with ironing as usual.
5.4 Spray Function
Use the spray function to moisten fabrics and help remove stubborn wrinkles.
- Ensure the water tank is filled.
- Point the iron at the garment and press the spray button.
5.5 Automatic Shut-off
For safety and energy saving, the iron is equipped with an automatic shut-off feature. If left stationary on its soleplate for 30 seconds or on its heel rest for 8 minutes, the iron will automatically turn off. The indicator light will flash to signal this. To restart, simply move the iron.
6. Maintenance
6.1 Cleaning the Iron
Always unplug the iron and allow it to cool down completely before cleaning.
- Soleplate: Wipe the soleplate with a damp cloth and a non-abrasive cleaner if necessary. Do not use abrasive scouring pads or harsh cleaners as they can damage the soleplate.
- Housing: Wipe the housing with a damp cloth.
- Water Tank: Empty the water tank after each use to prevent mineral buildup.
6.2 Descaling (Calc-Clean Function)
To maintain optimal steam performance and prolong the life of your iron, perform the Calc-Clean function regularly, especially in hard water areas. Refer to your iron's specific instructions for the Calc-Clean procedure, typically involving filling the tank, heating the iron, and then activating a self-clean function over a sink.
6.3 Storage
After use, unplug the iron and allow it to cool down completely. Empty the water tank. Store the iron on its heel rest in a dry, safe place.
7. Troubleshooting
If you encounter problems with your iron, consult the following table before contacting customer support.
| Problem | Possible Cause | Solution |
|---|---|---|
| Iron does not heat up. | Not plugged in; power outlet faulty; automatic shut-off activated. | Check plug connection; try another outlet; move the iron to reactivate. |
| No steam or insufficient steam. | Water tank empty; temperature too low; steam control set to 'Dry'; calc buildup. | Fill water tank; set temperature to steam range; move steam control to steam setting; perform Calc-Clean. |
| Water drips from soleplate. | Temperature too low for steam; anti-drip system working. | Set higher temperature for steam; this is normal for the anti-drip system at low temperatures. |
| Brown stains on fabric. | Mineral deposits in water tank; fabric not clean. | Perform Calc-Clean; ensure garments are clean before ironing. |
8. Specifications
| Feature | Detail |
|---|---|
| Brand | Philips |
| Model Number | DST7511/80 |
| Color | Black |
| Water Tank Capacity | 300 ml |
| Continuous Steam Output | 55 g/min |
| Cable Length | 2 m |
| Voltage | 240V |
| Soleplate Material | SteamGlide Elite |
| Weight | Approx. 1.67 kg |
| Special Features | Anti-drip, Automatic Shut-off, 360° Swivel Cord, Indicator Light |
9. Warranty and Support
This Philips appliance comes with a standard manufacturer's warranty. For detailed warranty terms and conditions, please refer to the warranty card included with your product or visit the official Philips website. For technical support, spare parts, or service, please contact Philips customer care in your region. You can find contact information on the Philips website or in the documentation provided with your iron.
Ask a question about this manual
Ask about setup, troubleshooting, compatibility, parts, safety, or missing instructions. Manuals+ will review the question and use this page’s manual context to help answer it.