1. Introduction
The Dr. Senst Pulsoximeter YK-80B is a portable, non-invasive device intended for spot-checking of oxygen saturation of arterial hemoglobin (SpO2) and pulse rate (PR) in adults and pediatric patients at home or in medical facilities. It is designed for ease of use and provides quick, reliable measurements.

Figure 1: Dr. Senst Pulsoximeter YK-80B. This image shows the compact, white and black design of the pulse oximeter with its digital display showing readings.
2. Safety Information
Please read all safety information carefully before using the device.
- Do not use the pulse oximeter in an MRI or CT environment.
- Do not use the device in situations requiring continuous monitoring.
- Keep the device away from young children. Small parts may pose a choking hazard.
- Avoid exposing the device to direct sunlight, high temperatures, or moisture.
- Do not use the device if it appears damaged.
- Consult a medical professional for interpretation of results. This device is for informational purposes and not a substitute for medical advice.
3. Product Overview
Familiarize yourself with the components of your Dr. Senst Pulsoximeter YK-80B.
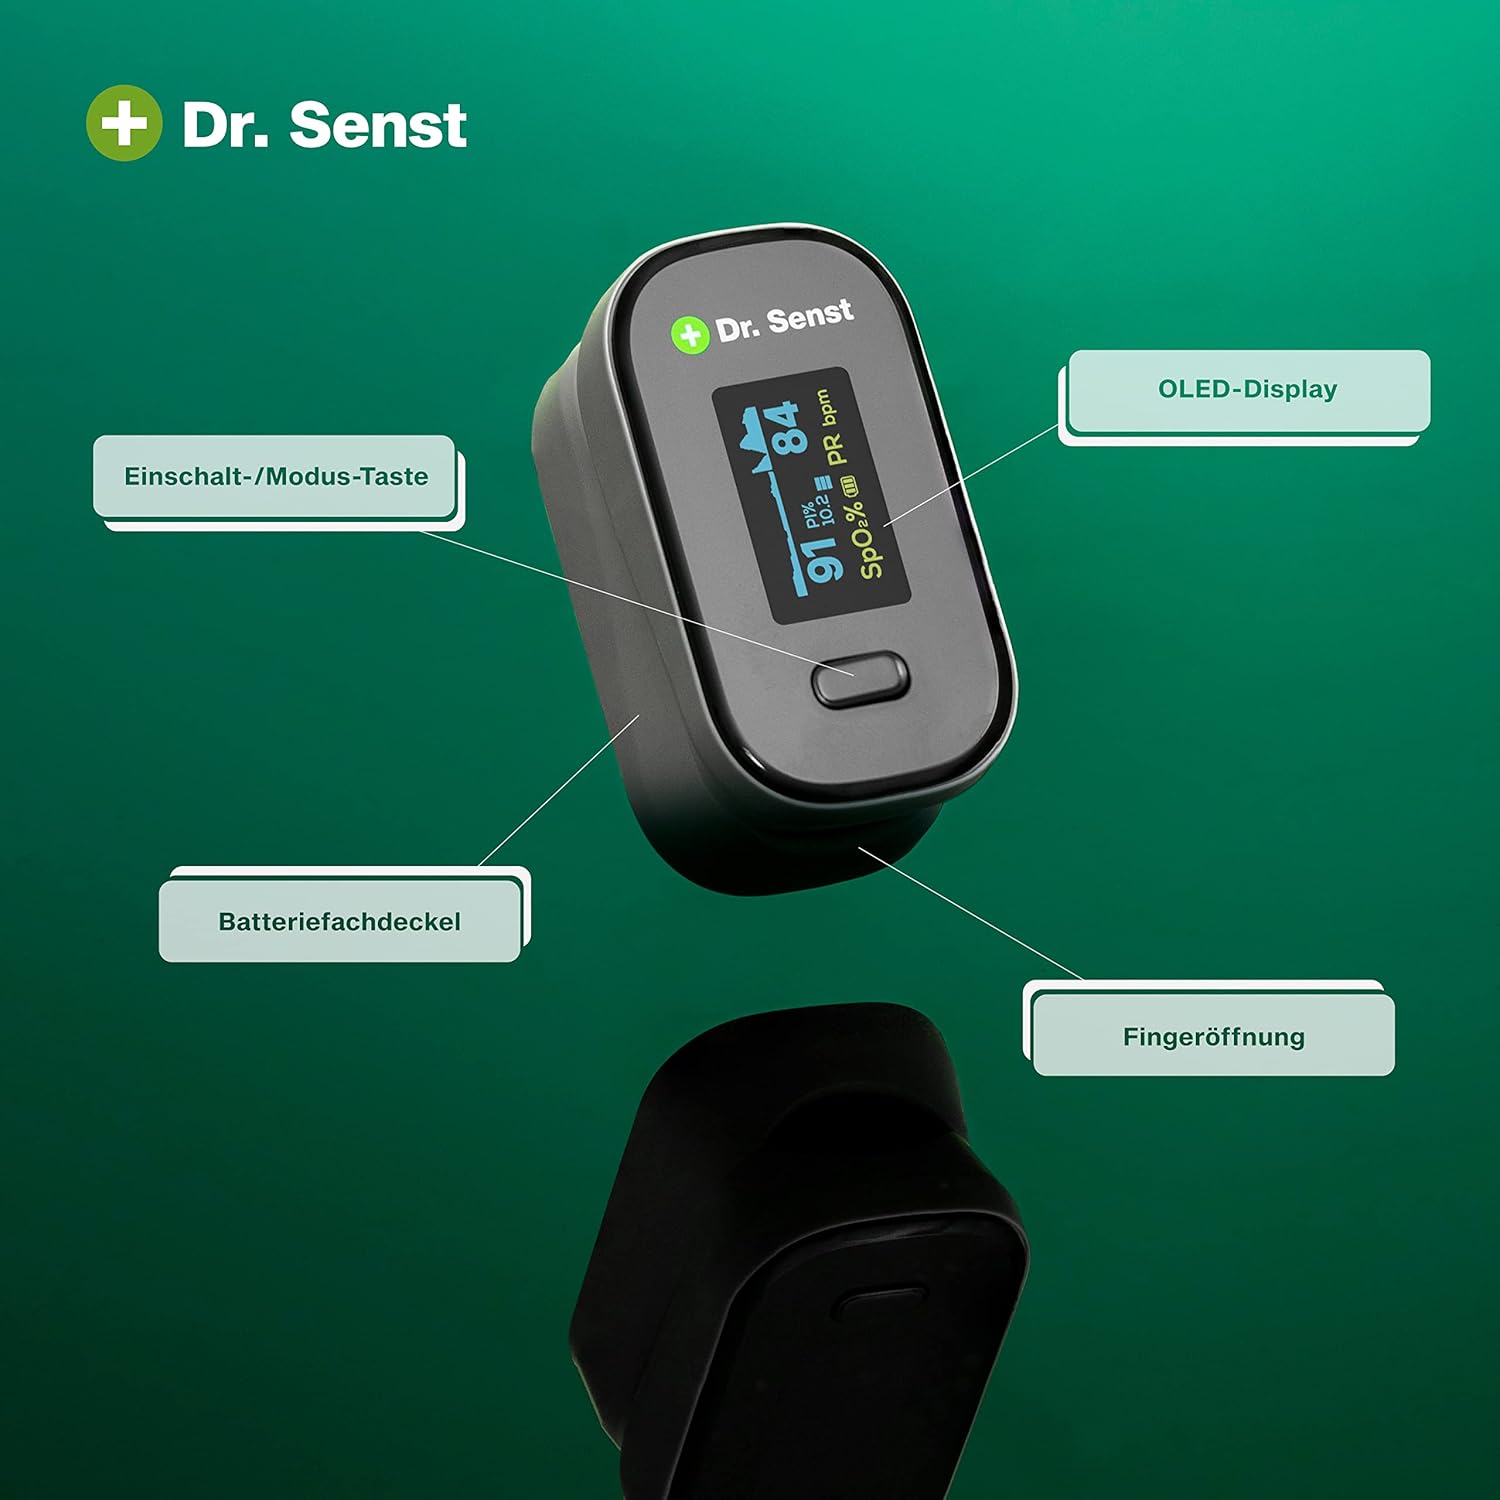
Figure 2: Labeled components of the Dr. Senst Pulsoximeter YK-80B. This image highlights the OLED-Display, Power/Mode Button, Battery Compartment Cover, and Finger Opening.

Figure 3: Display elements and dimensions of the Dr. Senst Pulsoximeter YK-80B. This image shows the device's compact size (58mm x 32mm) and points out the Oxygen Saturation (SpO2), Perfusion Index (PI), and Pulse Rate (PR) indicators on the display.
Key Components:
- OLED-Display: Shows SpO2, Pulse Rate, Perfusion Index (PI), and battery level.
- Power/Mode Button: Used to turn the device on/off and change display modes.
- Finger Opening: Where the finger is inserted for measurement.
- Battery Compartment: Located at the back for battery insertion.
4. Setup
Battery Installation:
The device requires 2 AAA batteries (included).
- Open the battery compartment cover on the back of the device.
- Insert the two AAA batteries according to the polarity indicators (+/-) inside the compartment.
- Close the battery compartment cover securely.
5. Operating Instructions
Taking a Measurement:
- Ensure your finger is clean and free of nail polish or artificial nails.
- Open the clamp of the pulse oximeter.
- Insert one of your fingers (preferably the index or middle finger) into the finger opening until it touches the stop.
- Release the clamp, ensuring the finger is comfortably in place.
- Press the Power/Mode button to turn on the device.
- Keep your hand still during the measurement. Readings will appear on the display within a few seconds.
- The device will automatically turn off after approximately 8 seconds of inactivity.

Figure 4: Demonstrating quick and reliable results. This image shows a hand with the pulse oximeter attached to a finger, indicating ease of use for obtaining readings.

Figure 5: Illustrating precise and painless measurement. This image shows a person's hand with the pulse oximeter on a finger, emphasizing the comfortable and accurate measurement process.

Figure 6: Ideal for measurement at home or in the workplace. This image depicts the pulse oximeter being used in both a home setting (on a bed) and a desk setting, highlighting its versatility.
Display Information:
- SpO2 (%): Oxygen Saturation level. Normal range is typically 95-100%.
- PR (bpm): Pulse Rate in beats per minute.
- PI (%): Perfusion Index, indicating the strength of the pulse signal.
- Battery Indicator: Shows remaining battery life.
6. Maintenance
Cleaning:
- Clean the surface of the device with a soft cloth dampened with a mild disinfectant (e.g., 70% isopropyl alcohol).
- Do not immerse the device in water or any cleaning solution.
- Ensure the device is completely dry before reuse.
Storage:
- Store the device in a cool, dry place, away from direct sunlight and extreme temperatures.
- If the device will not be used for an extended period, remove the batteries to prevent leakage.
7. Troubleshooting
| Problem | Possible Cause | Solution |
|---|---|---|
| Device does not turn on | Low or dead batteries; Incorrect battery installation | Replace batteries; Check battery polarity |
| Inaccurate readings | Finger not inserted correctly; Movement during measurement; Nail polish/artificial nails; Cold fingers | Reinsert finger; Remain still; Remove nail polish; Warm hands |
Display shows "---
Ask a question about this manualAsk about setup, troubleshooting, compatibility, parts, safety, or missing instructions. Manuals+ will review the question and use this page’s manual context to help answer it. |