1. Introduction
This manual provides detailed instructions for the installation, operation, and maintenance of your JUBEST 60" Bifold Door Hardware. This kit is designed for 4-panel folding doors, each 15" wide, suitable for various interior spaces such as bedrooms, bathrooms, storerooms, closets, and living rooms. The hardware features a top-mounted system with upgraded 3-wheel ball-bearing hangers for smooth and quiet operation, and a precision extruded aluminum box track for durability.
2. Safety Information
Please read and understand all instructions before beginning installation. Failure to follow these instructions may result in injury or product damage. Keep this manual for future reference.
- Always wear appropriate personal protective equipment, including safety glasses, during installation.
- Ensure all measurements are accurate before cutting or drilling. Incorrect measurements can lead to improper fit and function.
- Use the correct tools for each step as specified in the instructions.
- Exercise caution when handling door panels, especially heavy ones. Seek assistance if needed to prevent injury.
- Verify that the mounting surface (e.g., door frame, header) is structurally sound and capable of supporting the weight of the doors and hardware.
- Keep children and pets away from the work area during installation.
3. Package Contents
Verify that all components listed below are present and undamaged before starting installation. If any parts are missing or damaged, please contact customer service.
- Aluminum Track x 1
- Top Pivot Set x 2
- 3-wheel ball-bearing Hanger x 2
- Panel Hinges x 6
- Bottom Pivot Set x 2
- Track Stop x 2
- Door Knob x 2
- Panel Aligners (for 4-door sets) x 2
- Wrench & Instructions x 1
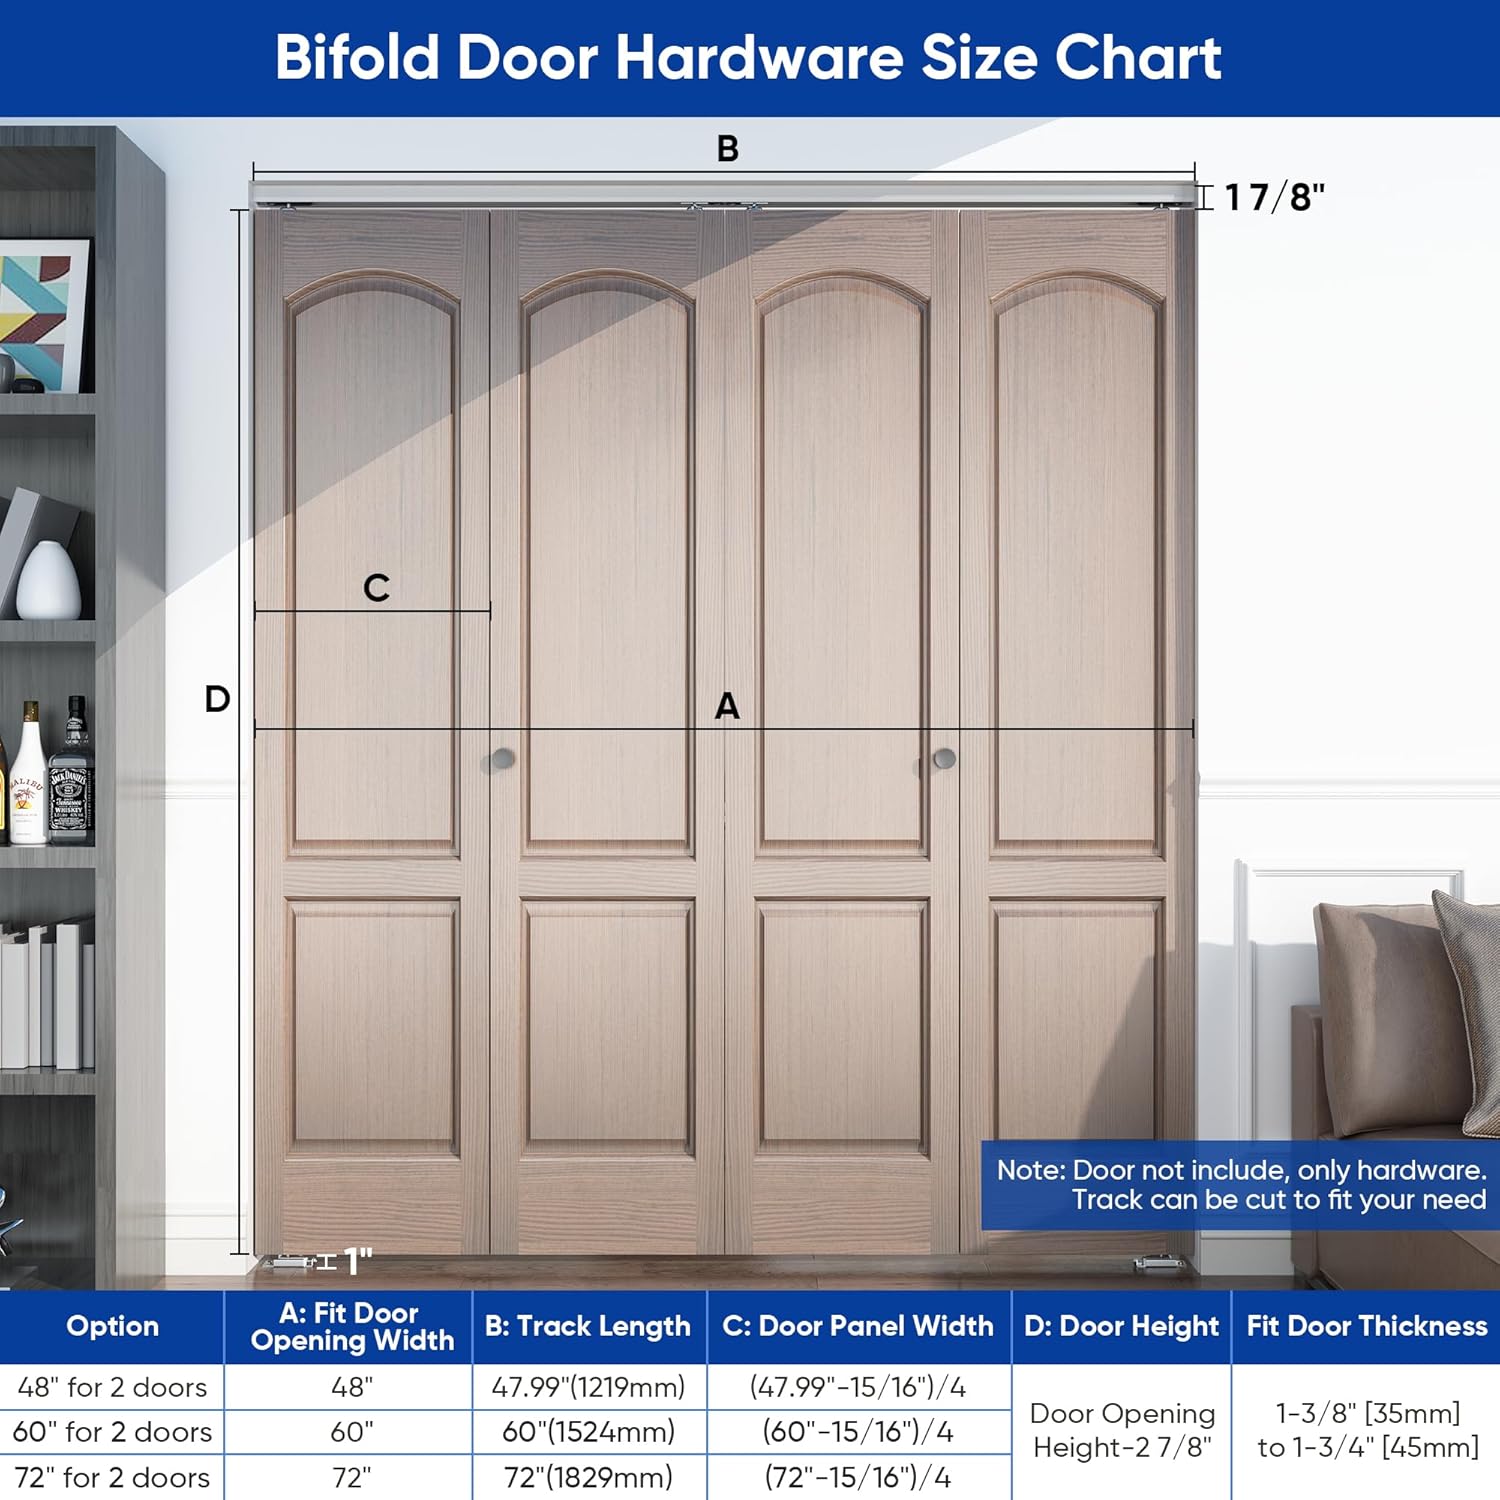
Image: All components included in the JUBEST 60" Bifold Door Hardware kit.
4. Specifications
| Feature | Detail |
|---|---|
| Brand | JUBEST |
| Model | 60" for 4 doors |
| Track Length | 60 inches (1524mm) |
| Fit Door Width (Each Panel) | 15 inches |
| Max Door Weight | Up to 300 lbs (75 lbs per panel) |
| Fit Door Thickness | 1-3/8" [35mm] to 1-3/4" [45mm] |
| Finished Height Calculation | Door height + 2-7/8" |
| Material | Aluminum (Track), Steel (Hangers, Pivots), Plastic (Knobs, Aligners) |
| Color | Silver (Hardware) |
| Item Weight | 6.5 Pounds |
| Required Assembly | Yes |

Image: Detailed dimensions for various hardware components.

Image: Bifold Door Hardware Size Chart, illustrating track length, door panel width, and finished height calculation. Note: Track can be cut to fit specific needs.
5. Setup & Installation
This section guides you through the installation of the JUBEST bifold door hardware. Accurate measurements and careful execution are crucial for proper function.
5.1. Pre-Installation Checks
- Door Preparation: Ensure your door panels are the correct width (15" each) and thickness (1-3/8" to 1-3/4"). If necessary, trim doors to achieve the desired finished height, accounting for the hardware (door height + 2-7/8").
- Opening Clearance: Verify sufficient clearance for door swing. The system requires adequate space for the doors to fold and open without obstruction.
- Track Customization: The 60" aluminum track can be cut to a shorter length if required for your specific opening. Use appropriate tools for a clean cut.
5.2. Step-by-Step Installation
- Install Pivot Plates on Door Panels:
Attach the top and bottom pivot plates to the door panels as shown in the diagram. Ensure the tabs on the pivot plates open towards the rear of the door opening. Use a 1/8" (3mm) pilot hole for screws to prevent stripping, especially in harder wood. Be precise with measurements (e.g., 15/32" or 3/4" from the edge) to ensure proper alignment.
Video: Installation of pivot plates on door panels. This video demonstrates the correct placement and attachment of pivot plates to the top and bottom edges of the door panels, highlighting the orientation of the tabs.
- Attach Hinges:
Connect the door panels using the provided panel hinges. Ensure hinges are installed securely and allow for smooth folding action. For a 4-door setup, you will connect two pairs of doors.
- Install 3-Wheel Ball-Bearing Hangers:
Mount the 3-wheel ball-bearing hangers to the top edge of the appropriate door panels. These hangers are designed to distribute door weight evenly and ensure smooth, quiet operation within the track.

Image: Close-up view of the upgraded 3-wheel ball-bearing hanger, designed for smooth and quiet door movement.
- Mount Aluminum Track:
Secure the aluminum track to the top of your door frame or header. The precision extruded box track protects against dust and dirt, ensuring flexible and free rolling. Use appropriate fasteners for your wall material. Ensure the track is level and securely mounted.

Image: The aluminum track installed above a closet opening, with bifold doors partially open, showcasing the top-mounted system.
- Hang Doors:
Carefully lift and insert the top pivot pin into the wide hole of the track, then slide it into the smaller slot. Simultaneously, engage the bottom pivot pin into the floor-mounted pivot bracket. Push the plastic flange to secure the top pin. This step may require angling the door panels. Adjust the top and bottom pivot points after installation to achieve optimal alignment and smooth action.
- Install Track Stops and Panel Aligners:
Position and secure the track stops at the ends of the track to prevent doors from over-traveling. Install panel aligners (for 4-door sets) to ensure panels remain properly aligned when closed.
- Attach Door Knobs:
Install the door knobs onto the appropriate door panels for easy opening and closing.
- Final Adjustments:
Once all doors are hung, make final adjustments to the top and bottom pivot points to ensure the doors are plumb, level, and operate smoothly without binding. Lubricate the top track with white grease for enhanced performance.
6. Operating Instructions
To open the bifold doors, gently pull the door knob. The panels will fold inward and slide along the top track. To close, push the door panels back into position until they are fully extended and aligned. The 3-wheel ball-bearing hangers ensure a smooth and quiet operation.

Image: Comparison of bifold doors in open and closed positions, demonstrating smooth sliding and quiet operation.
7. Maintenance
- Cleaning: Wipe the aluminum track and hardware components with a soft, damp cloth to remove dust and debris. Avoid abrasive cleaners that could damage the finish.
- Lubrication: Periodically apply a small amount of white lithium grease or silicone spray to the top track and the ball bearings of the hangers to ensure continued smooth operation.
- Inspection: Regularly check all screws and fasteners to ensure they are tight. Over time, vibrations from door use can loosen connections. Inspect hinges and pivot points for wear and tear.
8. Troubleshooting
| Problem | Possible Cause | Solution |
|---|---|---|
| Doors do not slide smoothly or bind. | Track is dirty, hangers need lubrication, or doors are misaligned. | Clean the track, apply lubricant to hangers and track. Adjust top and bottom pivot points to correct alignment. |
| Doors do not close completely or leave a gap. | Misalignment of pivot points or track stops. | Adjust the top and bottom pivot points to ensure doors are plumb and meet correctly. Verify track stops are correctly positioned. |
| Screws strip out during installation. | Pilot holes too small or excessive torque applied. | Ensure pilot holes are the correct size (1/8" or 3mm). Use a hand screwdriver or a drill with a clutch set to a low torque setting. Replace stripped screws with higher quality alternatives if necessary. |
| Lower pivot pin comes loose. | Improper seating or insufficient securing. | Re-seat the lower pivot pin firmly. Ensure any locking mechanisms are engaged. If the metal is deformed, it may need to be reshaped or the part replaced. |
9. Warranty & Support
JUBEST is committed to providing quality products. For any quality problems, missing parts, or installation issues, please contact our professional customer service team. They are available to assist you with any concerns regarding your bifold door hardware.
Please retain your proof of purchase for warranty claims. Specific warranty duration and terms may vary; refer to your purchase documentation or contact customer support for details.


