
1. Introduction
This manual provides detailed instructions for the assembly, operation, and maintenance of your JOYJOM MATX Case. This compact PC case is designed to support Micro ATX, DTX, and ITX motherboards, offering versatility for various small form factor builds. Please read this manual thoroughly before beginning installation to ensure proper setup and functionality.
2. Product Overview
The JOYJOM MATX Case is a 7.3L compact enclosure crafted from 0.8mm SPCC alloy steel, designed for both vertical and horizontal placement. It features a minimalist aesthetic with ample ventilation for efficient cooling.
Key Features:
- Supports Micro ATX (24.4x24.4cm), DTX, and ITX (17x17cm) motherboards.
- Compatible with FLEX-Small 1U Power Supplies (15x4x8cm).
- Accommodates Half-Height Graphics Cards (without HDD).
- Storage options: 2x 2.5-inch SSDs or 1x 3.5-inch SSD (if no graphics card is installed).
- CPU Cooler clearance: 63mm-73mm (depending on SSD configuration).
- Front Panel Interface: 2x USB 3.0, 2x USB 2.0, HD Audio, Power Button.
Dimensions:
The case measures approximately 10.32 inches (D) x 3.62 inches (W) x 11.93 inches (H) (262mm D x 92mm W x 303mm H).

Figure 2.1: JOYJOM MATX Case with dimensions shown in vertical orientation.

Figure 2.2: Front panel of the JOYJOM MATX Case displaying USB ports, audio jacks, and power button.
3. Package Contents
Upon unpacking, please verify that all components are present:
- 1x JOYJOM MATX Case
- Assorted Screws for component installation
4. Setup Guide
Follow these steps to assemble your PC within the JOYJOM MATX Case.
4.1. Preparing the Case
Carefully remove the side panel(s) of the case to access the interior for component installation. The case is designed for easy access to internal components.
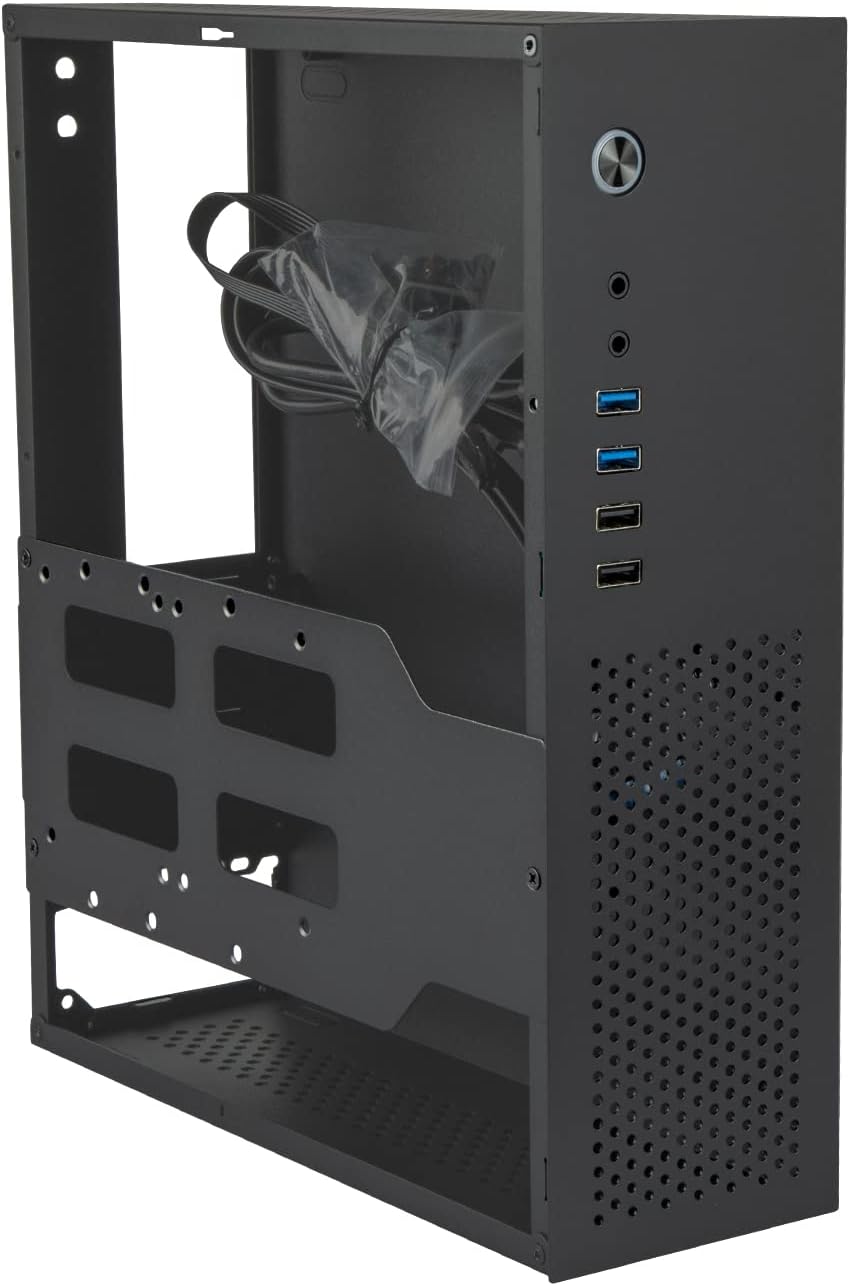
Figure 4.1: Internal view of the JOYJOM MATX Case with side panel removed.
4.2. Motherboard Installation
- Install the CPU, CPU cooler (if applicable), and RAM onto your Micro ATX or ITX motherboard before placing it into the case.
- Align the motherboard with the standoffs inside the case.
- Secure the motherboard using the provided screws.
4.3. Power Supply Installation
This case supports FLEX-Small 1U Power Supplies (15x4x8cm). Install the power supply into its designated bay, typically at the rear of the case, and secure it with screws. Connect the necessary power cables to your motherboard and other components.
Video 4.1: Overview of the JOYJOM MATX Case, demonstrating its internal layout and compatibility with ITX/MATX motherboards and low-profile graphics cards. This video provides visual guidance for component placement, including the power supply area.
4.4. Storage Device Installation
The case supports either two 2.5-inch SSDs or one 3.5-inch SSD. Note that installing a 3.5-inch HDD may limit space for a graphics card.
- Locate the drive mounting bracket inside the case.
- Attach your SSD(s) or HDD to the bracket using the appropriate screws.
- Secure the bracket back into the case.

Figure 4.2: Internal view showing the designated mounting areas for 2.5-inch SSDs and 3.5-inch HDDs.
4.5. Graphics Card Installation
This case is designed for Half-Height Graphics Cards. If you plan to install a graphics card, ensure it is a half-height model to fit within the case's dimensions. Installing a graphics card may require sacrificing the 3.5-inch HDD bay.
- Remove the necessary PCIe slot covers from the rear of the case.
- Insert the graphics card into the appropriate PCIe slot on your motherboard.
- Secure the graphics card with screws.
4.6. CPU Cooler Installation
Ensure your CPU cooler's height is within the specified range of 63mm-73mm, depending on your SSD configuration, to allow the side panel to close properly.
4.7. Front Panel Connections
Connect the front panel cables (USB 3.0, USB 2.0, HD Audio, Power Button) to their corresponding headers on your motherboard. Refer to your motherboard manual for specific header locations.
5. Operating Instructions
Once all components are installed and secured, replace the side panel(s).
- Connect your monitor, keyboard, mouse, and power cable to the PC.
- Press the power button on the front panel to start your system.
Placement Options:
The JOYJOM MATX Case supports both vertical and horizontal placement. Choose the orientation that best suits your setup and space requirements.

Figure 5.1: JOYJOM MATX Case in horizontal placement.

Figure 5.2: JOYJOM MATX Case integrated into a desktop setup, placed horizontally beneath a monitor.
6. Maintenance
Regular maintenance helps ensure the longevity and optimal performance of your PC case.
- Cleaning: Use a soft, dry cloth to wipe down the exterior of the case. For dust accumulation inside, use compressed air to gently clear vents and components. Ensure the PC is powered off and unplugged before cleaning.
- Airflow: The case features perforated panels for airflow. Ensure these vents are not obstructed to maintain proper cooling.
- Material: The case body is made of 0.8mm SPCC alloy steel. Avoid using harsh chemicals or abrasive materials that could damage the finish.
7. Troubleshooting
If you encounter issues during or after assembly, consider the following:
- System Not Powering On: Double-check all power connections, including the power supply to the wall outlet, the power supply to the motherboard, and the front panel power button cable to the motherboard header.
- Components Not Fitting: Verify that all components, especially the motherboard (Micro ATX, DTX, ITX), power supply (FLEX-Small 1U), graphics card (Half-Height), and CPU cooler (63mm-73mm height), adhere to the case's compatibility specifications.
- Overheating: Ensure proper airflow by checking that all vents are clear and that any installed fans are functioning correctly. Confirm the CPU cooler is adequately seated.
- Front Panel Ports Not Working: Recheck the connections of the front panel USB and audio cables to the motherboard headers.
8. Specifications
| Feature | Specification |
|---|---|
| Brand | JOYJOM |
| Model Name | MATX Case |
| Case Type | Desktop |
| Motherboard Compatibility | Micro ATX, DTX, ITX |
| Material | 0.8mm SPCC Alloy Steel |
| Product Dimensions (D x W x H) | 10.32" x 3.62" x 11.93" (262mm x 92mm x 303mm) |
| Power Supply Mounting Type | Rear Mount (FLEX-Small 1U) |
| Cooling Method | Air |
| Internal Bays Quantity | 3 (2x 2.5" SSD or 1x 3.5" HDD) |
| Front Panel USB 3.0 Ports | 2 |
| Front Panel USB 2.0 Ports | 2 |
| Other Special Features | Supports Half-Height GPU, Vertical/Horizontal Placement |
9. Warranty Information
Warranty information for your JOYJOM MATX Case is typically provided with your purchase documentation or can be found on the official JOYJOM website. Please retain your proof of purchase for warranty claims.
10. Support
For further assistance, technical support, or to view additional products, please visit the official JOYJOM store on Amazon: JOYJOM Amazon Store.