Spolehli B0BY1PMML7
Spolehli Compact Lithium-Powered Digital Scoreboard User Manual
Model: B0BY1PMML7
1. Introduction
Thank you for choosing the Spolehli Compact Lithium-Powered Digital Scoreboard. This manual provides detailed instructions for the safe and efficient operation, setup, and maintenance of your new scoreboard. Please read this manual thoroughly before use and retain it for future reference.
This digital scoreboard is designed for various sports, school events, and family games, offering clear visibility, portability, and user-friendly controls.
2. Safety Information
- Do not expose the scoreboard to extreme temperatures, direct sunlight for prolonged periods, or high humidity.
- Keep the device away from water and other liquids.
- Use only the provided charging cable and adapter. Do not use fast charge cables or connect to a computer for charging, as this may damage the battery or device.
- Do not attempt to disassemble or modify the scoreboard. Repairs should only be performed by qualified personnel.
- Ensure proper ventilation when charging.
- Keep out of reach of children.
- Dispose of batteries according to local regulations.
3. Package Contents
Please check the package for the following items:
- Digital Scoreboard
- Remote Control
- Battery Pack (contains 3 rechargeable lithium batteries)
- Battery Charging Head (Power Adapter)
- Battery Charging Cable (Type-C)
- Desktop Mounting Plate
- Wall & Table Mounting Screws
- Professional Instruction Manual
- Portable Packaging Carton Box with Carrying Handle

Figure 3.1: All items included in the package.
4. Product Overview
The Spolehli Digital Scoreboard features a clear LED display, compact design, and multiple functions for various sports. It includes a countdown timer, score displays for Home and Guest, period indicator, possession arrows, and bonus indicators.
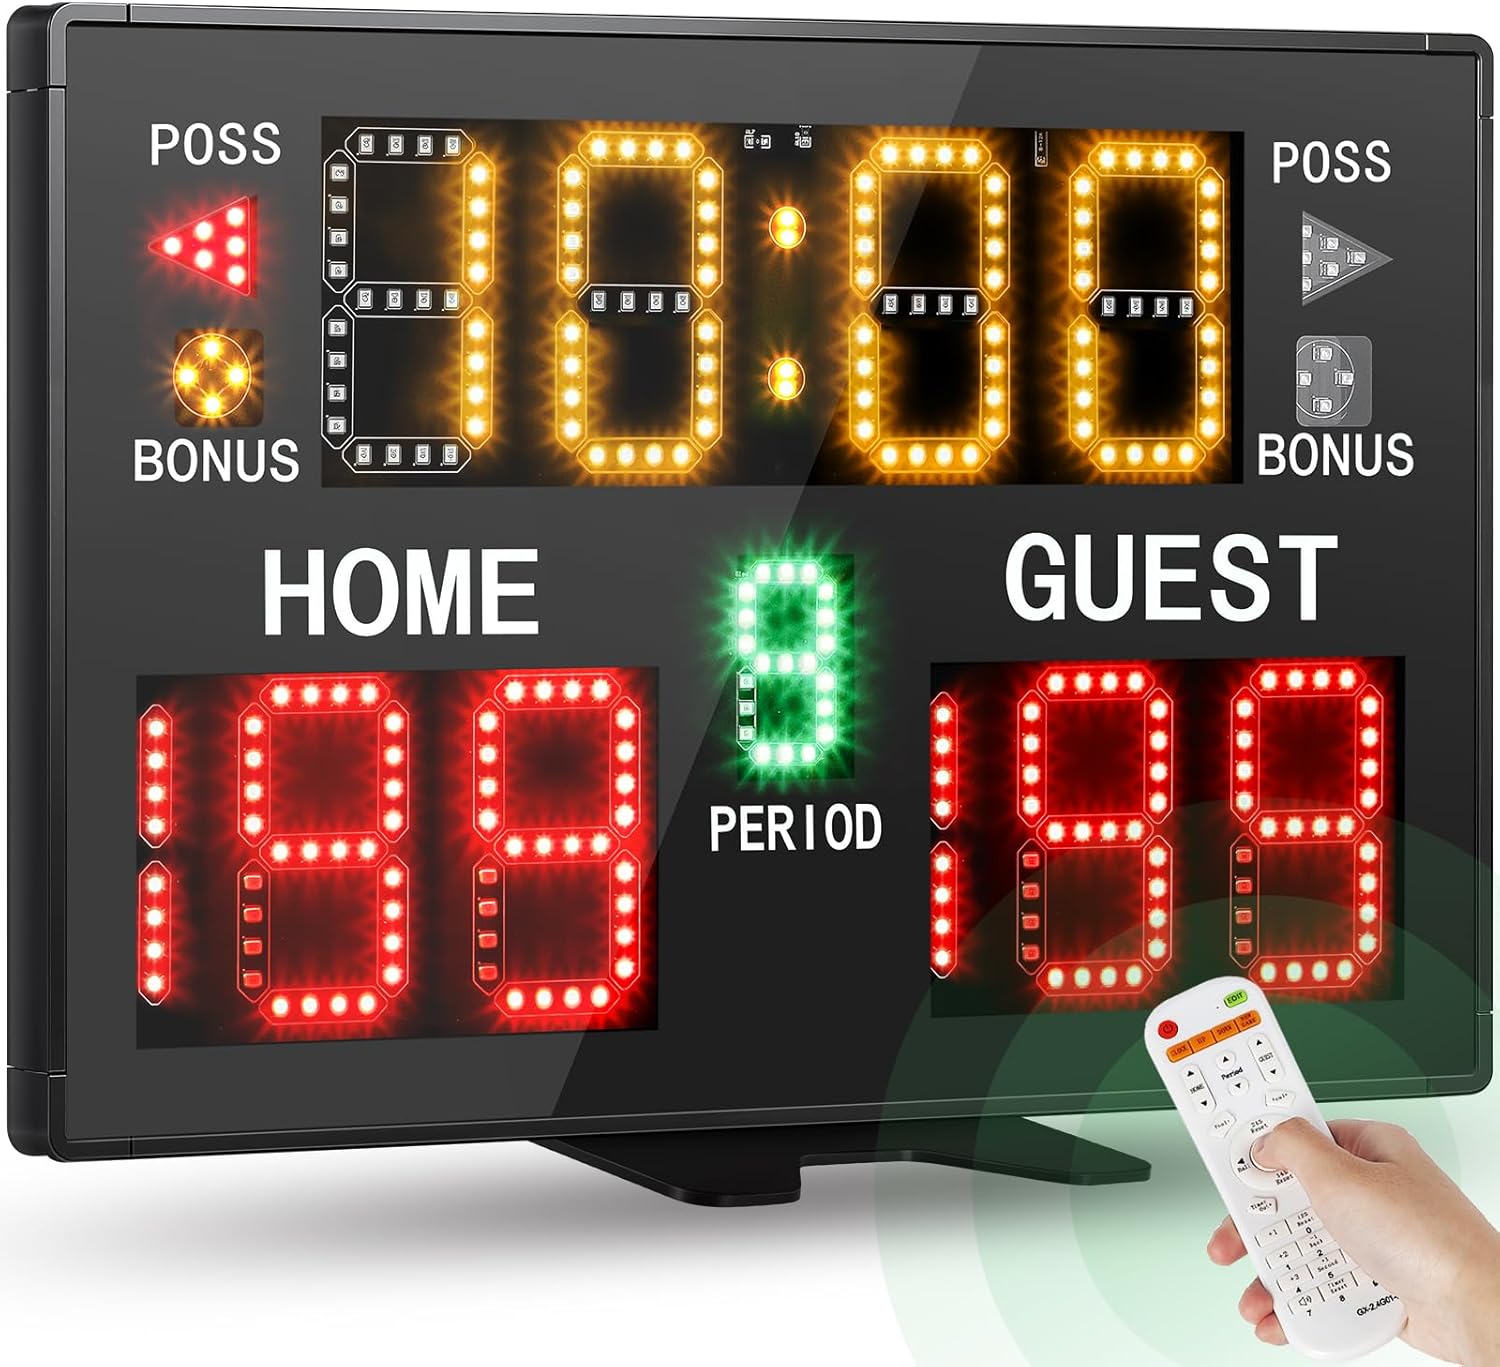
Figure 4.1: Front view of the Digital Scoreboard.
4.1 Key Features
- Display: Bright LED display with 3-inch yellow timer, 1.8-inch green period, and 3-inch red scores.
- Timer: Editable countdown timer up to 99:59 (minute-second format), switching to second-milliseconds below 1 minute.
- Scores: Home and Guest scores adjustable from 0 to 199.
- Period: Adjustable from 0 to 9.
- Indicators: Ball possession (POSS) and foul free throw (BONUS) signs.
- Brightness: Five adjustable brightness levels for various environments.
- Power: High-performance rechargeable lithium battery (up to 3 batteries for extended use) or plug-in power.
- Portability: Lightweight (2.65 lbs / 1.2 kg) and compact design.
- Control: Easy-to-use remote control with extra-long control distance (up to 98.4 ft / 30m).
- Buzzer: Two-position adjustable buzzer.
- Mounting: Table, wall, and tripod mountable (tripod sold separately).
4.2 Scoreboard Components

Figure 4.2: Rear components of the scoreboard.
- Buzzer/Brightness/Reset Game Button
- Power On/Off Button
- Type-C Charging Port
- Battery Compartment (holds up to 3 rechargeable batteries)
- Two-step Volume Adjustable Buzzer

Figure 4.3: Display elements and their sizes.
5. Setup
5.1 Charging the Scoreboard
The scoreboard is powered by rechargeable lithium batteries. For optimal performance, fully charge the batteries before first use.
- Ensure the 3 rechargeable batteries are correctly inserted into the battery compartment on the back of the scoreboard.
- Connect the provided Type-C charging cable to the charging port on the scoreboard.
- Plug the other end of the charging cable into the provided battery charging head (power adapter) and then into a standard wall socket.
- A full charge provides approximately 6 hours of operation with three batteries. Each battery provides about 2 hours of use.
Important: Do not use fast charge cables or connect the scoreboard to a computer for charging. Only use the provided charging accessories.

Figure 5.1: Correct charging method for the scoreboard.
5.2 Mounting Options
The scoreboard offers versatile mounting options:
- Table Stand: Attach the included desktop mounting plate to the bottom of the scoreboard for stable placement on any flat surface.
- Wall-Mounted: Use the included wall mounting screws to securely attach the scoreboard to a wall. Ensure the wall can support the weight of the scoreboard.
- Tripod Mounted: The scoreboard can be mounted on a standard tripod (sold separately, ASIN: B0B452BWMB) for adjustable height and positioning.

Figure 5.2: Various mounting configurations.
6. Operating Instructions
6.1 Power On/Off
Locate the Power On/Off button on the back of the scoreboard (refer to Figure 4.2). Press it to turn the scoreboard on or off.
6.2 Remote Control Operation
The scoreboard is primarily controlled by the included remote. Ensure the remote has fresh AAA batteries (not included). The remote has an extra-long control distance of up to 98.4 feet (30 meters).
Figure 6.1: Remote control and its operational range.
Refer to the remote control diagram in the included professional manual for specific button functions. Common functions include:
- Score Adjustment: Buttons for increasing/decreasing Home and Guest scores.
- Timer Control: Start, Stop, Reset, and adjustment buttons for the countdown timer.
- Period Adjustment: Buttons to change the current period.
- Possession/Bonus: Buttons to toggle possession arrows and bonus indicators.
- Buzzer: Button to activate the buzzer.
- Brightness: Buttons to adjust display brightness.
6.3 Adjusting Display Brightness
The scoreboard features five adjustable brightness levels. Use the dedicated brightness buttons on the remote control or the external button on the scoreboard (Buzzer/Brightness/Reset Game Button) to cycle through the brightness settings. This allows for optimal visibility in various lighting conditions, from indoor gyms to outdoor fields.

Figure 6.2: Brightness adjustment levels.
6.4 Adjusting Buzzer Volume
The scoreboard has a two-position adjustable buzzer. Locate the buzzer adjustment switch on the back of the scoreboard (refer to Figure 4.2) to select the desired volume level.

Figure 6.3: Buzzer volume adjustment switch.
6.5 Resetting the Game
To reset all scores, timer, and period to their default values, use the "Reset" button on the remote control or the external Buzzer/Brightness/Reset Game Button on the scoreboard.
7. Maintenance
- Cleaning: Wipe the scoreboard surface with a soft, dry cloth. For stubborn marks, use a slightly damp cloth with mild soap, then dry thoroughly. Do not use abrasive cleaners or solvents.
- Battery Care: For long-term storage, charge the batteries to about 50% and store the scoreboard in a cool, dry place. Recharge every 3-6 months to prevent deep discharge.
- Storage: When not in use, store the scoreboard in its original packaging or a protective case to prevent damage.
8. Troubleshooting
| Problem | Possible Cause | Solution |
|---|---|---|
| Scoreboard does not turn on. | Battery is depleted or not inserted correctly. Power cable is not connected. | Ensure batteries are charged and correctly inserted. Connect the power adapter to a working outlet. |
| Remote control is not responding. | Remote batteries are depleted or incorrectly inserted. Obstruction between remote and scoreboard. Remote is out of range. | Replace remote batteries (AAA). Ensure a clear line of sight to the scoreboard. Move closer to the scoreboard (within 98.4 ft / 30m). |
| Display is dim or flickering. | Brightness setting is too low. Low battery power. | Adjust brightness using the remote or external button. Charge the scoreboard batteries. |
| Buzzer is not sounding or is too quiet. | Buzzer volume is set to low. | Adjust the two-position buzzer switch on the back of the scoreboard to a higher volume setting. |
9. Specifications
| Model Name | Battery Powered Digital Scoreboard |
| ASIN | B0BY1PMML7 |
| Brand | Spolehli |
| Dimensions (L x W x H) | 14.8 x 9.8 x 0.9 inches (375mm x 250mm x 23mm) |
| Weight | 2.65 lbs (1.2 kg) |
| Material | Aluminum |
| Color | Black |
| Timer Digit Height | 3 inches (76.2mm) |
| Score Digit Height | 3 inches (76.2mm) |
| Period Digit Height | 1.8 inches (45.7mm) |
| Power Source | Rechargeable Lithium Battery / AC Power Adapter |
| Battery Life | Approx. 6 hours with 3 batteries (2 hours per battery) |
| Remote Control Distance | Up to 98.4 feet (30 meters) |
| Brightness Levels | 5 levels adjustable |
10. Warranty and Support
Spolehli products are designed for durability and performance. For information regarding warranty coverage, technical support, or service inquiries, please refer to the contact information provided with your purchase or visit the official Spolehli website. Please have your product model (B0BY1PMML7) and purchase date available when contacting support.
Related Documents - B0BY1PMML7
 |
Bodet BT6000 Range User Manual: Sports Scoreboard Operation and Configuration Detailed user manual for Bodet BT6000 series sports scoreboards. Covers operation of main, secondary, and shot clock keyboards for Basketball, Handball, Volleyball, Tennis, and Training. Includes setup, sport-specific rules, configuration options, and troubleshooting. |
 |
Colorado Time Systems Numeric LED Scoreboards Installation Guide This comprehensive installation guide provides step-by-step instructions for setting up, mounting, wiring, and testing Colorado Time Systems' single and multi-line numeric LED scoreboards. It includes product specifications, troubleshooting tips, and contact information for support. |
 |
Daktronics MS-2113 Portable LED Scoreboard Display Manual Comprehensive display manual for the Daktronics MS-2113 Portable LED Scoreboard, covering specifications, mechanical installation, electrical operation, battery care, and troubleshooting. Includes support information and technical references. |
 |
LUCKY TIME Electronic Basketball Scoreboard Installation Guide Step-by-step installation instructions for the LUCKY TIME Electronic Basketball Scoreboard, covering ceiling mount and hole stand methods with detailed textual descriptions of diagrams. |
 |
Krusader Portable Wireless Scoreboard User Manual Official product manual for the Krusader Portable Wireless Scoreboard, detailing setup, operation, and compliance information. Includes instructions for placement, powering, direct and wireless operation, and FCC/Canadian compliance. |
 |
365 Games: Comprehensive Instruction Manual Explore a vast collection of game rules from 365 Games, covering board games, card games, dice games, and more. This manual provides instructions for over 300 different games. |
Ask a question about this manual
Ask about setup, troubleshooting, compatibility, parts, safety, or missing instructions. Manuals+ will review the question and use this page’s manual context to help answer it.