FEELWORLD CUT6 Recording Monitor User Manual
Brand: FEELWORLD | Model: CUT6
1. Introduction
The FEELWORLD CUT6 is a 6-inch IPS recording monitor designed for professional video production. It features a 1920x1080 full HD touch screen, HDR support, 3D LUT capabilities, and various monitoring tools. This manual provides detailed instructions for the proper setup, operation, and maintenance of your CUT6 monitor.

Figure 1: The FEELWORLD CUT6 Recording Monitor in operation, showing a recording indicator on the screen.
2. Key Features
- 6-inch Full HD IPS Touch Screen: 1920x1080 resolution with a responsive touch interface for intuitive control.
- USB2.0 Real-time Recording: Records video images up to 1080p30 in MP4 format via HDMI to a FAT32 formatted USB flash disk.
- 3D LUT Support: Supports 3D LUT Log to REC.709 conversion and user 3D LUT upload (up to 50 custom LUTs). Recording with LUT effects is also possible.
- HDMI 2.0 Input & HDMI 1.4 Output: Supports 4K 60Hz signal input and up to 1080p60 output, including LUT loop-out functionality.
- Professional Monitoring Tools: Includes Waveform, RGB Parade, Vector Scope, Histogram, Audio Meter, Focus Peaking, Zoom, Zebra, False Color, Frame Guides, and Safe Area.
- Flexible Power Options: DC 7-14V input and NP-F battery slot. Features DC 8.4V power output for cameras.

Figure 2: The CUT6 monitor showcasing its array of professional monitoring tools and features.
3. Setup
3.1 Unpacking and Inspection
Carefully remove all components from the packaging. Verify that all items are present and undamaged. If any items are missing or damaged, contact your retailer immediately.
3.2 Powering the Monitor
The CUT6 monitor can be powered by two methods:
- DC Power Input: Connect a compatible DC 7-14V power adapter to the DC IN port on the monitor.
- NP-F Battery: Attach a fully charged NP-F series battery to the battery plate on the rear of the monitor.
3.3 Mounting the Monitor
The monitor features 1/4"-20 thread sockets on the right, top, and bottom sides for flexible mounting options. Attach the monitor to your camera rig or stand using a compatible mounting arm or bracket.
3.4 Connecting Video Sources
Connect your camera or video source to the HDMI IN port using an HDMI 2.0 cable. The monitor supports 4K 60Hz input signals.
4. Operating Instructions
4.1 Power On/Off
Press and hold the power button to turn the monitor on or off. Important: Always press the power button to shut down the monitor before disconnecting the power cable to prevent potential data loss or damage.
4.2 Touch Screen Operation and UI
The CUT6 features a touch screen for intuitive menu navigation. Swipe from the edge of the screen or tap the screen to access the main menu and various monitoring functions. The new UI interface is designed for ease of use and quick setup.
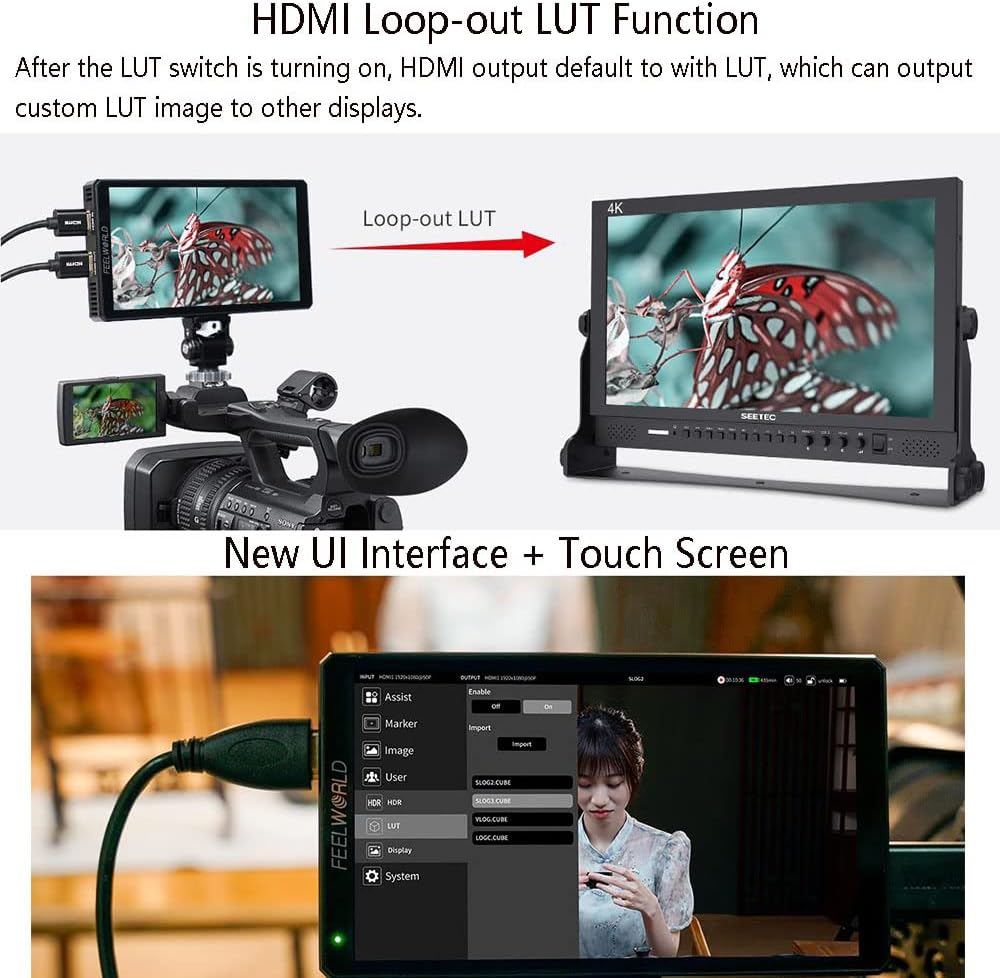
Figure 3: The new UI interface and touch screen functionality of the CUT6 monitor.
4.3 Monitoring Tools
Access various professional monitoring tools through the touch screen menu to assist with exposure, focus, and color accuracy:
- Waveform: Visualizes the luminance and chrominance levels of your video signal.
- RGB Parade: Displays the red, green, and blue components of the video signal separately.
- Vector Scope: Shows the color information (hue and saturation) of the video signal.
- Histogram: Graphical representation of the tonal distribution in your image.
- Focus Peaking: Highlights sharp edges to assist with manual focusing.
- Zebra: Indicates overexposed areas with a striped pattern.
- False Color: Assigns false colors to different exposure levels for quick exposure assessment.
- Frame Guides & Safe Area: Helps ensure proper framing for different aspect ratios and broadcast safe zones.
5. Advanced Functions
5.1 USB2.0 Real-time Recording
The CUT6 monitor can record video directly from its HDMI input. To use this feature:
- Insert a USB flash disk (formatted to FAT32) into the USB 2.0 port.
- Navigate to the recording menu or locate the recording icon on the screen.
- Press the red recording key to start recording. The monitor will record video up to 1080p30 in MP4 format.
- Recording time is dependent on the capacity of the external storage media. For example, 1 hour of broadcast recording takes approximately 1860MB of memory.
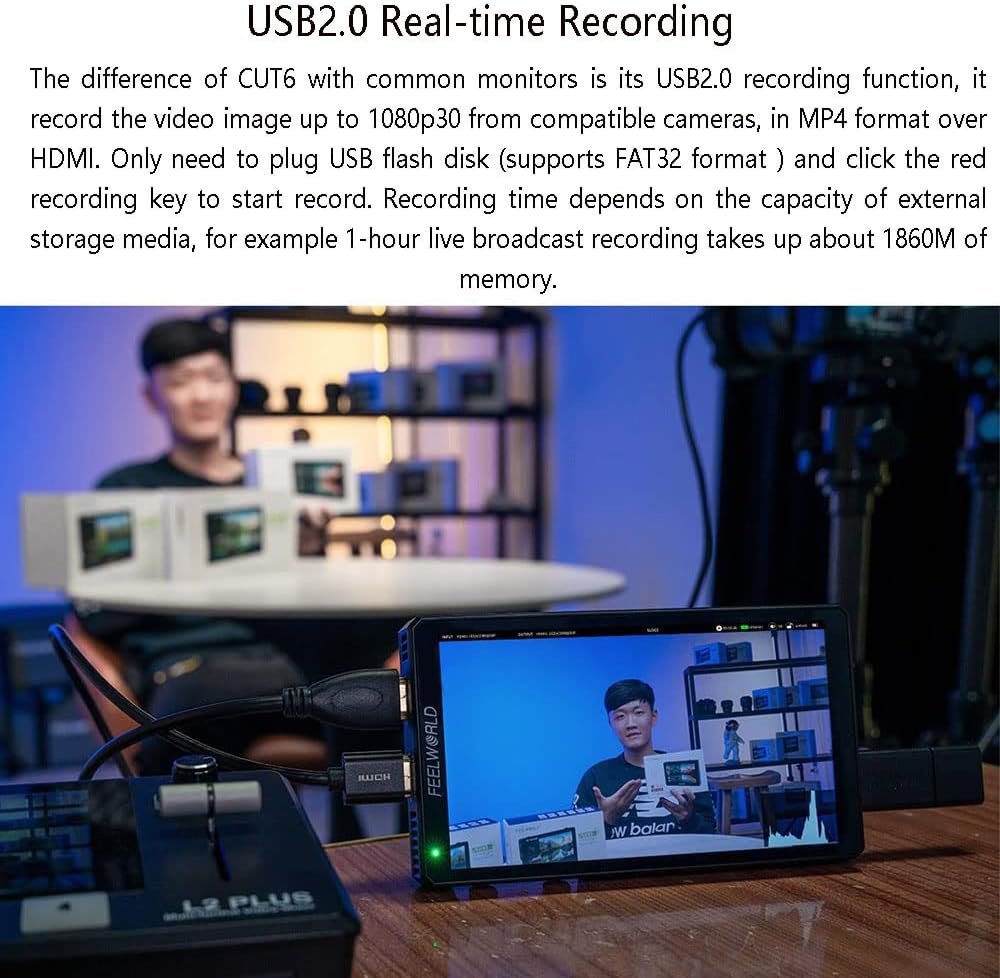
Figure 4: Demonstrating the USB2.0 real-time recording capability of the CUT6 monitor.
5.2 LUT Management
The CUT6 supports 3D LUTs for color calibration and creative looks. You can upload up to 50 custom LUTs (.cube files) via the Micro SD card slot. These LUTs can be applied for monitoring and can also be included in recorded footage.
- Save your .cube LUT files to a Micro SD card.
- Insert the Micro SD card into the monitor's Micro SD card slot.
- Navigate to the LUT menu in the monitor's settings to import and manage your custom LUTs.
- Select the desired LUT for real-time monitoring or recording.
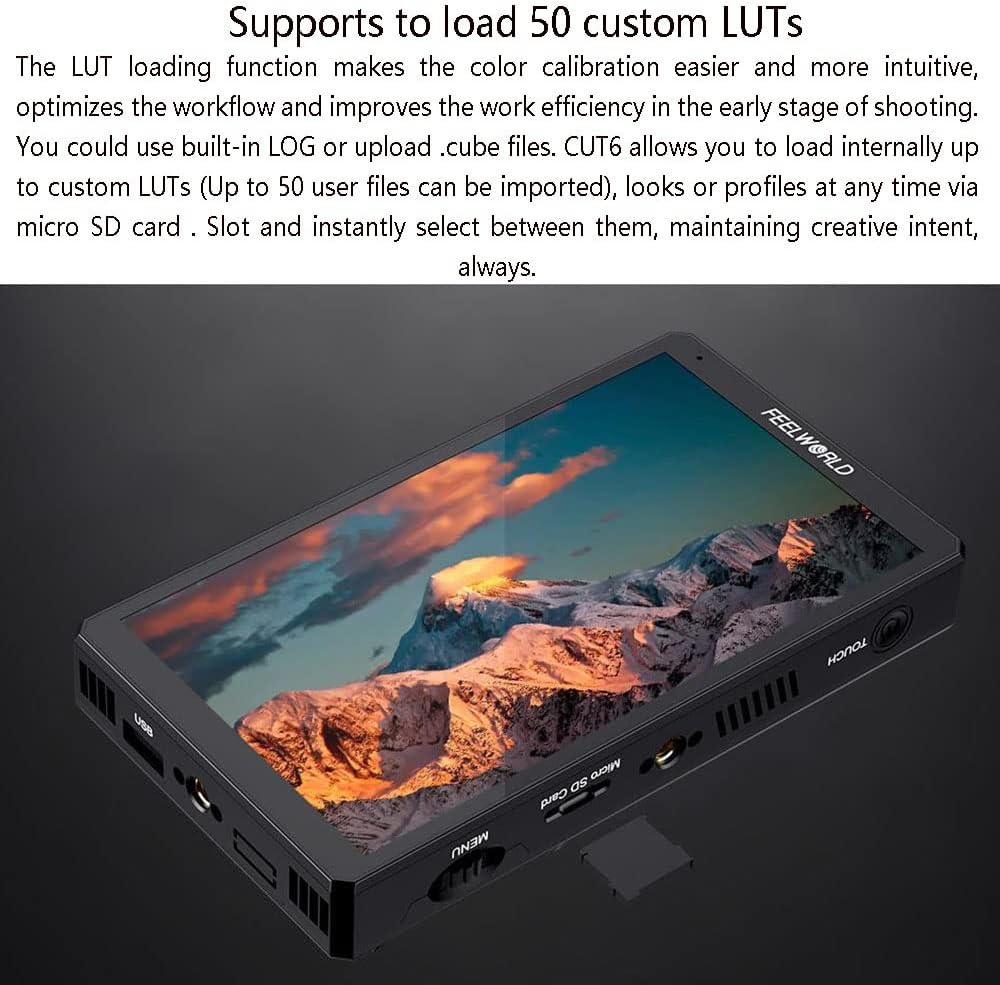
Figure 5: The CUT6 monitor's Micro SD card slot for loading custom LUTs.
5.3 HDMI Connectivity and Loop-out
The monitor features both HDMI 2.0 input and HDMI 1.4 output. The HDMI output supports up to 1080p60. A key feature is the HDMI LUT loop-out function, which allows you to output the image with an applied LUT to another display or a live streaming device.

Figure 6: The HDMI 2.0 Input and HDMI 1.4 Output ports on the CUT6 monitor.

Figure 7: Workflow for secondary editing and live streaming using the CUT6 monitor.
6. Maintenance
6.1 Cleaning
To clean the monitor screen, use a soft, lint-free cloth. For stubborn smudges, lightly dampen the cloth with a screen-cleaning solution. Avoid using harsh chemicals or abrasive materials. Clean the monitor body with a dry, soft cloth.
6.2 Storage
When not in use, store the monitor in a cool, dry place, away from direct sunlight and extreme temperatures. Use a protective case or pouch to prevent scratches and impacts.
7. Troubleshooting
7.1 No Power
- Ensure the power adapter is securely connected and functioning, or that the NP-F battery is fully charged and correctly installed.
- Verify that the power button has been pressed and held sufficiently to turn on the device.
7.2 No Video Signal
- Check that the HDMI cable is securely connected to both the camera/source and the monitor's HDMI IN port.
- Confirm that the camera/source is outputting a compatible HDMI signal (refer to specifications).
- Try a different HDMI cable to rule out cable issues.
7.3 Recording Issues
- Ensure the USB flash disk is formatted to FAT32.
- Check if there is sufficient free space on the USB flash disk.
- Verify that the recording function is activated in the monitor's menu.
7.4 Touch Screen Unresponsive
- Restart the monitor.
- Ensure the screen is clean and free of debris or moisture.
8. Technical Specifications
| Feature | Specification |
|---|---|
| Model | CUT6 |
| Screen Size | 6" IPS |
| Resolution | 1920x1080 pixels |
| Pixel Pitch | 0.069 (H) × 0.069 (V) (mm) |
| Aspect Ratio | 16:9 |
| Brightness | 450cd/m² |
| Contrast Ratio | 1000:1 |
| Backlight | LED |
| Viewing Angle | 80°/80°(L/R) 80°/80°(U/D) |
| Input | 1 x HDMI 2.0, 1 x Micro SD Card Slot |
| Output | 1 x HDMI 1.4, 1 x USB 2.0 Recording, 1 x DC Barrel (5.5mm outer, 2.1mm inner) |
| Audio | 3.5mm Stereo Headphone |
| USB Recording Format | MP4 (1080P30) |
| HDMI Input Support | SMPTE: 720p@50/60, 1080i@50/60, 1080p@24/30/50/60 VESA: Up to 4096×2160@60 |
| HDMI Output Support | SMPTE: 720p@50/60, 1080p@24/25/30/50/60 VESA: Up to 1920×1080@60 |
| Input Voltage | DC 7~14V |
| Power Consumption | ≤11W |
| Working Temperature | -20°C~50°C |
| Install Way | 1/4"-20 Thread Socket (Right, Top, Bottom) |
| Unit Size | 152L x 86H x 23D (mm) |
| Unit Weight | 230g |
9. Warranty and Support
For warranty information and technical support, please refer to the official FEELWORLD website or contact your authorized dealer. Keep your purchase receipt as proof of purchase for warranty claims.