
Rain Harvesting WDDP112
First Flush Max with Catch-All Tee Instruction Manual
Model: WDDP112 | Brand: Rain Harvesting
1. Product Overview
The Rain Harvesting First Flush Max with Catch-All Tee is an innovative rainwater diverter designed to improve the quality of collected rainwater. It effectively diverts the initial roof run-off, which often contains leaves, dust, and other contaminants, ensuring that only cleaner water enters your rain harvesting system. This system features a large 4-inch chamber for increased capacity and a unique Catch-All Tee to prevent water bypass during the flush process.

Image: All components of the First Flush Max with Catch-All Tee system.

Image: Diagram illustrating how the First Flush Max diverter offers more diverting efficiency with less space by utilizing a 4-inch chamber.
2. Components List
The First Flush Max system includes the following parts:
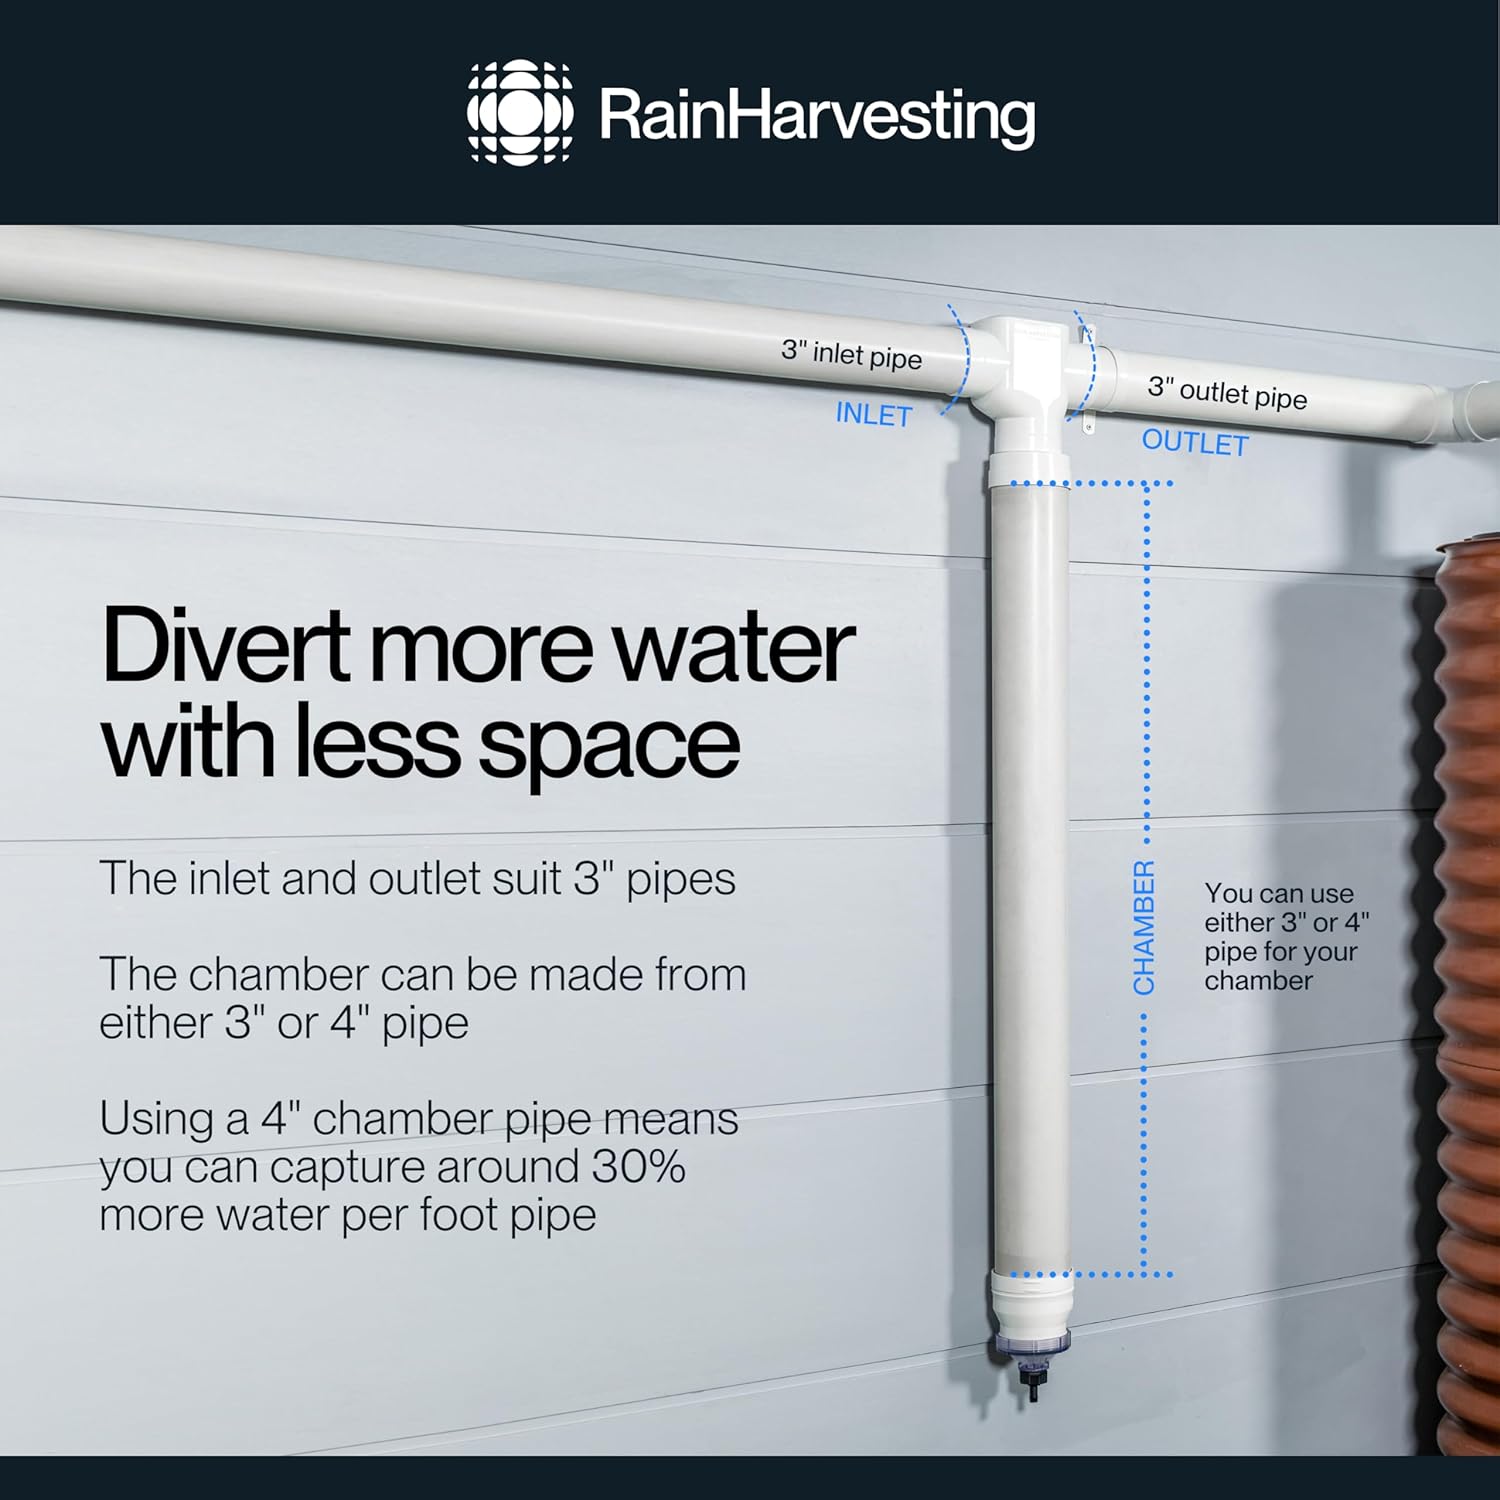
Image: Detailed view of all components with corresponding numbers for identification.
- 4" First Flush Plus Tee: The main diversion unit.
- 2 x 4" Pipe Wall Brackets: For securing 4-inch chamber pipe to a wall.
- 2 x 3" Pipe Wall Brackets: For securing 3-inch inlet/outlet pipes to a wall.
- 8 x Flow Control Valves: Small inserts to regulate the drain rate.
- Max Chamber Adaptor: Connects the 3" tee to a 4" chamber pipe.
- 4" End Coupling: For the bottom of the 4-inch chamber pipe.
- Sealing Ball: Floats to seal off the chamber when full.
- Ball Seat: Provides a resting point for the sealing ball.
- 3" End Coupling: For the bottom of a 3-inch chamber pipe (if used).
- Plastic Filter Screen: Prevents larger debris from entering the valve.
- Transparent Rapid Release Exit Funnel: The clear bottom section with the drain valve.
- Hose Connector: For attaching a hose to the drain valve.
Note: The chamber pipe itself is not included and must be sourced separately. You can use either 3" or 4" pipe for the chamber, depending on your diversion needs and space.
3. Setup and Installation
Proper installation is crucial for the optimal performance of your First Flush Max diverter. This system is designed for vertical installation on a downpipe.
3.1 Planning Your Installation
- Determine the ideal location for the diverter, typically near your rain barrel or tank.
- Measure the required length of the chamber pipe. A longer chamber allows for more initial flush diversion.
- Ensure you have the correct pipe sizes. The inlet and outlet on the tee are designed for 3-inch pipes. The chamber can be constructed from either 3-inch or 4-inch pipe. Using a 4-inch chamber pipe allows for approximately 30% more water capture per foot of pipe.
- Consider the type of pipe material (e.g., PVC) and ensure compatibility with the diverter components.
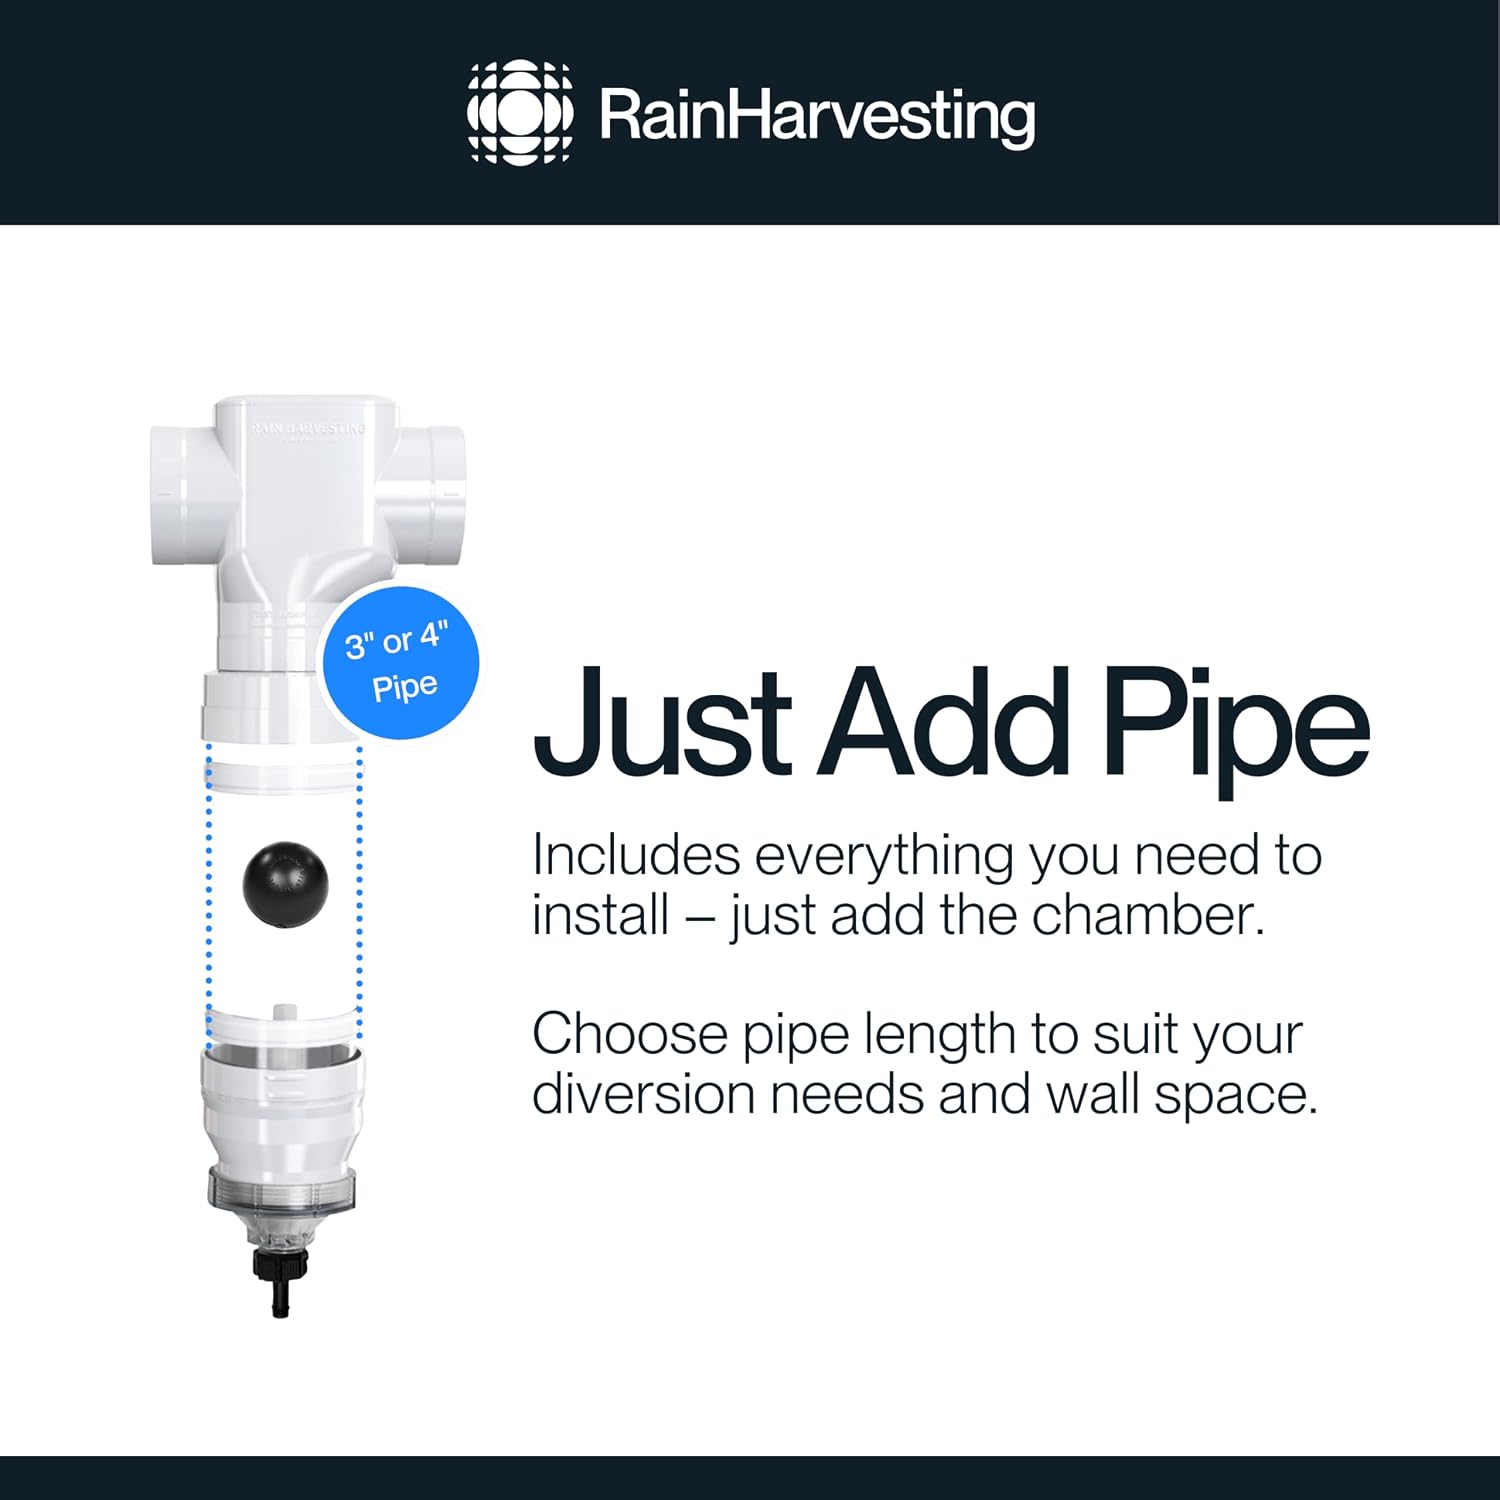
Image: Illustration emphasizing that the system includes all necessary parts except the main chamber pipe, which can be chosen to suit specific needs.
3.2 Assembly Steps
- Prepare the Downpipe: Cut a section out of your existing downpipe where the diverter will be installed. Ensure clean, straight cuts.
- Assemble the Chamber:
- Insert the chosen flow control valve(s) into the transparent rapid release exit funnel. The number of valves used will determine the drain rate.
- Attach the plastic filter screen above the flow control valves.
- Place the ball seat into the top of the transparent rapid release exit funnel.
- Insert the sealing ball into the chamber pipe.
- Connect the transparent rapid release exit funnel assembly to the bottom of your chamber pipe using the appropriate end coupling (4" End Coupling or 3" End Coupling).
- If using a 4" chamber pipe with a 3" tee, attach the Max Chamber Adaptor to the top of the 4" chamber pipe.
- Connect the Tee: Connect the assembled chamber to the bottom of the 4" First Flush Plus Tee.
- Install into Downpipe: Connect the 3" inlet and outlet pipes from your downpipe to the sides of the 4" First Flush Plus Tee. Ensure all connections are secure and watertight.
- Secure with Brackets: Use the provided 3" and 4" pipe wall brackets to secure the entire assembly firmly to the wall.
- Attach Hose (Optional): Connect a hose to the hose connector on the transparent rapid release exit funnel to direct the diverted water away from your foundation.

Image: Visual explanation of the Catch-All Tee ensuring no water bypasses the flush until the chamber is full.
4. Operating Principle
The First Flush Max diverter operates automatically to ensure clean rainwater collection:
- Initial Run-off Diversion: As rain begins, the first flow of water from your roof, which typically contains leaves, dust, and other contaminants, is directed into the vertical chamber of the diverter.
- Chamber Filling: The chamber fills with this initial, dirtier water.
- Sealing Mechanism: Once the chamber is full, the buoyant sealing ball floats up and seats itself, blocking the entrance to the chamber. This prevents any more water from entering the chamber.
- Clean Water Collection: With the chamber sealed, subsequent clean rainwater is then diverted through the main outlet of the tee directly into your rain barrel or tank.
- Automatic Draining: After the rainfall event, the slow release valve at the bottom of the chamber gradually drains the diverted dirty water. This prepares the diverter for the next rainfall.

Image: Step-by-step diagram illustrating how the first flush fills the chamber and how the float ball seals off the chamber to direct clean water to the tank.

Image: Close-up view of the automatic valve at the bottom of the diverter, responsible for slow release draining.
5. Maintenance
Regular maintenance ensures the longevity and efficiency of your First Flush Max diverter.
- Cleaning: Periodically wipe down the exterior of the diverter with a damp cloth to remove dirt and grime.
- Check for Blockages: Inspect the slow release valve and the filter screen for any debris or sediment buildup. Clear any blockages to ensure proper draining.
- Inspect Components: Regularly check all connections and components for signs of wear, cracks, or leaks. Address any issues promptly.
- Winterization (if applicable): In freezing climates, ensure the diverter is fully drained to prevent ice damage.
6. Troubleshooting
If you encounter issues with your First Flush Max diverter, consider the following common problems and solutions:
| Problem | Possible Cause | Solution |
|---|---|---|
| Water not diverting to tank after flush | Sealing ball not seating properly or chamber not filling completely. | Ensure the sealing ball is free of debris and can move freely. Check for airlocks in the chamber. Verify the chamber pipe is vertical. |
| Chamber not draining | Slow release valve or filter screen is clogged. | Remove and clean the slow release valve and plastic filter screen. Ensure flow control valves are not completely blocked. |
| Leaks at connections | Improper pipe fitting or loose connections. | Ensure correct pipe sizes are used (3" for inlet/outlet, 3" or 4" for chamber). Apply appropriate sealant (e.g., PVC cement or silicone) if necessary, and tighten all couplings. |
| System not fitting standard US PVC pipes | Product designed for specific pipe dimensions, which may differ from common US Schedule 40 PVC. | Carefully measure your pipes and the diverter's openings. You may need to source specific adapters or use flexible couplings designed for slight size variations. Consult a plumbing professional if unsure. |
7. Specifications
| Feature | Detail |
|---|---|
| Brand | Rain Harvesting |
| Model Number | WDDP112 |
| Inlet/Outlet Size | 3 inches |
| Chamber Diameter | Expands to 4 inches (can use 3" or 4" pipe for chamber) |
| Material | Plastic |
| Color | White |
| Item Weight | 3.32 pounds |
| Package Dimensions | 12.76 x 9.13 x 4.84 inches |
| Care Instructions | Wipe with Damp Cloth |
8. Warranty and Support
For warranty information, technical support, or further assistance, please contact Rain Harvesting customer service. Details can typically be found on the product packaging or the official Rain Harvesting website.
Please retain your proof of purchase for any warranty claims.
Related documentsWDDP112


Ask a question about this manual
Ask about setup, troubleshooting, compatibility, parts, safety, or missing instructions. Manuals+ will review the question and use this page’s manual context to help answer it.