ANPUDS 1/2" Digital Torque Adapter (Model AP05) Instruction Manual
Introduction
This manual provides detailed instructions for the safe and effective use of your ANPUDS 1/2" Digital Torque Adapter. Please read this manual thoroughly before operation and retain it for future reference. This device converts any standard ratchet wrench into a precise digital torque wrench, offering advanced features for accurate torque measurement.
Safety Information
- Always wear appropriate personal protective equipment, such as safety glasses, when using this tool.
- Ensure the adapter is securely attached to your wrench and the fastener before applying torque.
- Do not exceed the maximum torque capacity of the device (1.1-22.1 Ft-lb / 1.5-30 Nm).
- Keep the device clean and dry. Avoid exposure to extreme temperatures or moisture.
- Store the device in its protective case when not in use.
Product Overview
The ANPUDS Digital Torque Adapter features a clear LCD display and intuitive controls for precise torque applications.

Image 1: Digital Torque Adapter Components. This image highlights the key components of the ANPUDS Digital Torque Adapter, including the display screen, indicator lights, and control buttons for adjusting torque values, switching units, and managing data.

Image 2: Included Adapters. This image displays the ANPUDS Digital Torque Adapter along with its 3/8'' and 1/4'' drive adapters, showcasing the versatility for different wrench sizes.
Key features include:
- Display Screen: Large advanced LCD for clear readings.
- Indicator Lights: Green, yellow, and red LEDs provide visual feedback on torque status.
- Control Buttons: Up/Down arrows for value adjustment, P/T for Peak/Track mode, U for Unit switch, M for Memory/Save, C for Clear/Confirm.
- Drive Size: 1/2 inch drive, with included 3/8'' and 1/4'' adapters for versatility.
Setup
Battery Installation
The ANPUDS Digital Torque Adapter uses AAA batteries. To install or replace batteries:
- Locate the battery compartment cover, typically on the back or side of the device.
- Use a small screwdriver (often provided) to remove the screws securing the cover.
- Insert the AAA batteries, ensuring correct polarity (+/-).
- Replace the cover and tighten the screws.
Note: If the buzzer does not sound upon power-on, press and hold the P/T and M buttons simultaneously in the shutdown state to reactivate it.
Operating Instructions
Power On/Off
- To power on, press and hold the 'C' button until the display illuminates.
- The device will perform a self-check and emit a beep, then display "0.0".
- To power off, press and hold the 'C' button until the display turns off. The device also features an automatic shut-off after 2 minutes of inactivity to conserve battery life.
Unit Selection
The adapter supports four measurement units: ft-lb, Nm, in-lb, and kg-cm.
- With the device powered on, press the 'U' button to cycle through the available units.
- Select your desired unit, which will be indicated on the display.
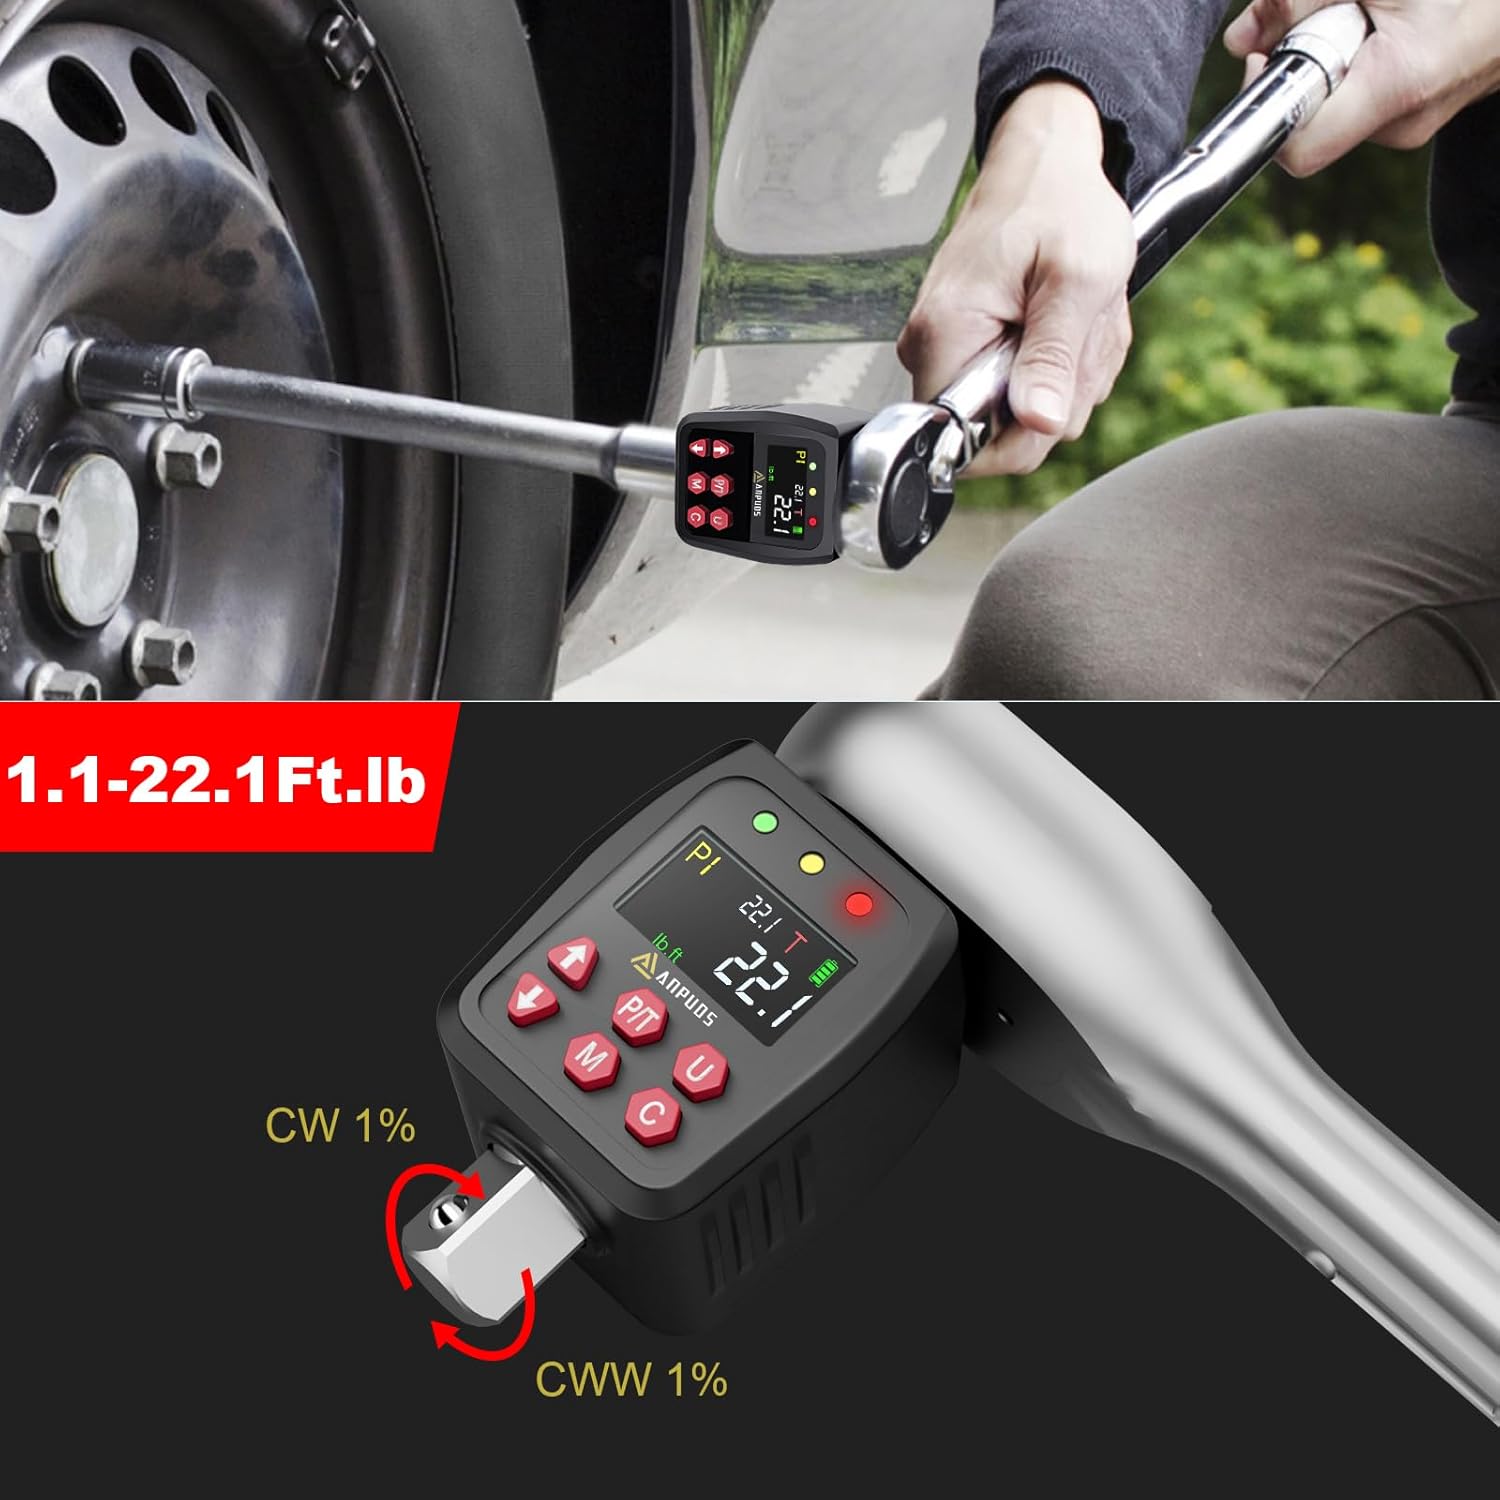
Image 3: Multiple Measurement Units. This image illustrates the adapter's ability to display torque values in various units, including Nm, ft-lb, in-lb, and kg-cm, selectable via the 'U' button.
Mode Selection (Track/Peak)
The device offers two operating modes: Track (T) and Peak (P).
- Track Mode (T): Displays real-time torque values as force is applied. This is useful for monitoring torque during the tightening process.
- Peak Mode (P): Records and displays the maximum torque value achieved during the tightening process. This is useful for verifying the highest torque applied.
- To switch between modes, press the 'P/T' button. The current mode will be indicated on the display.
Setting Preset Torque Values
The adapter allows you to preset and save up to 10 target torque values (P0 to P9) for frequently repeated applications.
- In Track or Peak mode, press the 'M' button to enter the preset value setting.
- Use the Up/Down arrow buttons to select a preset memory slot (P0-P9).
- Press 'M' again to select the value for adjustment. Use the Up/Down arrows to set the desired torque value.
- Press 'C' to confirm and save the preset value.
Image 4: Preset Values and Data Storage. This image illustrates the display showing a preset torque value (P1) and the capability to store up to 500 sets of data, allowing for quick access to frequently used settings.
Applying Torque
Attach the digital torque adapter to your 1/2" drive ratchet or breaker bar, then attach the appropriate socket. Place the socket onto the fastener you wish to tighten.

Image 5: Adaptable for Any Wrench. This image shows the ANPUDS Digital Torque Adapter connected to a standard ratchet wrench, demonstrating its versatility in converting any wrench into a digital torque wrench.
As you apply force, the display will show the real-time torque value (in Track mode) or the peak value (in Peak mode). The device provides visual and audible alerts:
- Green LED: Indicates torque is below the target.
- Yellow LED: Indicates torque is approaching the target (80% of target). The buzzer will emit regular beeps.
- Red LED: Indicates target torque has been reached. The LED will become solid red, and the buzzer will emit a continuous tone.

Image 6: Buzzer and LED Alert System. This image illustrates the visual and audible feedback provided by the adapter, with LED lights changing from green to yellow to solid red, accompanied by a buzzer, to indicate proximity to and achievement of the target torque.
Data Storage and Recall
The device can store up to 500 sets of torque data.
- After reaching the target torque in Peak mode, the value is automatically stored.
- To recall stored data, press and hold the 'M' button. Use the Up/Down arrows to navigate through the stored records.
Maintenance
- Clean the device with a soft, dry cloth. Do not use abrasive cleaners or solvents.
- Ensure the drive square and adapters are free from debris and corrosion.
- Replace batteries when the low battery indicator appears on the display.
- Store the adapter in its protective case in a cool, dry place to maintain accuracy and prolong its lifespan.
Troubleshooting
Buzzer Not Sounding
If the buzzer does not sound when torque is applied, it may have been deactivated.
- In the shutdown state, press and hold the 'P/T' and 'M' buttons simultaneously.
- If you hear one beep, the buzzer has been activated. If you hear two beeps, it has been deactivated. Repeat the process until the desired setting is achieved.
Specifications
| Feature | Detail |
|---|---|
| Model Number | AP05 |
| Torque Range | 1.1-22.1 Ft-lb / 1.5-30 Nm |
| Accuracy | ±1% (Clockwise & Counterclockwise) |
| Drive Size | 1/2 inch (includes 3/8'' & 1/4'' adapters) |
| Measurement Modes | ft-lb, Nm, in-lb, kg-cm |
| Operating Modes | Track Mode (Real-time), Peak Mode (Max value) |
| Preset Values | 10 groups (P0-P9) |
| Data Storage | 500 sets |
| Alerts | Buzzer & LED Indicators (Green, Yellow, Red) |
| Automatic Shut-off | After 2 minutes of inactivity |
| Item Weight | 0.45 Kilograms |
| Item Length | 2.95 Inches |
Warranty and Support
For warranty information, technical support, or service inquiries, please refer to the contact information provided with your product packaging or visit the official ANPUDS website. Keep your purchase receipt as proof of purchase.