1. Product Overview
The ERYUE Pipe Welding Machine is a high-power, efficient, and portable device designed for melting and joining water pipes. It features quick heating, uniform and stable heat conduction, and an intelligent temperature control chip for precise temperature adjustment between 350-450℃. This device is compatible with lithium batteries (not included), offering wireless convenience for various applications.
Key Features:
- High power design for quick and efficient heating.
- Intelligent temperature control chip for precise adjustment (350-450℃).
- Lightweight and reliable anti-scald heat insulation heads.
- Baking paint ironing heads prevent pipe sticking and leakage.
- Embedded switch design for enhanced safety.
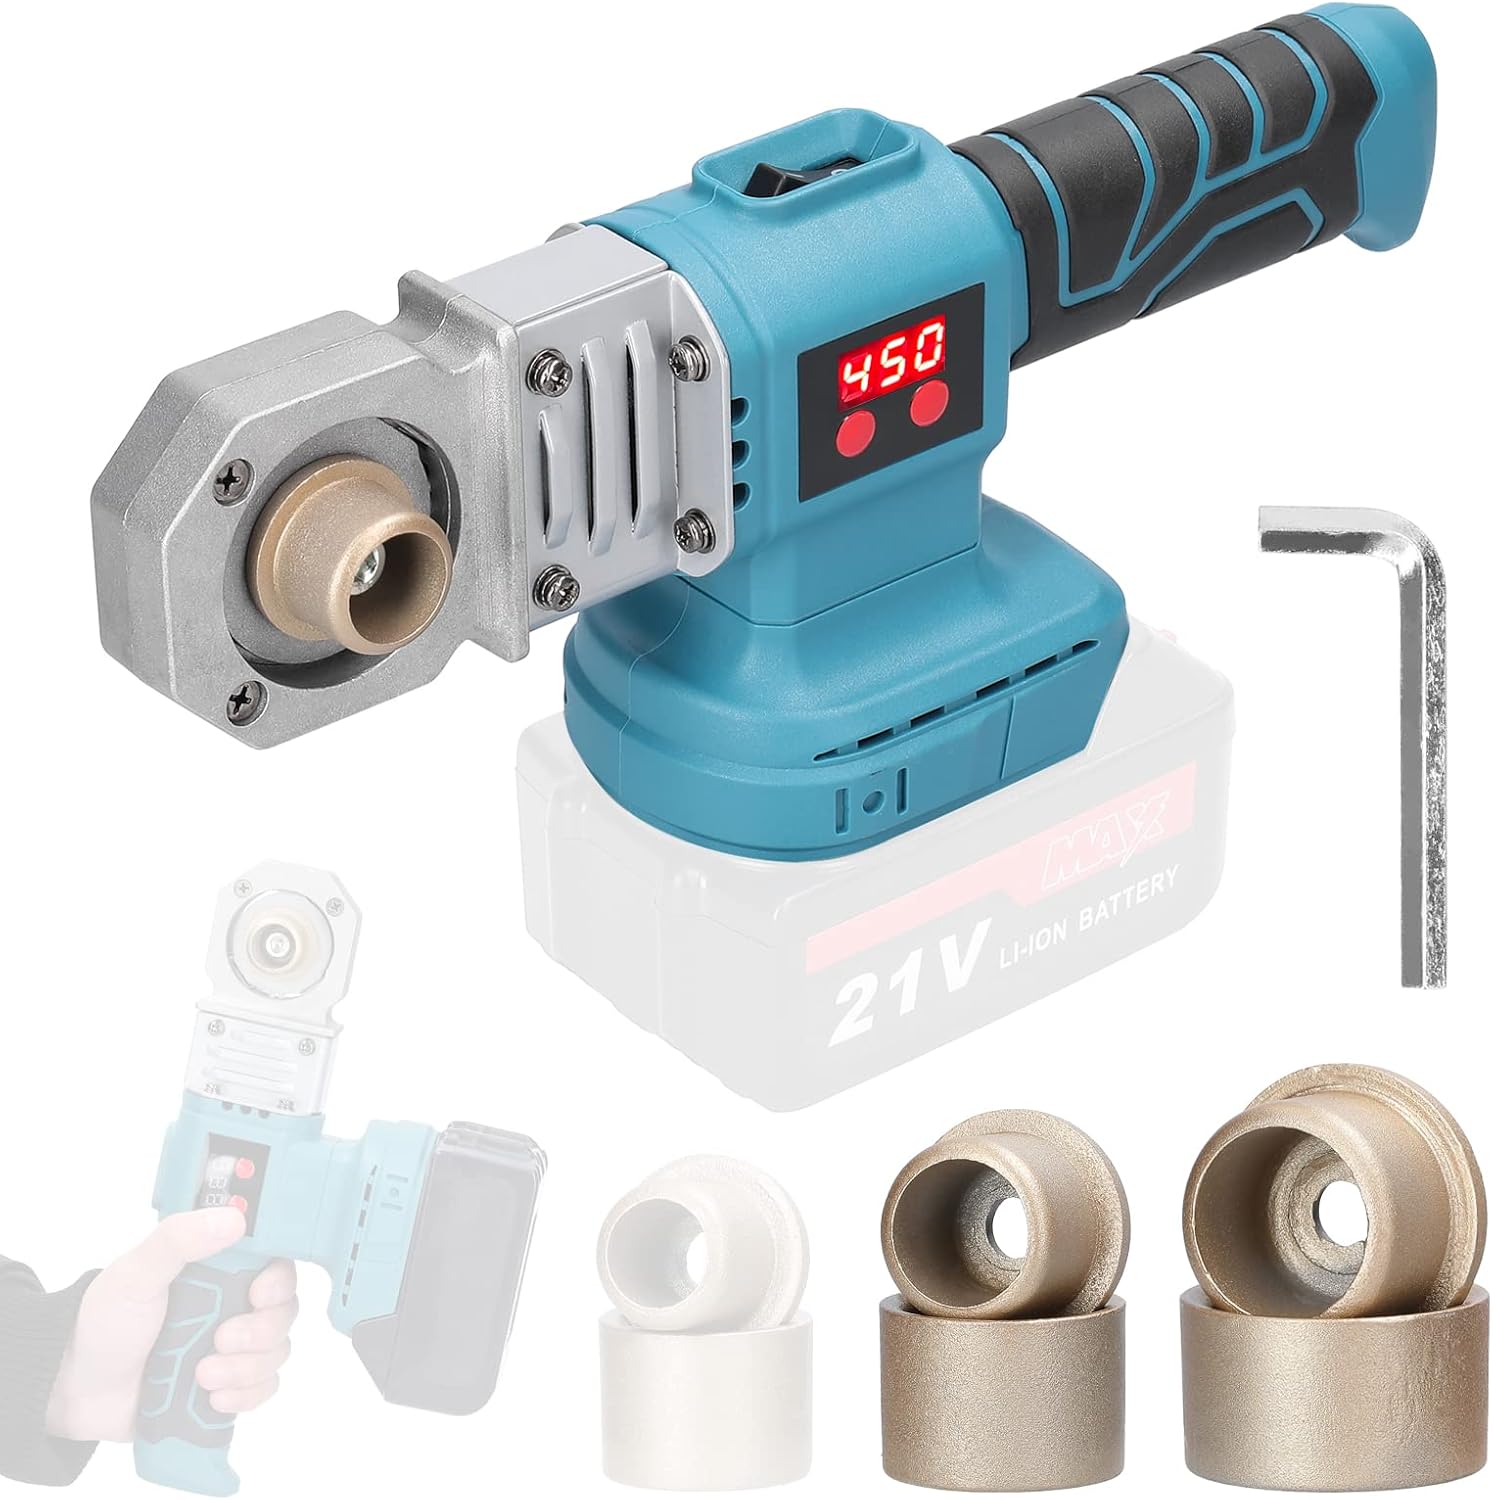
This image displays the main unit of the ERYUE Pipe Welding Machine, featuring a teal and black body with a digital temperature display. It is shown with a lithium battery base (battery not included) and various sizes of brass-colored welding heads, along with an Allen key for installation. The overall design emphasizes portability and ease of use.
2. Setup and Installation
2.1 Battery Installation
The device operates on a lithium battery (21V, not included). Ensure you purchase a compatible lithium battery separately. To install, align the battery with the base of the welding machine and slide it in until it clicks securely into place.
2.2 Welding Head Installation
The machine comes with three replacement ironing heads: 20mm, 25mm, and 30mm. Select the appropriate head size for your pipe diameter.
- Insert the screw into the designated hole on the hot head screw.
- Connect the hot head to the other end of the machine.
- Use the provided hex wrench to tighten the screws securely.

This image illustrates the three-step process for installing the welding heads. Step 1 shows inserting a screw into the head. Step 2 shows connecting the head to the machine. Step 3 shows tightening the screws with a hex wrench. A finished assembly is also shown, ready for use.
3. Operating Instructions
3.1 Powering On and Temperature Setting
Once the battery is installed and the correct welding head is attached, press the power button (typically located on the handle) to turn on the device. The intelligent temperature control chip allows for precise temperature adjustment between 350-450℃. Use the control buttons (if available, typically up/down arrows near the display) to set the desired temperature for your specific pipe material.

This image highlights the precise temperature adjustment feature of the welding machine, showing the digital display set to 350°C and 450°C. It also shows the machine being held and used to weld pipes, emphasizing its cordless and portable nature.
3.2 Welding Process
Allow the machine to reach the set temperature. The baking paint ironing heads are designed to prevent pipes from sticking and ensure a leak-free joint. The embedded switch design helps prevent accidental contact and enhances safety during operation.
General Steps for Pipe Welding:
- Ensure pipes and fittings are clean and free of debris.
- Insert the pipe and fitting onto the heated welding heads simultaneously.
- Hold them in place for the recommended heating time (refer to pipe manufacturer guidelines).
- Remove the pipe and fitting from the welding heads and immediately join them together with a firm, steady push.
- Hold the joint still for a few seconds to allow it to cool and solidify.

This image illustrates the welding process with the machine and shows examples of PPR, PB, and PE pipes, along with their respective melting points. It emphasizes the machine's ability to handle various pipe materials with precise temperature regulation.
3.3 Video Demonstrations
For a visual guide on the pipe welding process, please refer to the following instructional videos:
Video 1: Demonstration of plastic pipe welding using a similar device. This video shows the process of heating and joining plastic pipes and fittings.
Video 2: Another demonstration of plastic water pipe welding. This video provides additional visual context for the welding technique.
4. Maintenance
Proper maintenance ensures the longevity and optimal performance of your pipe welding machine.
- Cleaning: After each use, allow the welding heads to cool completely. Gently wipe any residue from the heating elements and heads using a soft cloth. Avoid using abrasive cleaners or tools that could damage the non-stick coating.
- Storage: Store the machine and its accessories in a dry, clean place, away from direct sunlight and extreme temperatures. Ensure all components are securely stored to prevent damage.
- Inspection: Periodically inspect the power connections, welding heads, and the machine body for any signs of wear, damage, or loose components. Address any issues promptly.
5. Troubleshooting
If you encounter issues with your ERYUE Pipe Welding Machine, refer to the following common troubleshooting tips:
- Device Not Heating:
- Ensure the battery is fully charged and correctly installed.
- Verify the power button is pressed and the temperature display is active.
- Check for any visible damage to the heating elements or wiring.
- Poor Weld Quality:
- Confirm the correct temperature setting for the pipe material being used.
- Ensure pipes and fittings are clean before welding.
- Verify that the pipe and fitting are inserted fully and held for the appropriate heating time.
- Ensure a firm and steady connection immediately after removing from the heating heads.
- Digital Display Not Working:
- Check battery connection and charge level.
- If the issue persists, contact customer support.
6. Specifications
Detailed specifications for the ERYUE Pipe Welding Machine:
| Feature | Detail |
|---|---|
| Product Name | Water Pipes Melting Device |
| Material | Plastics |
| Color | Black + Blue |
| Rated Power | 350-450W |
| Rated Voltage | 21V |
| Clamping Size | 20-32mm |
| Replacement Heads Size | φ20mm/25mm/30mm |
| Item Dimensions | 278 x 116 x 76mm (10.94 x 4.56 x 2.99 inches) |
| Package Dimensions | 280 x 250 x 90mm (11.02 x 9.84 x 3.54 inches) |
| Package Weight | 530g (1.17lb) |

This image provides a visual representation of the machine's dimensions and reiterates key specifications such as rated power, voltage, and clamping size. It also notes compatibility with Makita lithium batteries.
7. Warranty and Support
Information regarding product warranty and customer support was not provided in the source material. Please refer to the product packaging or contact the seller directly for details on warranty coverage and support options.