caivimvn YUEKEJI-10
caivimvn Disco Ball Light Party Lights
User Manual
Introduction
Thank you for purchasing the caivimvn Disco Ball Light Party Lights. This versatile lighting unit is designed to enhance any party or event with its dynamic light effects, including LED background lights, RGB disco ball patterns, and laser patterns. Featuring sound activation and remote control, it offers a comprehensive lighting solution for various indoor settings. This manual provides detailed instructions for setup, operation, maintenance, and troubleshooting to ensure optimal performance and longevity of your device.

Image: The caivimvn Disco Ball Light Party Lights unit, showcasing its compact design and the included remote control. The light projects vibrant patterns onto a surface.
What's in the Box
Please check the package contents carefully upon unboxing to ensure all components are present and undamaged.
- 1 x Disco Light Unit
- 1 x Remote Control (requires 2 AAA batteries, included)
- 1 x USB Power Adapter
- 1 x 10-foot (3m) USB Type-C Cable
- Installation Accessories (mounting brackets, screws)
- 1 x User Instruction Manual (this document)

Image: All items included in the product package: the disco light, remote control, USB power adapter, USB-C cable, and mounting hardware.
Product Features
- 3-in-1 Lighting Effects: Combines 7-color LED background lights, RGB colored disco ball lights, and red & green laser patterns for a dynamic visual experience.
- Wide Coverage: A single unit can effectively illuminate an area of up to 400 square feet.
- Memory Function: Retains the last used settings when powered off and on again.
- Sound Activated Modes: Lights flash and change with the rhythm of music, with adjustable sensitivity.
- New Remote Control: Comprehensive control over power, sound activation sensitivity, auto modes, sound modes, motor speed, light colors, strobe effects, pause, and timer functions (1 hour, 3 hours).
- Easy Installation: Comes with two mounting brackets for placement on tables, floors, ceilings, or walls.
- Plug-and-Play: Simple operation with the included 10-foot USB cable.
- Durable Construction: Features a robust metal shell for enhanced durability.

Image: A collage demonstrating the diverse lighting effects and patterns projected by the disco light in different room settings.
Setup
- Unpack: Carefully remove all components from the packaging.
- Insert Batteries: Open the battery compartment on the remote control and insert 2 AAA batteries, ensuring correct polarity.
- Choose Placement:
- Table/Floor: Place the unit on a stable, flat surface.
- Wall/Ceiling: Use the included mounting brackets and screws to securely attach the light to a wall or ceiling. Ensure the mounting surface can support the weight of the unit. The stand allows for 360-degree rotation to adjust the projection angle.
- Connect Power: Connect the USB Type-C cable to the light unit and the USB power adapter. Plug the adapter into a standard electrical outlet.
- Power On: The unit will power on automatically or can be turned on using the remote control.

Image: Illustrations demonstrating the 360-degree rotatable stand and different installation methods, including tabletop, wall, and ceiling mounting.
Operating Instructions
Remote Control Functions
The included remote control provides full command over the disco light's features. Ensure the remote is pointed towards the IR receiver on the light unit.
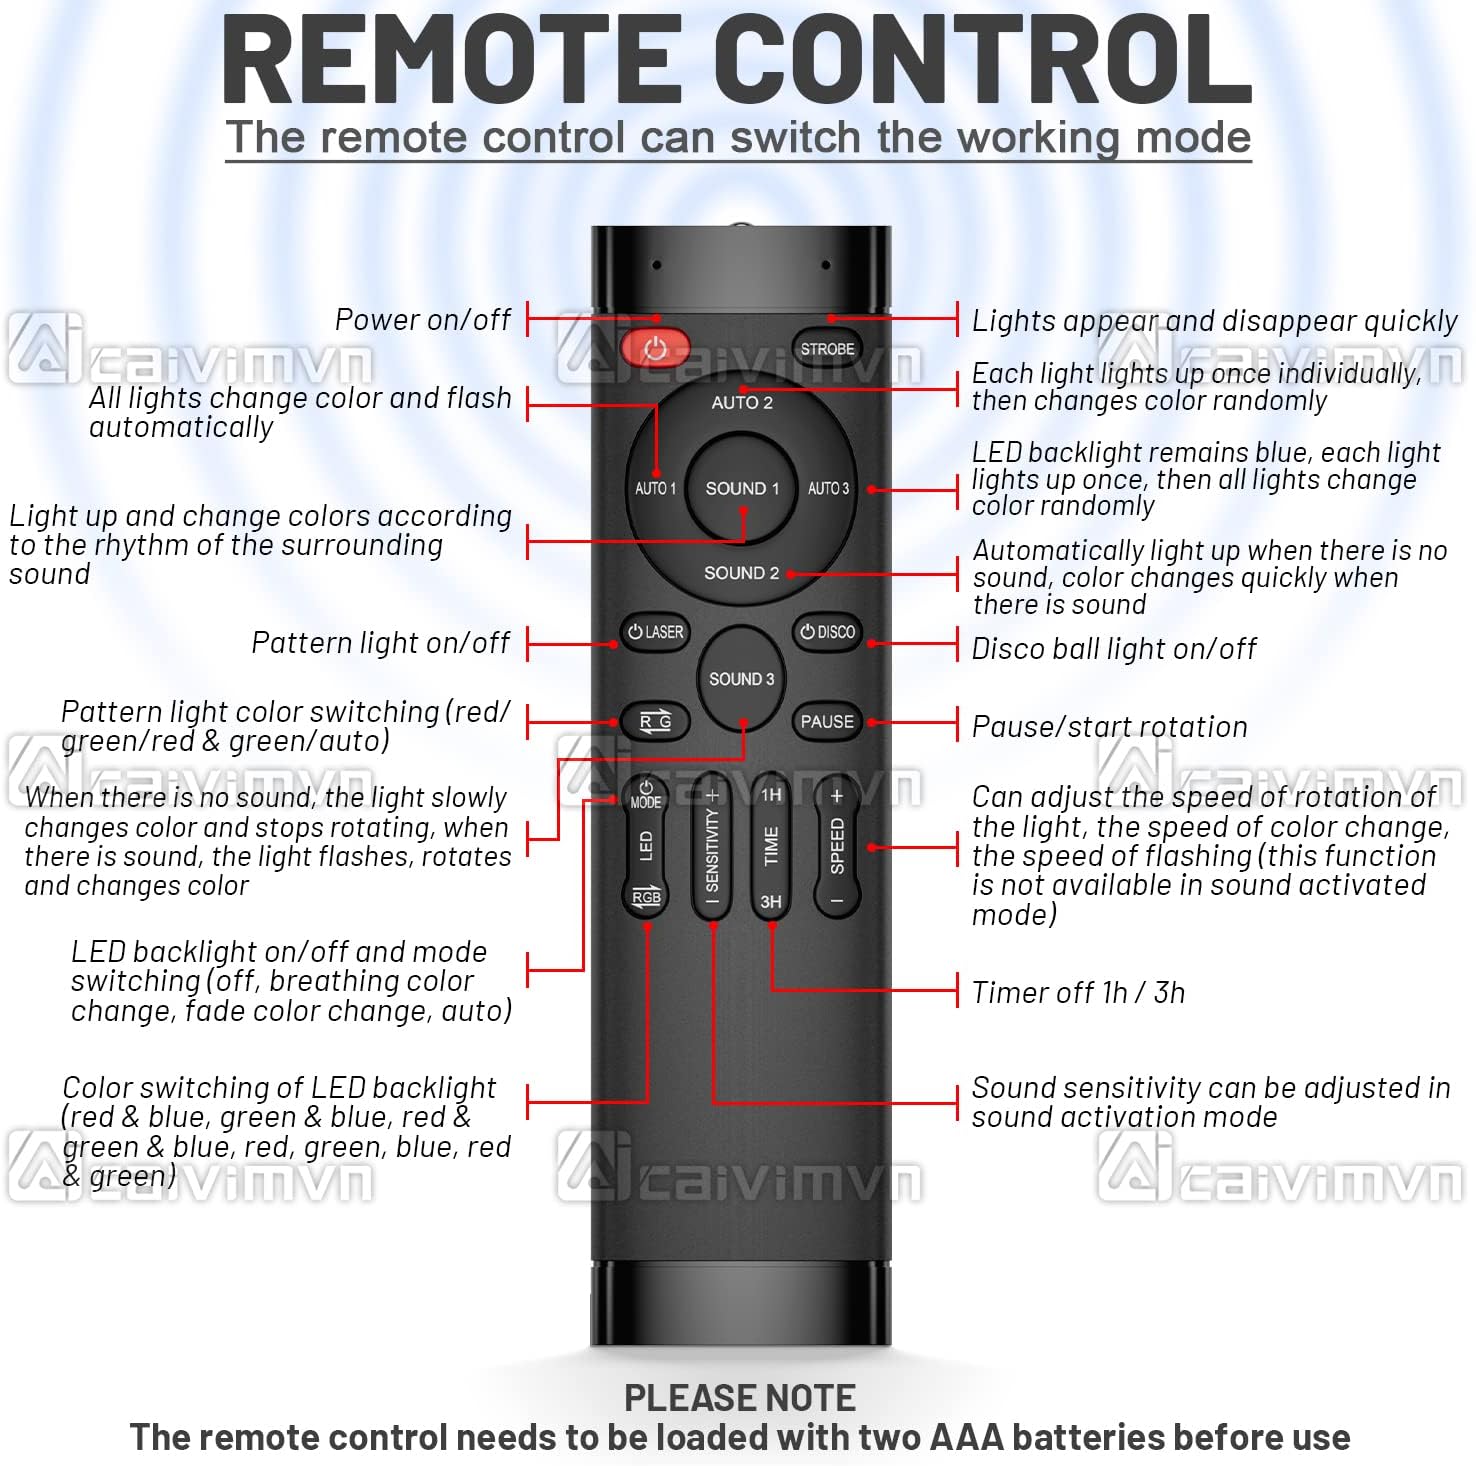
Image: A close-up view of the remote control, with labels indicating the function of each button, such as power, mode selection, sensitivity, and timer.
- Power On/Off: Turns the unit on or off.
- AUTO 1/2/3: Selects different automatic lighting modes.
- AUTO 1: All lights change color and flash automatically.
- AUTO 2: Lights appear and disappear quickly, each light lights up individually, then changes color randomly.
- AUTO 3: LED backlight remains blue, each light lights up once, then all lights change color randomly.
- SOUND 1/2/3: Activates sound-controlled lighting modes.
- SOUND 1: Lights change colors according to the rhythm of surrounding sound.
- SOUND 2: Automatically lights up when there is no sound, color changes fast with sound.
- SOUND 3: Lights change color slowly and stop rotation when there is no sound; sound makes lights flash, rotate, and change color.
- LASER: Toggles laser pattern light on/off.
- DISCO: Toggles disco ball light on/off.
- L-G: Switches pattern light color (Red, Green, Red & Green, Auto).
- PAUSE: Pauses/starts rotation.
- MODE: Cycles through LED backlight on/off, breathing color, fade color, and auto modes.
- SENSITIVITY: Adjusts sound activation sensitivity.
- TIME (1H, 3H): Sets a timer for the unit to turn off after 1 or 3 hours.
- SPEED (+/-): Adjusts motor speed, background light color, pattern light color, strobe on/off, and strobe speed. (Note: Speed adjustment is not available in sound activated mode).
- STROBE: Toggles strobe effect on/off.
Sound Activated Modes
The unit features intelligent sound activation, allowing the lights to synchronize with music or ambient sounds. Adjust the sensitivity using the remote control to best suit your environment.

Image: A visual representation of the three distinct sound-activated music modes, showing how the lights react to different sound conditions.
Important Note: The disco light does not play music itself. It uses an internal microphone to detect sound from its environment and trigger the light effects accordingly.
Maintenance
To ensure the longevity and optimal performance of your disco light, follow these maintenance guidelines:
- Cleaning: Regularly wipe the exterior of the unit with a soft, dry cloth. Do not use abrasive cleaners or solvents. Ensure the lenses are clean for clear light projection.
- Storage: When not in use, store the unit in a cool, dry place, away from direct sunlight and excessive moisture.
- Power Off: Always disconnect the power adapter before cleaning or performing any maintenance.
- Battery Replacement: Replace the remote control batteries (2 x AAA) when the remote's range decreases or it becomes unresponsive.
Troubleshooting
| Problem | Possible Cause | Solution |
|---|---|---|
| Light does not turn on. | No power connection; Faulty power adapter/cable; Unit malfunction. | Ensure power adapter is securely plugged into both the unit and the outlet. Try a different outlet. Check cable for damage. If problem persists, contact support. |
| Remote control not working. | Dead batteries; Obstruction between remote and unit; Remote not pointed at IR receiver. | Replace AAA batteries in the remote. Ensure no objects are blocking the signal path. Point the remote directly at the IR receiver on the front of the light unit. |
| Sound activated mode not responding. | Low sound sensitivity; Insufficient sound volume; Microphone obstructed. | Increase sound sensitivity using the remote control. Ensure music/sound source is loud enough and close to the unit. Check if the microphone opening on the unit is clear. |
| Light patterns are dim or blurry. | Dirty lenses; Unit placed too far from projection surface. | Gently clean the light lenses with a soft, dry cloth. Move the unit closer to the desired projection surface. |
Specifications
| Attribute | Detail |
|---|---|
| Model Number | YUEKEJI-10 |
| Brand | caivimvn |
| Color | Black |
| Material | Metal shell |
| Product Dimensions | 6.7"L x 4.7"W x 3.7"H |
| Item Weight | 1.8 Pounds |
| Light Source Type | Light Emitting Diode (LED) |
| Power Source | Corded Electric |
| Remote Control Batteries | 2 AAA batteries (included) |
| Special Features | Memory Function, Remote Control, RGB, Sound Activated |
| Manufacturer | Shenzhen Yu' e Technology Co., Ltd. |

Image: Technical drawing illustrating the precise dimensions of the disco light unit and its remote control.
Warranty and Support
For information regarding warranty coverage, technical support, or service inquiries, please refer to the purchase platform or contact the seller directly. Keep your purchase receipt as proof of purchase.
Note on Videos: This manual does not include embedded product videos. Please refer to the product listing on the retail website for any available video demonstrations.
Ask a question about this manual
Ask about setup, troubleshooting, compatibility, parts, safety, or missing instructions. Manuals+ will review the question and use this page’s manual context to help answer it.