JRAHK CON002-15G-GD
JRAHK BLDC Sine Wave Controller Electric Scooter/E-Bike Controller User Manual
Model: CON002-15G-GD
1. Introduction
This user manual provides comprehensive instructions for the installation, operation, and maintenance of the JRAHK BLDC Sine Wave Controller. This controller is designed for electric bicycles, scooters, small tricycles, and two-wheelers, offering stable speed control and sensitive response for braking and direction changes. Its robust design ensures reliable performance and protection against thermal overload.

Image: The JRAHK BLDC Sine Wave Controller integrated into an electric bicycle system, demonstrating its application in e-mobility.
2. Safety Information
- Always disconnect power before installation, maintenance, or troubleshooting.
- Ensure all connections are secure and properly insulated to prevent short circuits.
- Do not expose the controller to water or extreme temperatures.
- Consult a qualified technician if you are unsure about any installation steps.
- Verify correct voltage and current ratings before connecting to your motor and battery system.
3. Product Overview
The JRAHK BLDC Sine Wave Controller features a robust aluminum alloy casing for excellent heat dissipation, protecting internal circuits from thermal overload. It is designed for sensitive control and stable speed delivery for various electric vehicles.

Image: A comprehensive view of the JRAHK BLDC Sine Wave Controller, showcasing its compact design and numerous wiring connections.
3.1 Key Features
- Sensitive Control: Provides stable speed and sensitive control of braking and direction changes.
- Professional Design: Exquisite workmanship with a bright, durable finish.
- Circuit Protection: Thickened aluminum alloy case ensures good heat dissipation and prevents thermal overload.
- Wide Application: Compatible with 36V, 48V, 60V, 72V, 84V systems, suitable for electric bicycles, scooters, small tricycles, and two-wheelers.
- Easy Installation: Each cable is clearly labeled for straightforward setup.
3.2 Component Identification
Refer to the diagram below for identification of the various wires and their functions.
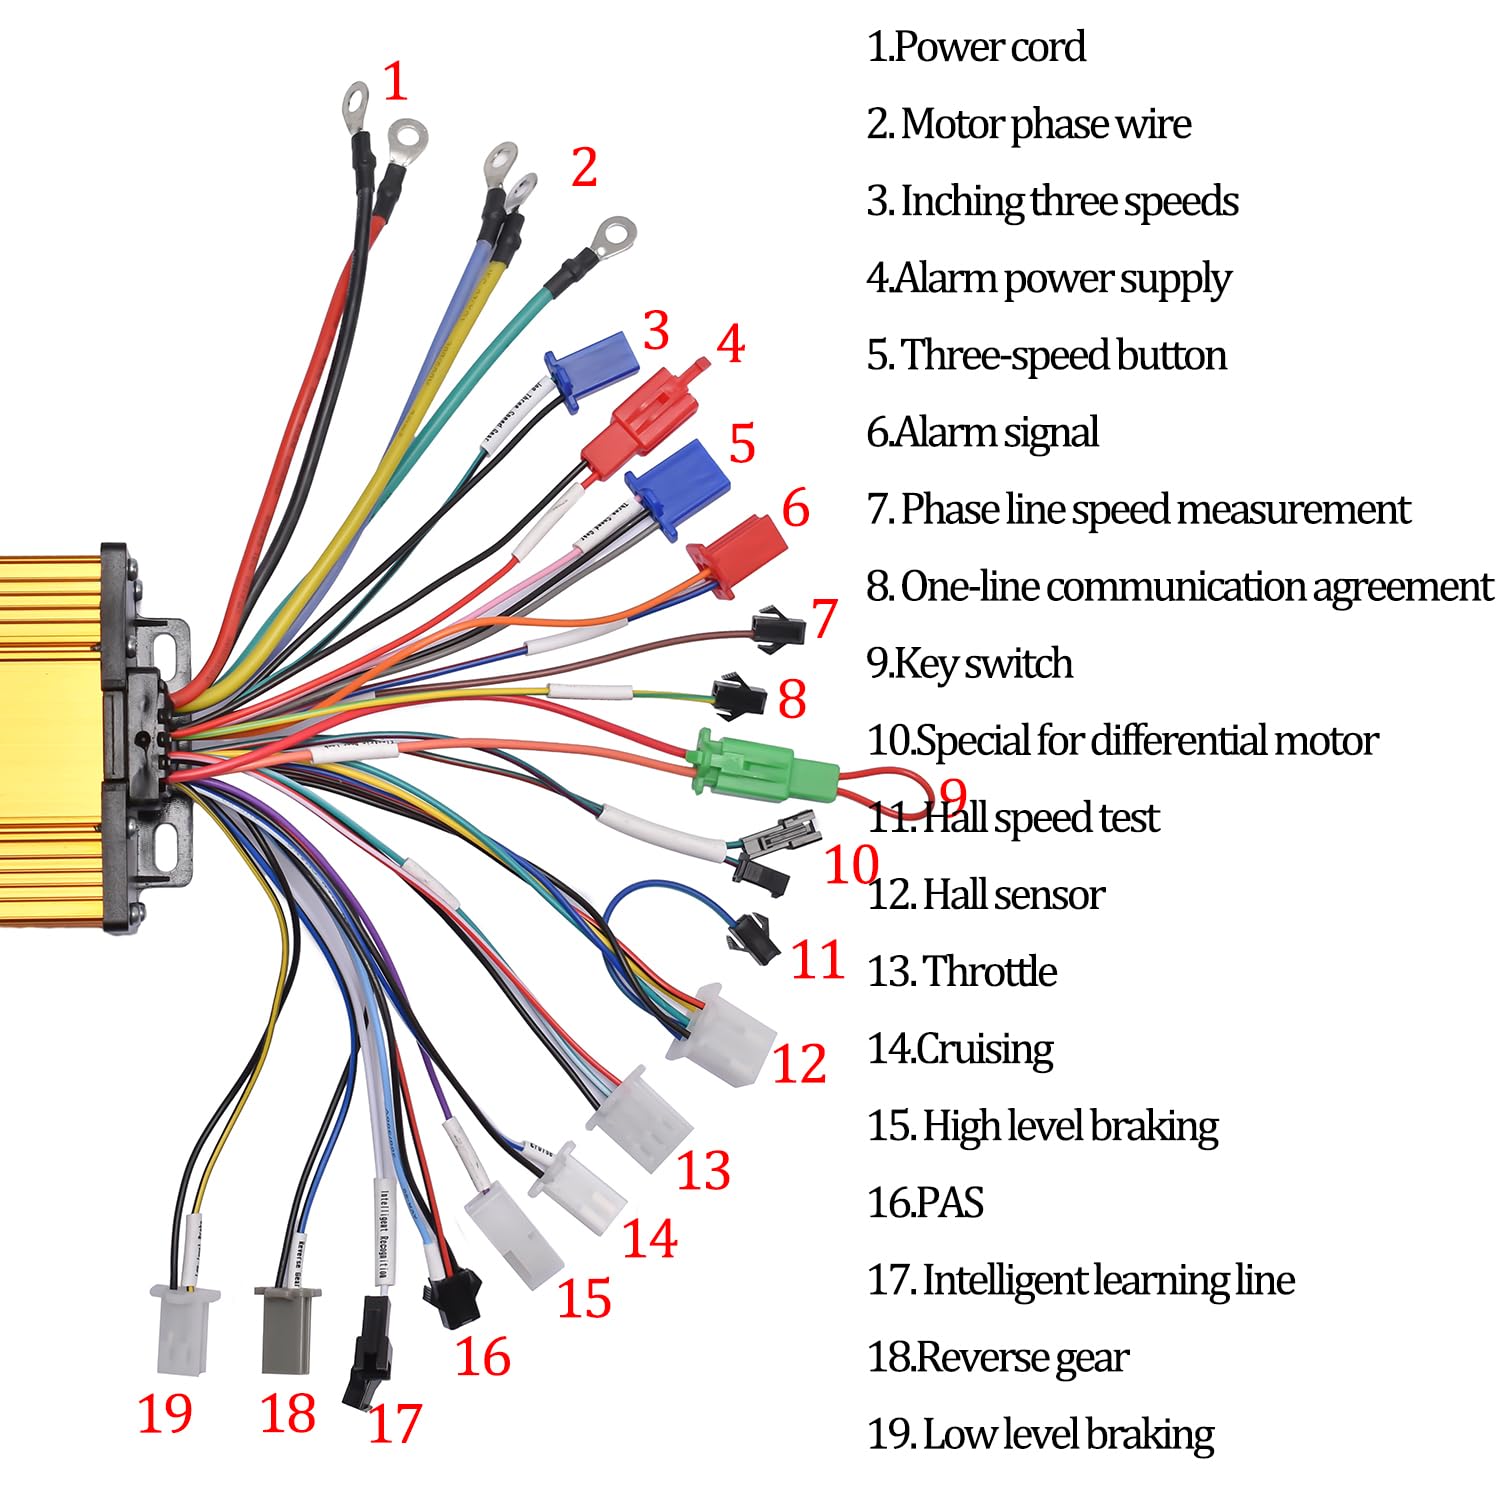
Image: A detailed diagram illustrating the various wires of the controller and their corresponding functions, crucial for correct installation.
| No. | Function |
|---|---|
| 1 | Power cord |
| 2 | Motor phase wire |
| 3 | Inching three speeds |
| 4 | Alarm power supply |
| 5 | Three-speed button |
| 6 | Alarm signal |
| 7 | Phase line speed measurement |
| 8 | One-line communication agreement |
| 9 | Key switch |
| 10 | Special for differential motor |
| 11 | Hall speed test |
| 12 | Hall sensor |
| 13 | Throttle |
| 14 | Cruising |
| 15 | High level braking |
| 16 | PAS |
| 17 | Intelligent learning line |
| 18 | Reverse gear |
| 19 | Low level braking |

Image: A close-up view highlighting the clear English labels on each wire, simplifying the connection process.
4. Setup and Installation
Follow these steps for proper installation of your JRAHK BLDC Sine Wave Controller. Ensure all power is disconnected before beginning.
4.1 Initial Connection Test
- Step 1: Connect the following lines:
- Line 1 (Power cord)
- Line 2 (Motor phase wire)
- Line 8 (One-line communication agreement)
- Line 17 (Intelligent learning line)
- Step 2: Connect Line 5 (Three-speed button) with the motor suspended. After connecting Line 5, the motor should rotate slowly. If the motor rotates in reverse, reconnect Line 5.
- Note: The above steps are for testing whether the controller is functional.

Image: Visual guide for the initial connection test, illustrating the specific wires to connect for basic functionality verification.
4.2 Full Installation
After the initial test is complete and the controller is confirmed to be working, proceed with connecting the remaining lines according to your specific vehicle's requirements and the wiring diagram provided in Section 3.2.
- Connect the Throttle (Line 13) for speed control.
- Connect Hall Sensor wires (Line 12) if your motor is Hall sensored.
- Connect Braking wires (Line 15 for High level, Line 19 for Low level) to your brake levers.
- Connect Key Switch (Line 9) for power on/off.
- Connect PAS (Line 16) if your system uses pedal assist.
- Connect Alarm wires (Line 4 and 6) if using an alarm system.
- Secure the controller in a dry, protected location on your vehicle, ensuring adequate airflow for heat dissipation.
5. Operating Instructions
Once installed, operating the JRAHK BLDC Sine Wave Controller is straightforward.
- Power On: Turn the key switch (Line 9) to power on the system.
- Speed Control: Use the throttle (Line 13) to control the motor speed. The sine wave control provides smooth and responsive acceleration.
- Braking: Apply the brakes. The controller will cut power to the motor, providing sensitive and effective braking.
- Three-Speed Function: If connected, use the three-speed button (Line 5) to cycle through different speed modes (e.g., low, medium, high).
- Intelligent Learning: The intelligent learning line (Line 17) allows the controller to adapt to your motor's characteristics for optimized performance. This is typically used during initial setup or if motor characteristics change.
6. Maintenance
The JRAHK BLDC Sine Wave Controller is designed for durability and requires minimal maintenance. Following these guidelines will ensure its longevity:
- Keep Clean: Periodically wipe the controller's exterior with a dry, soft cloth to remove dust and dirt. Avoid using harsh chemicals or abrasive materials.
- Inspect Connections: Regularly check all wire connections to ensure they are secure and free from corrosion. Loose connections can lead to intermittent performance or damage.
- Avoid Moisture: While the casing offers protection, avoid direct exposure to heavy rain or submersion in water. If the controller gets wet, ensure it is completely dry before re-applying power.
- Ensure Ventilation: Confirm that the controller's mounting location allows for adequate airflow to facilitate heat dissipation, especially during prolonged use.
- Storage: If storing the vehicle for an extended period, disconnect the battery from the controller. Store in a cool, dry place.
7. Troubleshooting
This section addresses common issues you might encounter with your JRAHK BLDC Sine Wave Controller.
| Problem | Possible Cause | Solution |
|---|---|---|
| Motor not responding to throttle | Loose throttle connection; Faulty throttle; Controller not powered; Motor or Hall sensor issue. | Check throttle wiring (Line 13). Test throttle functionality. Ensure key switch (Line 9) is on and battery is charged. Verify motor and Hall sensor connections (Line 12). |
| Motor rotates in reverse during initial test | Incorrect intelligent learning line connection. | Reconnect Line 5 (Three-speed button) as per initial test instructions. The controller should auto-correct direction. |
| Intermittent power or erratic behavior | Loose wire connections; Overheating; Low battery voltage. | Inspect all connections for tightness. Ensure controller has adequate ventilation. Check battery charge level. |
| Controller feels hot to the touch | Overload; Insufficient ventilation; Prolonged high-power usage. | Reduce load on the motor. Ensure controller is mounted in a location with good airflow. Allow controller to cool down. |
| Brakes not cutting motor power | Brake lever sensor wires (Line 15 or 19) not connected or faulty. | Check connections for high-level or low-level braking wires. Test brake lever sensors. |
If you encounter issues not listed here or if the suggested solutions do not resolve the problem, please contact JRAHK customer support for further assistance.
8. Specifications
Detailed technical specifications for the JRAHK BLDC Sine Wave Controller.
| Attribute | Value |
|---|---|
| Brand | JRAHK |
| Model Name | CON002-15G-GD |
| Voltage Compatibility | 36V, 48V, 60V, 72V, 84V (Auto recognition) |
| Current (Speed) | 34-40 Amps |
| Horsepower (Max) | 2000 Watts |
| Motor Type | Hall sensored brushless DC motor (Sine Wave) |
| Product Dimensions | 3.5 x 3.5 x 1.9 inches (85mm x 85mm x 48mm) |
| Item Weight | 1.43 Pounds (697g) |
| Case Material | Thickened Aluminum Alloy |

Image: Detailed dimensions of the controller, indicating its length, width, and height for installation planning.
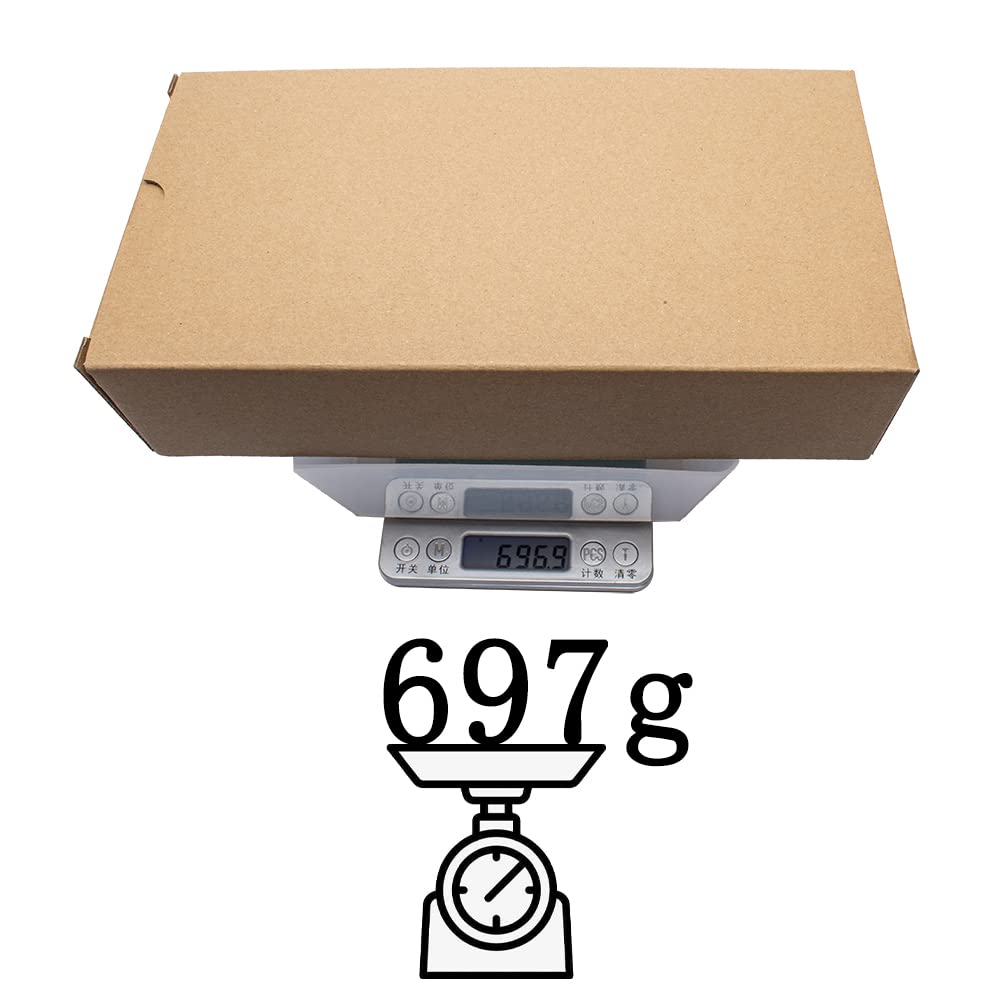
Image: The controller being weighed on a scale, showing its approximate weight of 697 grams.
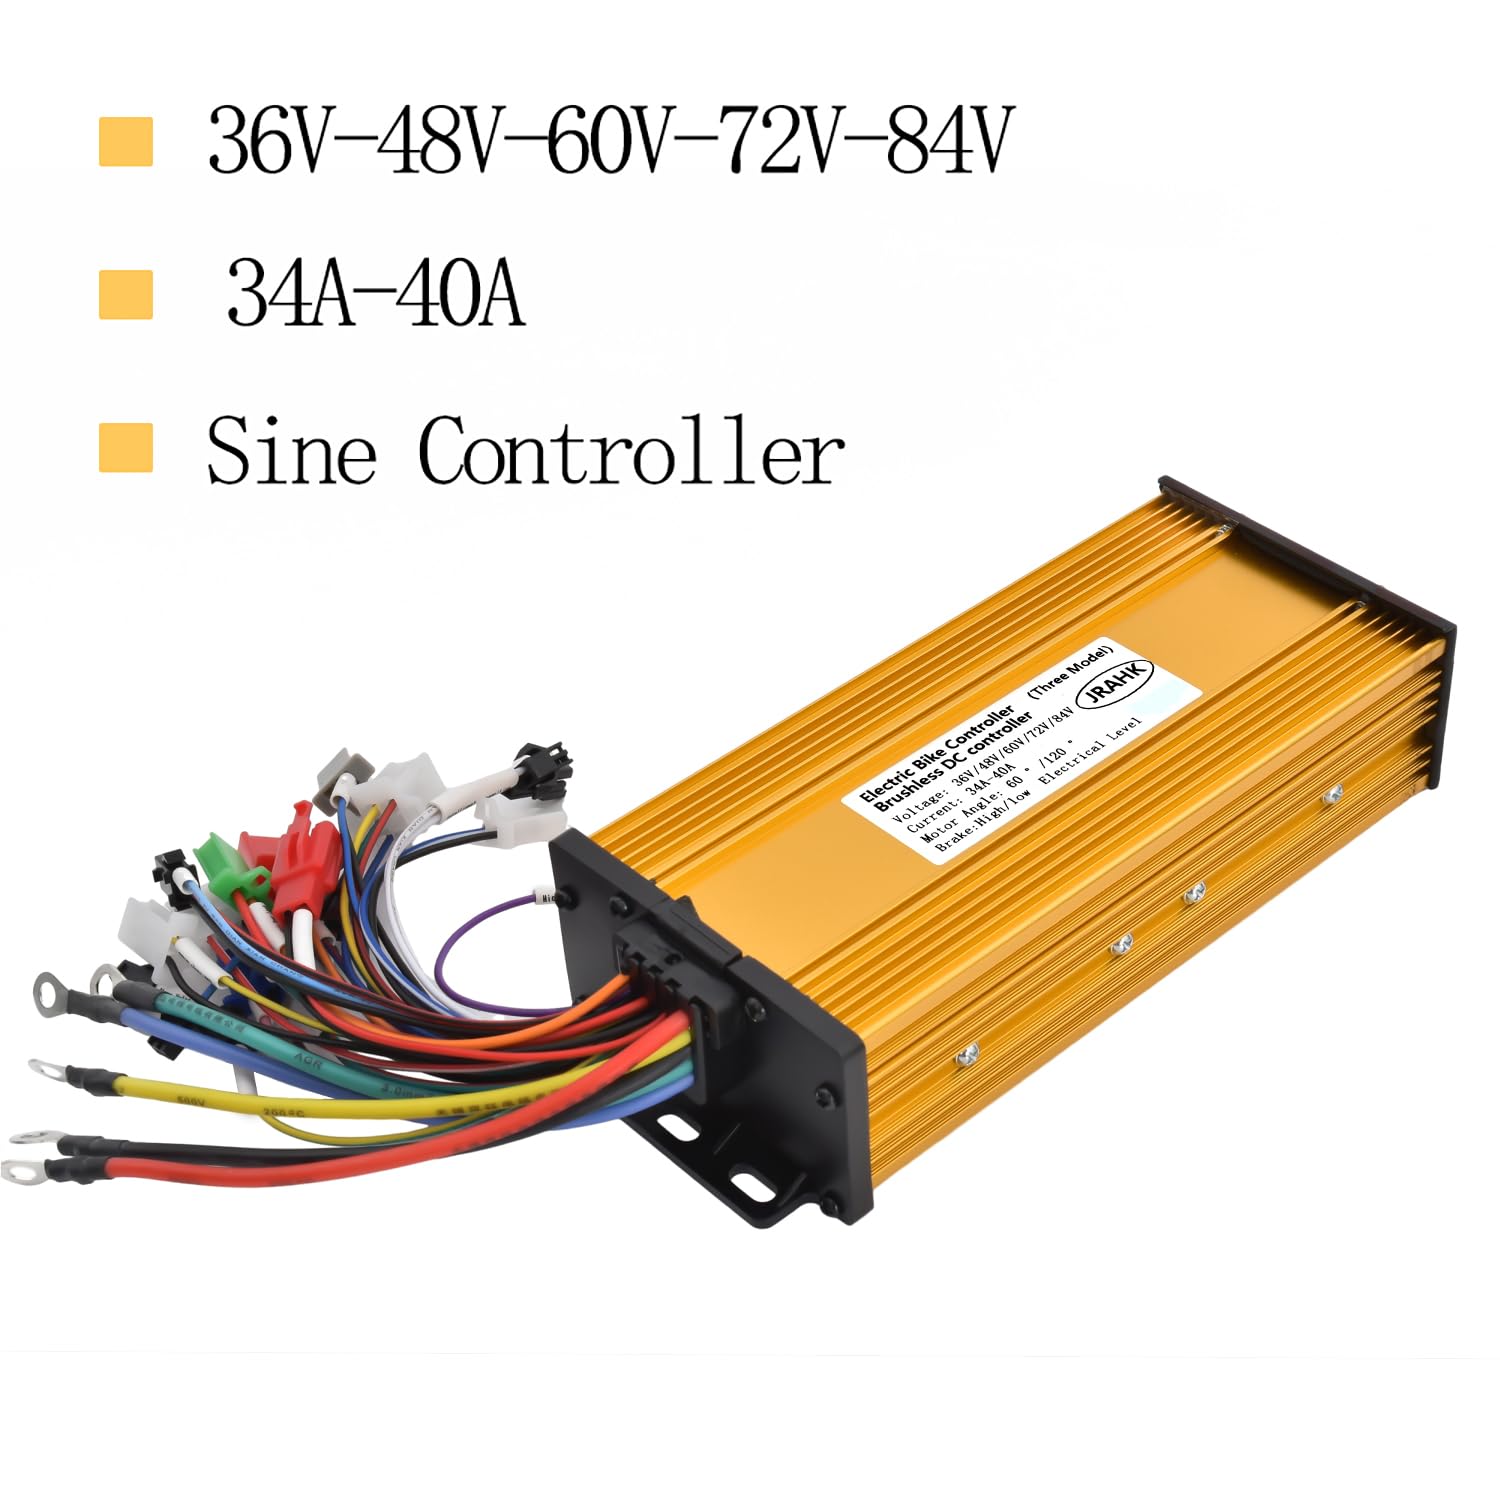
Image: Visual representation of the controller's voltage and current specifications, emphasizing its versatility.
9. Warranty and Support
JRAHK is committed to providing high-quality products and excellent customer service.
9.1 Warranty Information
Specific warranty details are typically provided with your purchase documentation. Please refer to the warranty card or product packaging for the exact terms and duration of your warranty.
9.2 Customer Support
If you have any product issues, questions, or require technical assistance, please do not hesitate to contact us via the Amazon message system. Our support team will do their best to assist you promptly.
For more information, visit the JRAHK Brand Store on Amazon.
Ask a question about this manual
Ask about setup, troubleshooting, compatibility, parts, safety, or missing instructions. Manuals+ will review the question and use this page’s manual context to help answer it.