
1. Introduction
The Browning Command Ops Elite 22 (BTC-4E22) is a high-performance trail camera designed for wildlife monitoring. It features an infrared LED flash with an 80-foot range and Illuma-Smart technology for exceptional nighttime photos. With a rapid 0.3-second trigger reaction and a 70-foot detection range, this camera ensures comprehensive capture of wildlife activity. It delivers 22MP photo resolution and 720p video with sound, offering versatile recording options.
This camera is equipped with advanced features such as multi-shot and rapid-fire image modes, SD card management, and a programmable delay from 1 second to 60 minutes. All captured photos and videos are stamped with essential data including time, date, temperature, moon phase, and camera ID. For extended use, a 12V power jack allows connection to external power sources, complementing its long battery life with 6 AA batteries. The camera supports up to a 32GB memory card.

Image 1.1: The Browning Command Ops Elite 22 Trail Camera, showcasing its compact design and camouflage finish, ready for deployment in a natural environment.
2. Key Features
- High Resolution Imaging: Captures 22 Megapixel still images and 720p HD+ video with sound.
- Fast Trigger Speed: Ultra-fast 0.3-second trigger speed to capture fleeting moments.
- Extended Detection & Flash Range: 70-foot detection range and 80-foot infrared flash range with Illuma-Smart Technology for optimal night vision.
- Flexible Capture Modes: Supports up to 8 multi-shot images and up to 4 rapid-fire images.
- Programmable Delay: Adjustable picture delay from 1 second to 60 minutes.
- Data Stamping: Photos and videos include time, date, temperature, moon phase, and camera ID stamps.
- Power Options: Operates on 6 AA batteries (included) with a 12V external power jack for alternative power sources.
- Memory Card Support: Compatible with SD cards up to 32GB (included).
- Durable Design: Rugged and water-resistant construction suitable for outdoor use.
- Timelapse Plus Camera Mode: Advanced mode for capturing time-lapse sequences.

Image 2.1: A detailed view of the camera highlighting features such as adjustable IR flash, programmable delay, multi-shot options, battery life, SD card management, and the 12-volt external power jack.

Image 2.2: Another view of the camera, emphasizing its 22MP images, 70ft detection range with 80ft infrared illumination, 0.3-second trigger speed, and Timelapse Plus Camera Mode.
3. Setup Guide
3.1 Battery Installation
- Open the camera housing latch.
- Locate the battery compartment.
- Insert 6 AA alkaline or lithium batteries, ensuring correct polarity (+/-).
- Close the battery compartment securely.
3.2 SD Card Installation
- With the camera housing open, locate the SD card slot.
- Insert an SD card (up to 32GB) into the slot until it clicks into place. Ensure the card is inserted with the correct orientation.
- To remove, press the card gently until it springs out.
3.3 Mounting the Camera
The Command Ops Elite 22 offers two primary mounting options:
- Rear Housing Bracket: Use the included strap to secure the camera to a tree or post via the bracket on the back of the camera.
- Standard 1/4"-20 Thread: Attach the camera to a tripod or other mounting accessories using the threaded insert located at the bottom of the camera.
Ensure the camera is mounted securely and pointed towards the desired area of observation, free from obstructions that might trigger false detections (e.g., swaying branches).

Image 3.1: Demonstrates the process of mounting and positioning the trail camera in an outdoor setting.
4. Operating Instructions
4.1 Powering On/Off
Locate the ON/OFF switch inside the camera housing. Slide the switch to 'ON' to power up the camera. Slide to 'OFF' to power down.
4.2 Menu Navigation
The camera features a small LCD screen and control buttons (UP, DOWN, OK, M) for navigating the menu. Press 'M' to enter the menu, use UP/DOWN to scroll through options, and 'OK' to select.

Image 4.1: A close-up view of the camera's control panel, showing the LCD screen, navigation buttons (UP, DOWN, OK), and the 'M' (Mode) button.
4.3 Photo and Video Settings
Within the menu, you can adjust various settings:
- Mode: Select between Photo, Video, or Timelapse Plus.
- Photo Resolution: Set to 22MP for maximum detail.
- Video Resolution: Choose 720p for video capture.
- Video Length: Adjust video clip duration from 5 seconds up to 2 minutes.
- Multi-Shot/Rapid-Fire: Configure the number of photos taken per trigger event.
4.4 Delay Settings
The 'Delay' setting determines the waiting period before the camera can be re-triggered after an event. This can be set from 1 second to 60 minutes to prevent excessive captures of the same animal.
4.5 Time and Date Stamp
Ensure the camera's internal clock is set correctly. All captured media will automatically include a stamp with the time, date, temperature, moon phase, and camera ID for detailed record-keeping.

Image 4.2: An example of a captured image, demonstrating the automatic data stamp including temperature, date, time, moon phase, and camera ID.
5. Maintenance
5.1 Cleaning
- Regularly clean the camera lens and the PIR sensor window with a soft, lint-free cloth to ensure clear images and proper detection.
- Wipe the camera body with a damp cloth to remove dirt and debris. Avoid harsh chemicals.
5.2 Battery Replacement
Replace all 6 AA batteries when the low battery indicator appears on the LCD screen or when performance degrades. For optimal performance, use high-quality alkaline or lithium batteries.
5.3 SD Card Management
- Periodically check the SD card capacity. Format the SD card regularly to maintain optimal performance and prevent data corruption.
- Always remove the SD card when the camera is powered off to prevent data loss.
6. Troubleshooting
- Camera Not Powering On: Check battery installation and ensure batteries are fresh. Verify the ON/OFF switch is in the 'ON' position.
- No Images/Videos Captured: Ensure the SD card is properly inserted and not full. Check the camera's mode settings (Photo/Video). Verify the detection range and sensitivity settings.
- Poor Image Quality: Clean the camera lens and ensure it is free from dirt or condensation. Check for obstructions in front of the lens or flash.
- False Triggers: Adjust the camera's sensitivity settings. Ensure the camera is not pointed at heat sources or moving vegetation that could cause false detections.
- Short Battery Life: Use high-quality alkaline or lithium batteries. Reduce the frequency of captures or video length if possible. Consider using the 12V external power option for prolonged deployment.
7. Specifications
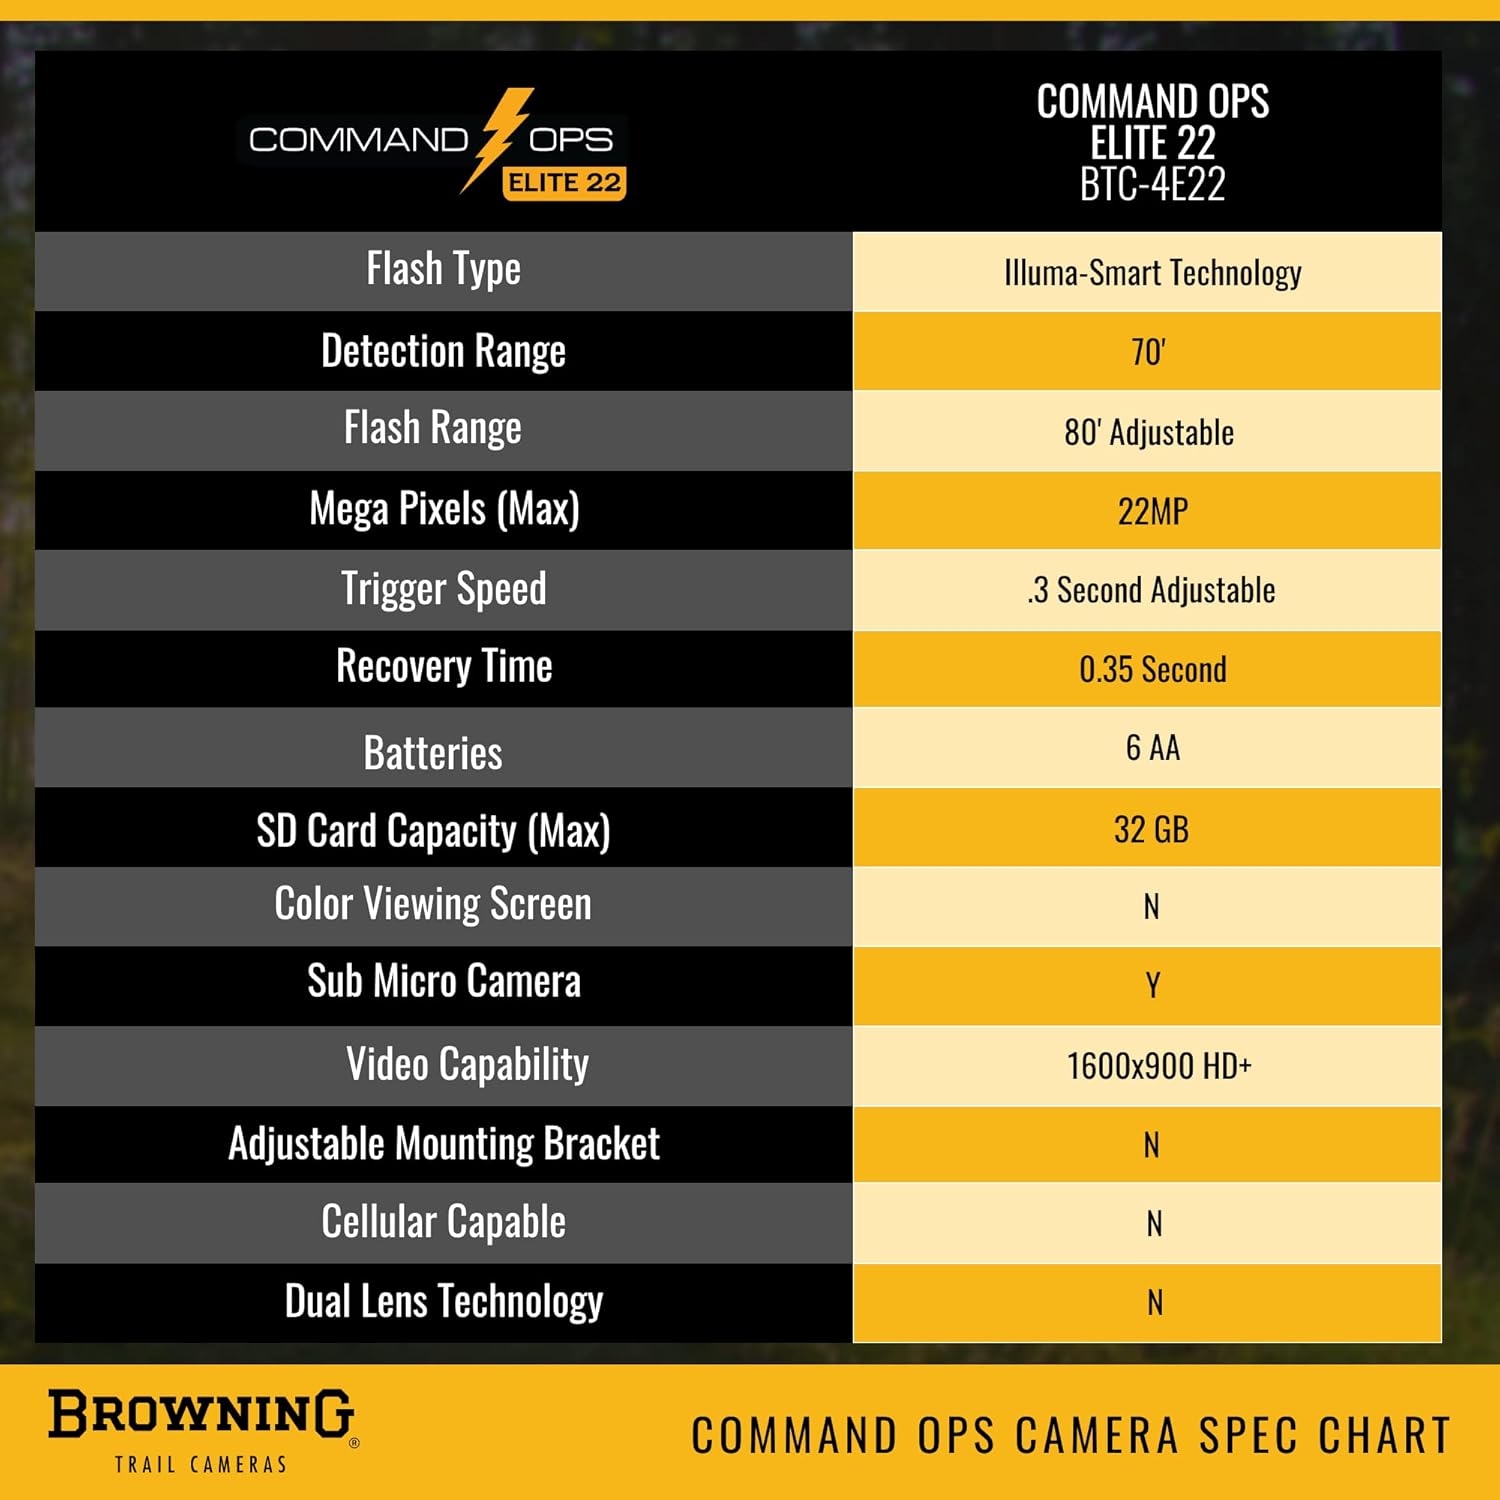
Image 7.1: Official specification chart for the Browning Command Ops Elite 22 (BTC-4E22) Trail Camera.
| Feature | Specification |
|---|---|
| Model Name | Command Ops Elite 22 |
| Model Number | BTC-4E22 |
| Photo Resolution | 22 Megapixels |
| Video Resolution | 720p (1600x900 HD+) |
| Trigger Speed | 0.3 seconds |
| Detection Range | 70 feet |
| Flash Range | 80 feet (Infrared LED with Illuma-Smart) |
| Power Source | 6 AA Batteries (or 12V External Power) |
| Memory Card Support | Up to 32GB SD Card |
| Water Resistance | Water Resistant (IP65) |
| Connectivity Technology | Wireless (Wi-Fi) |
| Item Dimensions | 3.13 x 9.13 x 4.25 inches |
| Item Weight | 0.82 Pounds |
| UPC | 850042317013 |
8. Warranty Information
The Browning Command Ops Elite 22 Trail Camera comes with a 1-Year Limited Warranty. This warranty covers defects in workmanship and materials under normal operating conditions. In the event of a defect, Browning will repair or replace the unit with a new or refurbished product as deemed necessary.
9. Support
For further assistance, technical support, or warranty claims, please refer to the official Browning website or contact their customer service department. Keep your purchase receipt as proof of purchase for warranty services.
Browning Official Website: www.browning.com


