Shaking Tank LT520 Black (R-LT720-BKAMNF-G-1)
Liquid Cooler LT520 Instruction Manual
Model: LT520 Black (R-LT720-BKAMNF-G-1) | Brand: Shaking Tank
1. Introduction
This manual provides detailed instructions for the installation, operation, and maintenance of your Shaking Tank LT520 240MM Liquid Cooler. Please read this manual thoroughly before installation and use to ensure optimal performance and longevity of your product.

Figure 1.1: Shaking Tank LT520 Liquid Cooler. This image displays the complete liquid cooling unit, including the 240mm radiator, two cooling fans, and the pump block with its distinctive design.
2. Product Features
- Efficient Heat Dissipation: Combines a 4th generation pump with a high-density radiator and FK120 fans, providing mighty 280W TDP efficient heat dissipation. Water tubes measure 410mm length with two tube clips for neat management.
- Visually Stunning ARGB: Features a multidimensional infinity mirror design on the magnetic pump block, creating a "geometric ice cube" effect with Aura Sync ARGB LED lighting.
- Optimized Pump Design: Improved 4th generation pump's microchannel design optimizes coolant flow. The three-phase brushless motor operates up to 3100RPM, combined with a thick pure copper plate for maximized overall cooling efficiency.
- Dual-Chamber Pump Structure: New structure dual-chamber pump cools the CPU first before circulating liquid through the motor chamber, making the motor more efficient and reducing heat transfer into the loop.
- Anti-Leak Technology: Equipped with Anti-Leak patent technology, a pressure-relief device in the radiator vents inner air pressure caused by high temperature, preventing potential leaks after long-term use.
- High-Performance FK120 Fans: FK120 FDB fans operate up to 2250RPM, offering 85.85CFM airflow each. Noise damping pads keep full load noise level under 32.9dB(A).
- Broad Compatibility: Supports AMD sTRX4/sTR4/AM5/AM4 and Intel LGA 1700/1200/1151/1150/1155/2066/2011-v3/2011 sockets.
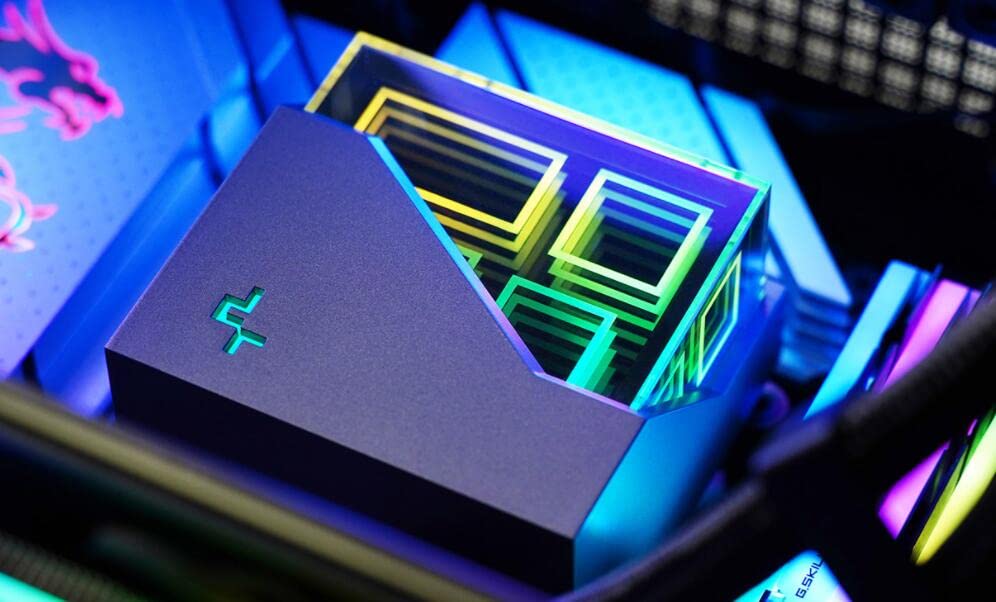
Figure 2.1: Multidimensional Infinity Mirror ARGB Block. This image shows a close-up of the pump block, highlighting its unique infinity mirror design with vibrant ARGB lighting effects.

Figure 2.2: Internal Structure of the 4th Generation Pump. This diagram illustrates the advanced internal design of the pump, showcasing the optimized waterway, high-turn three-phase inner motor, and large thickened copper base for efficient cooling.

Figure 2.3: FK120 High Performance Fan Details. This image provides key specifications for the FK120 fan, including its RPM range, maximum air volume (CFM), wind pressure, and noise level.
3. Package Contents
Verify that all components are present in the package before proceeding with installation:
- 1 x LT520 CPU Liquid Cooler (Radiator, Pump, and Tubes pre-assembled)
- 2 x 120mm FK120 Fans
- Mounting Hardware Kit for Intel (LGA 1700/1200/1151/1150/1155/2066/2011-v3/2011)
- Mounting Hardware Kit for AMD (sTRX4/sTR4/AM5/AM4)
- Thermal Paste (pre-applied or included in a tube)
- Fan Splitter Cable
- ARGB Controller Cable (if applicable)
- User Manual (this document)
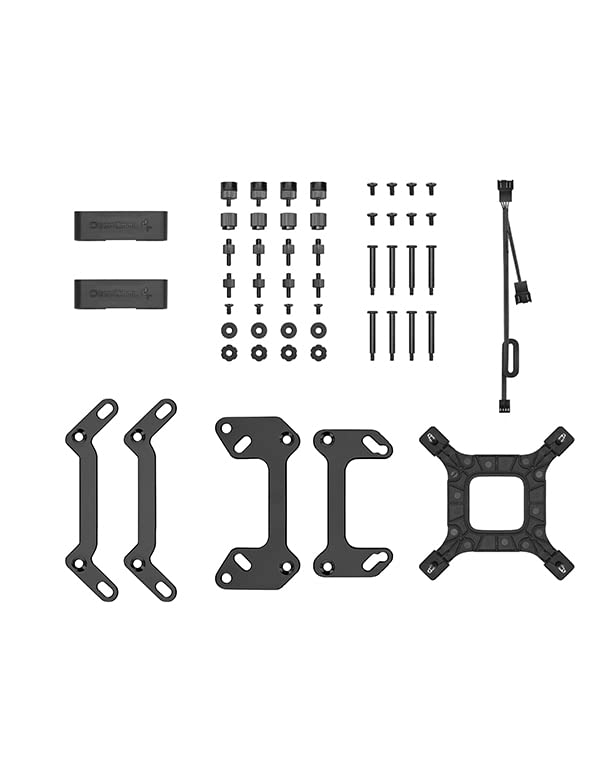
Figure 3.1: Included Accessories. This image displays the various components provided with the LT520 liquid cooler, such as the mounting brackets, screws, and cables necessary for installation on different CPU sockets.
4. Setup and Installation
Before beginning installation, ensure your system is powered off and unplugged. Refer to your motherboard's manual for specific CPU socket information.
4.1 Pre-Installation Checklist
- Ensure your PC case has adequate space for a 240mm radiator.
- Identify your CPU socket type (Intel or AMD) to select the correct mounting hardware.
- Gather necessary tools: Phillips head screwdriver, thermal paste cleaner (if reapplying).
4.2 General Installation Steps
- Prepare the CPU: Clean any old thermal paste from the CPU and apply a thin, even layer of new thermal paste if not pre-applied on the cooler's cold plate.
- Install Mounting Brackets: Attach the appropriate Intel or AMD mounting brackets to the pump block as per your CPU socket.
- Mount Radiator and Fans: Secure the two FK120 fans to the radiator using the long screws. Mount the assembled radiator and fans to your PC case (typically top or front) using the provided screws. Ensure proper airflow direction.
- Mount Pump Block: Carefully place the pump block onto the CPU, aligning it with the mounting holes. Secure it with the thumb screws or nuts, tightening in a cross pattern until snug.
- Connect Cables:
- Connect the pump power cable to the CPU_FAN or AIO_PUMP header on your motherboard.
- Connect the fan cables to the fan splitter, then connect the splitter to a SYS_FAN header on your motherboard.
- Connect the ARGB cable from the pump block and fans to your motherboard's 5V ARGB header or a dedicated ARGB controller.
- Cable Management: Use the included tube clips and zip ties (if provided) to manage cables and tubes for a clean build and unobstructed airflow.
Video 4.1: Installation Effect Display. This video demonstrates the visual effects and general appearance of the LT520 liquid cooler once installed in a PC system, showcasing the ARGB lighting and overall integration.
5. Operating Instructions
Once installed, the LT520 liquid cooler operates automatically based on your motherboard's fan and pump control settings. Ensure your motherboard's BIOS/UEFI settings are configured to manage CPU fan speeds based on temperature for optimal cooling performance and noise levels.
5.1 ARGB Lighting Control
The ARGB lighting of the pump block and fans can be controlled via your motherboard's ARGB software (e.g., ASUS Aura Sync, MSI Mystic Light, Gigabyte RGB Fusion, ASRock Polychrome Sync) if connected to a compatible 5V ARGB header. Alternatively, if an external ARGB controller is used, refer to its specific instructions for lighting customization.
6. Maintenance
Regular maintenance helps ensure the longevity and optimal performance of your liquid cooler.
- Dust Cleaning: Periodically clean dust from the radiator fins and fan blades using compressed air. Ensure fans are not spinning rapidly during cleaning to prevent damage.
- Tube Inspection: Visually inspect the tubes for any kinks, leaks, or damage. While the LT520 features Anti-Leak technology, regular checks are recommended.
- Thermal Paste: Re-application of thermal paste is generally not required unless the cooler is removed from the CPU. If re-installing, clean old paste and apply new.
7. Troubleshooting
| Problem | Possible Cause | Solution |
|---|---|---|
| High CPU Temperatures |
|
|
| Pump Noise |
|
|
| Fans Not Spinning / ARGB Not Lighting Up |
|
|
8. Specifications
| Attribute | Value |
|---|---|
| Product Dimensions | 11.1"L x 1.06"W x 4.72"H (Radiator) |
| Item Model Number | R-LT720-BKAMNF-G-1 |
| Brand | Shaking Tank |
| Power Connector Type | 3-Pin |
| Voltage | 12 Volts |
| Wattage (TDP) | 280 watts |
| Cooling Method | Water |
| Compatible Devices | Desktop |
| Noise Level (Max) | 32.9 dB(A) (FK120 Fan) |
| Material | Copper (Cold Plate) |
| Maximum Rotational Speed (Fan) | 2250 RPM |
| Tube Length | 410mm |
| Radiator Size | 282*120*27mm |
| Supported Sockets | AMD sTRX4/sTR4/AM5/AM4, Intel LGA 1700/1200/1151/1150/1155/2066/2011-v3/2011 |

Figure 8.1: Product Dimensions and Accessories. This image provides a visual representation of the cooler's dimensions and a detailed layout of all included accessories.
9. Warranty and Support
For warranty information and technical support, please refer to the official Shaking Tank website or contact their customer service directly. Keep your purchase receipt as proof of purchase for warranty claims.
Manufacturer: Shaking Tank
Date First Available: February 28, 2023