1. Introduction
This manual provides comprehensive instructions for the installation, operation, and maintenance of your new Ferilter Carburetor Replacement Kit. This kit is designed to restore optimal performance to compatible gas-powered backpack blowers and leaf blowers. Please read this manual thoroughly before attempting any installation or maintenance procedures.
Kit Contents:
- 1 x Carburetor
- 1 x Gasket
- 1 x Primer Bulb
- 1 x Fuel Filter
- 1 x Spark Plug
- 1 x Fuel Line Kit

Image 1.1: Complete Ferilter Carburetor Replacement Kit, including the carburetor, gasket, primer bulb, fuel filter, spark plug, and fuel lines.
2. Compatibility
This carburetor replacement kit is compatible with the following models:
- Poulan Pro: PR46BT, PR48BT (46cc, 48cc gas backpack blowers)
- Poulan: BP400, BP402 (gas leaf blowers, replaces 530058436)
- RedMax: EB4300, EB4400, EB4401 (leaf blowers), EB7000, EB7001 (backpack blowers)
- Shindaiwa: EB802, EB802RT (blowers, replaces A021002040)
Replaces Part Numbers: 521115801, WYK-66, A021002040, 530058436.
3. Setup and Installation
Safety First: Before beginning any work, ensure the engine is off and cool. Disconnect the spark plug wire to prevent accidental starting. Wear appropriate safety gear, including gloves and eye protection.
- Prepare the Work Area: Work in a well-ventilated area. Have a clean cloth and a container ready for any spilled fuel.
- Drain Fuel: If necessary, drain the fuel tank to prevent spills during carburetor removal.
- Remove Air Filter Assembly: Carefully remove the air filter cover and air filter. This will expose the carburetor.
- Disconnect Fuel Lines: Note the routing of the fuel lines (inlet and return) and carefully disconnect them from the old carburetor. Be prepared for minor fuel leakage.
- Disconnect Throttle Linkage: Detach the throttle cable and any other linkages connected to the carburetor. Take a photo if unsure about reassembly.
- Remove Old Carburetor: Unscrew the mounting bolts or nuts holding the carburetor to the engine intake. Carefully pull the old carburetor away from the engine. Remove and discard the old gasket.
- Install New Gasket: Place the new gasket provided in the kit onto the engine intake manifold, ensuring it aligns correctly with the mounting holes.
- Install New Carburetor: Position the new Ferilter carburetor onto the mounting studs, aligning it with the gasket and intake. Secure it with the mounting bolts/nuts, tightening them evenly.
- Reconnect Linkages and Fuel Lines: Reattach the throttle linkage and any other connections. Connect the new fuel lines from the kit, ensuring they are securely fitted and routed correctly. Replace the old fuel filter with the new one provided in the kit, ensuring the arrow on the filter points towards the carburetor.
- Replace Primer Bulb: If your old primer bulb is cracked or stiff, replace it with the new one.
- Install New Spark Plug: Remove the old spark plug and install the new one, ensuring it is tightened to the manufacturer's specifications.
- Reassemble Air Filter: Reinstall the air filter and air filter cover.

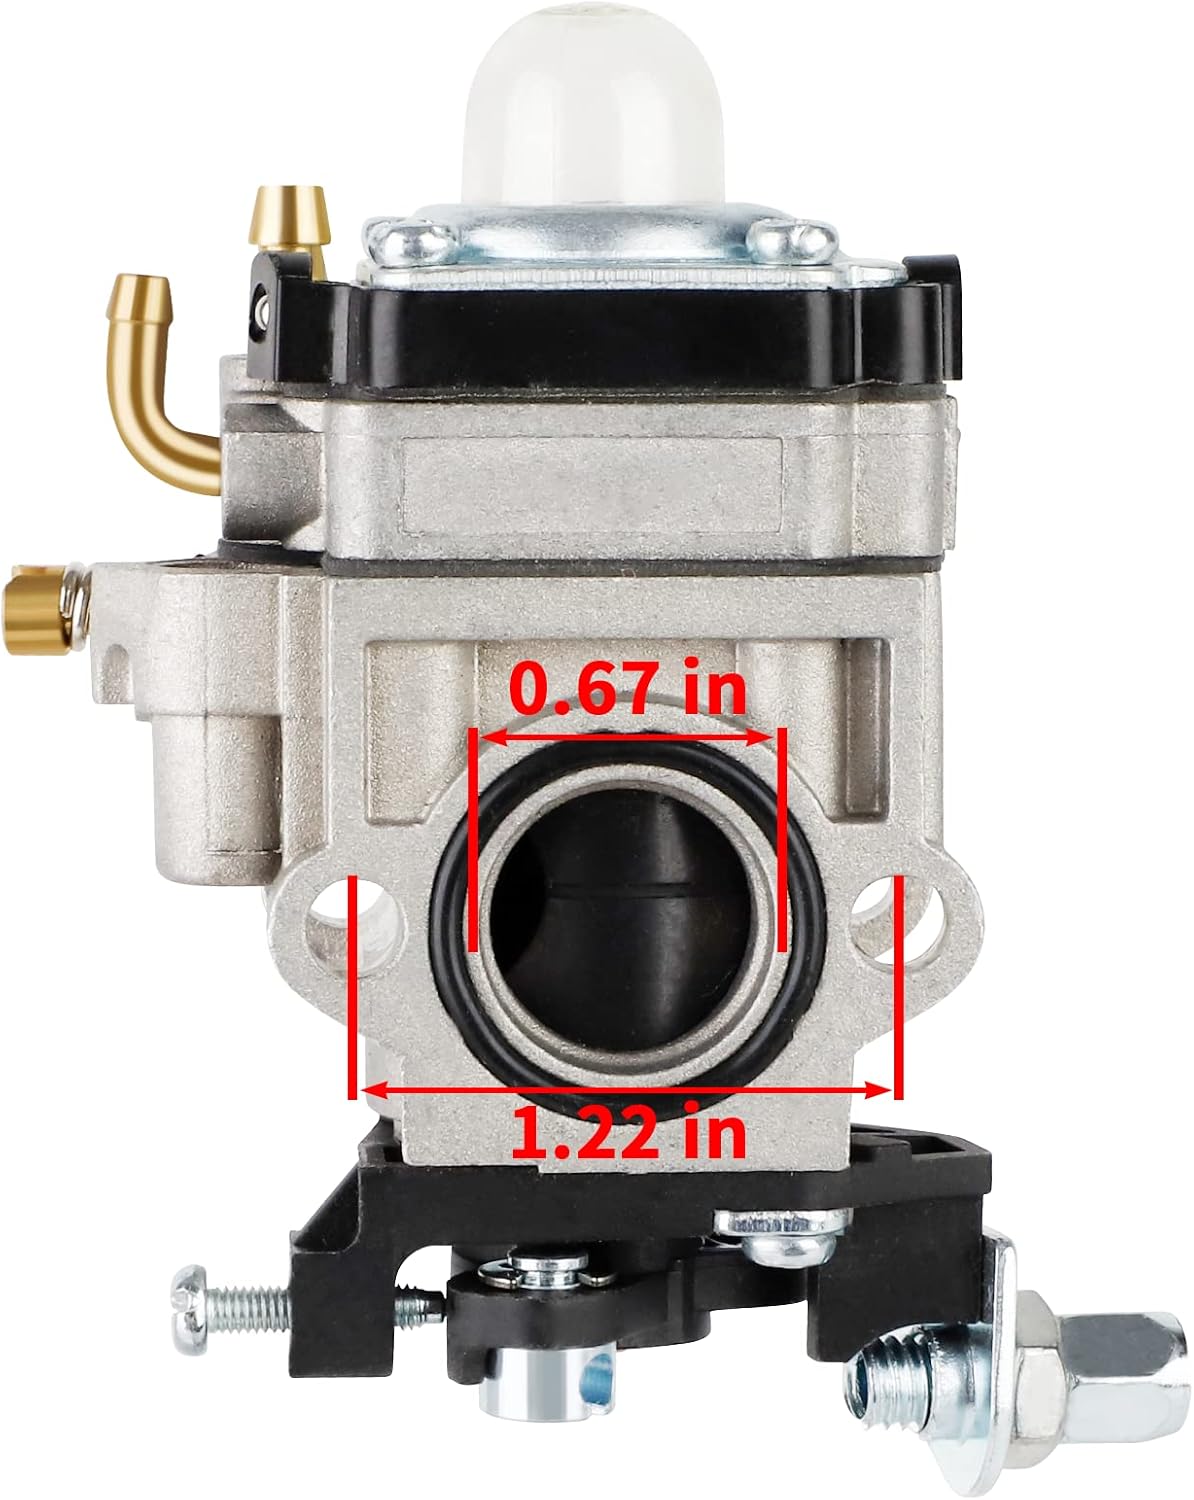
Image 3.1: Front and rear views of the carburetor, illustrating key dimensions for fitment verification.
4. Operating Instructions
After installation, follow these steps for initial startup and operation:
- Refill Fuel Tank: Fill the fuel tank with the appropriate fuel mixture (gasoline and 2-stroke oil, if applicable, according to your equipment's manufacturer specifications).
- Prime the Carburetor: Press the primer bulb several times until fuel is visible in the bulb and it feels firm. This ensures fuel is drawn into the carburetor.
- Choke and Start: Follow your equipment's specific starting procedure, which typically involves setting the choke, pulling the starter rope, and then gradually moving the choke to the run position once the engine fires.
- Idle and Adjust: Allow the engine to warm up for a minute or two. The carburetor is pre-tuned for general use, but minor adjustments to the idle screw may be necessary for smooth operation.
5. Maintenance
Regular maintenance of your carburetor and fuel system components will prolong the life of your equipment and ensure reliable performance.
- Fuel Quality: Always use fresh, clean fuel. Stale or contaminated fuel is a primary cause of carburetor issues. Consider using a fuel stabilizer if storing equipment for extended periods.
- Fuel Filter: Inspect and replace the fuel filter periodically (e.g., annually or every 50 hours of operation) to prevent debris from entering the carburetor.
- Air Filter: Keep the air filter clean to ensure proper air-fuel mixture. A dirty air filter can cause the engine to run rich and affect carburetor performance.
- Spark Plug: Inspect the spark plug regularly for wear or fouling. Replace it as needed to ensure consistent ignition.
- Carburetor Cleaning: If performance issues arise, the carburetor may need cleaning. This typically involves disassembling the carburetor and cleaning jets and passages with carburetor cleaner. This should be done by a qualified technician if you are not experienced.
6. Troubleshooting
If you encounter issues after installing the new carburetor, consider the following common problems and solutions:
| Problem | Possible Cause | Solution |
|---|---|---|
| Engine won't start | No fuel, clogged fuel filter, incorrect choke setting, faulty spark plug, fuel lines reversed. | Check fuel level, replace fuel filter, adjust choke, replace spark plug, verify fuel line routing. |
| Engine starts but dies | Improper idle adjustment, air leak, fuel delivery issue. | Adjust idle screw, check for loose connections around carburetor, ensure fuel flow. |
| Engine runs rough/bogs down | Dirty air filter, fuel quality, carburetor tuning. | Clean/replace air filter, use fresh fuel, consider professional carburetor adjustment. |
| Fuel leaks | Loose fuel lines, damaged gasket, cracked primer bulb. | Tighten fuel line clamps, replace gasket, replace primer bulb. |
If problems persist after attempting these solutions, it is recommended to consult a qualified small engine mechanic.
7. Specifications
| Attribute | Detail |
|---|---|
| Brand | Ferilter |
| Manufacturer | FERILTER |
| Item Model Number | EB4300 EB7000 PR46BT PR48BT |
| Manufacturer Part Number | 521115801 530058436 A021002040 |
| Item Weight | 8.8 ounces |
| Package Dimensions | 4.92 x 3.43 x 2.83 inches |
| Recommended Uses | Lawn Mower (also compatible with specified blowers) |
8. Warranty and Support
For warranty information or technical support regarding your Ferilter Carburetor Replacement Kit, please refer to the product packaging or contact Ferilter customer service directly. Keep your purchase receipt as proof of purchase for any warranty claims.
For additional resources and product information, you may visit the official Ferilter store on Amazon: Ferilter Store