1. Product Overview
The PADOM SDRD-306 Plus is a portable karaoke machine and PA speaker system designed for various indoor and outdoor events. It features two wireless microphones, multiple connectivity options, and sound enhancement functions for an engaging audio experience.
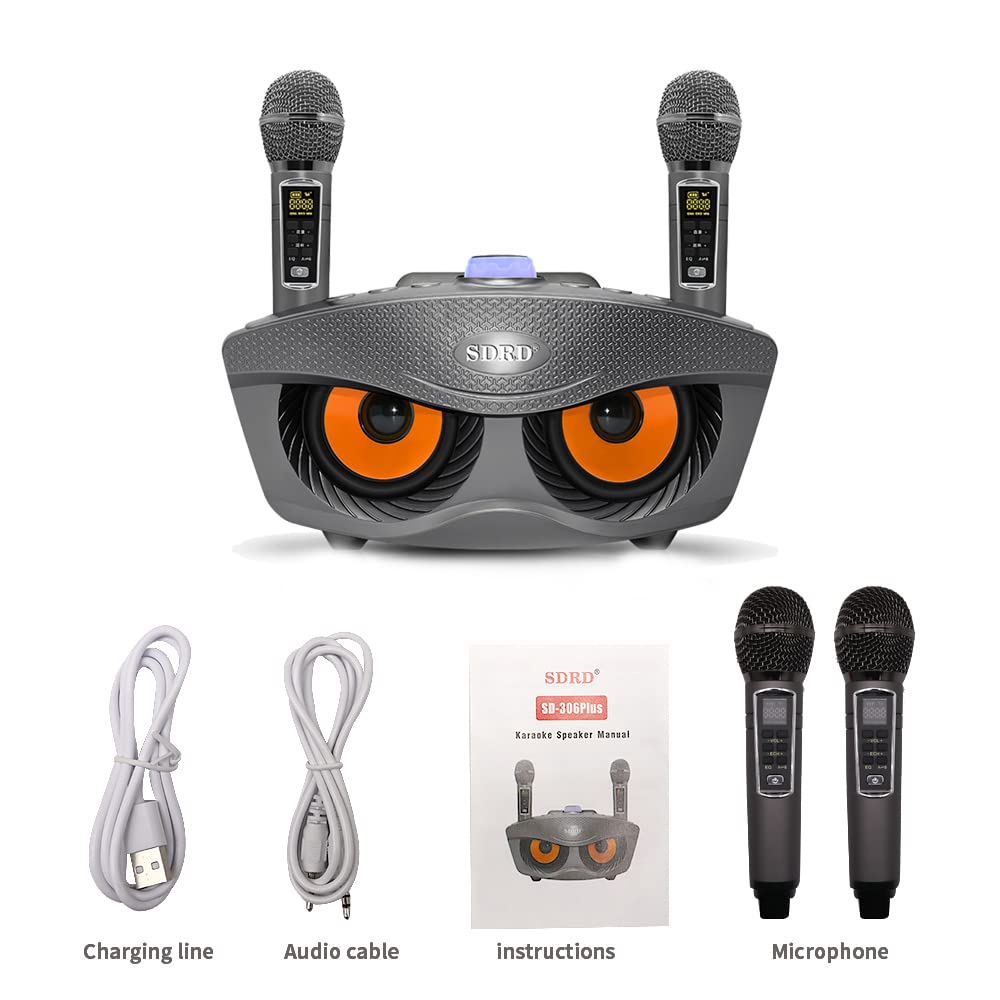
What's in the Box
- 1 x Karaoke Machine (SDRD-306 Plus Speaker)
- 2 x Wireless Microphones
- 1 x Charging Cable (USB)
- 1 x Audio Cable (AUX)
- 1 x Instruction Manual
2. Specifications
| Feature | Specification |
|---|---|
| Type | Karaoke Machine Set |
| Bluetooth Solution | Bluetooth 5.0 |
| Bluetooth Distance | Up to 10 meters (33 feet) |
| Speaker Power | 2 x 10W |
| Speaker Specifications | 3-inch external magnetic speakers |
| Speaker Battery | 9V 1800mAh (Built-in) |
| Speaker Play Time | 2-3 hours |
| Speaker Charging Input | 5V-2A |
| Speaker Charging Time | 1-2 hours |
| Product Material | ABS |
| Main Features | Bluetooth, TF card, AUX, FM Radio, U disk playback, Karaoke mode |
| Microphone Solution | BK U band |
| Microphone Distance | Up to 10 meters (33 feet) |
| Microphone Battery | Built-in 18650 1500mAh 3.7V |
| Microphone Charging Time | 1-2 hours |
| Microphone Type | Single-point capacitive |
| Product Weight | Approximately 1908g (4.2 lbs) |
| Product Dimensions | 29 x 14 x 15 cm (approximate) |
3. Setup
3.1 Initial Charging
Before first use, fully charge both the karaoke machine speaker and the wireless microphones to ensure optimal performance and battery life.
- Speaker Charging: Connect the provided USB charging cable to the charging port on the speaker and to a 5V-2A power adapter (not included). The charging indicator will illuminate.
- Microphone Charging: Connect the USB charging cable to the charging port at the bottom of each microphone. Alternatively, the microphones can be charged by placing them in the designated sleeves on the speaker unit while the speaker is charging or powered on.

3.2 Powering On/Off
- Speaker: Press and hold the power button on the speaker unit until the display illuminates.
- Microphones: Press and hold the power button on each microphone until the display illuminates.
3.3 Bluetooth Connection
To play music wirelessly from your device:
- Power on the karaoke machine speaker. It will automatically enter Bluetooth pairing mode, indicated by a flashing Bluetooth icon or an audible prompt.
- On your mobile phone, tablet, or laptop, enable Bluetooth and search for available devices.
- Select "SDRD-306 Plus" (or similar name) from the list of devices.
- Once connected, you will hear a confirmation sound, and the Bluetooth indicator on the speaker will become solid. You can now play audio from your device through the speaker.

3.4 Wired Connection (AUX)
To connect devices via the AUX input:
- Connect one end of the provided audio cable to the AUX input port on the karaoke machine.
- Connect the other end of the audio cable to the audio output (headphone jack) of your device (e.g., TV, desktop computer, MP3 player).
- The speaker will automatically switch to AUX mode, or you may need to press the "MODE" button on the speaker to select AUX input.
4. Operating Instructions
4.1 Speaker Controls

- VOLUME Knob: Rotate clockwise to increase volume, counter-clockwise to decrease.
- EQ Mode: Press the "EQ" button to cycle through different equalizer presets.
- Music Original Sound (MUSIC Orig): Press to remove vocals from a song, creating an instrumental track for karaoke.
- MODE: Press to switch between input sources: Bluetooth, TF card, AUX, FM, U disk.
- Voice Changing Functions: Buttons labeled "Man", "Girl", "Child's voice" allow you to apply different voice effects to your microphone input.
- MIC Priority: Press to enable microphone priority, which lowers music volume when you speak into the microphone.
- KTV Mode: Activates a specific sound profile optimized for karaoke.
- Concert Hall Mode: Activates a sound profile simulating a concert hall environment.
- Previous Song / Volume -: Short press for previous track, long press to decrease volume.
- Pause / Play: Press to pause or resume playback.
- Next Song / Volume +: Short press for next track, long press to increase volume.
4.2 Wireless Microphone Controls

- VOLUME - / VOLUME +: Adjusts the microphone's output volume.
- REVERBERATION - / REVERBERATION +: Adjusts the echo or reverb effect on your voice.
- EQ: Cycles through different equalizer settings for your voice.
- A/B Conversion: Used to switch between microphone channels (A or B) if interference occurs or to pair with a different speaker.
- POWER ON/OFF: Press and hold to power the microphone on or off.
4.3 Media Playback
In addition to Bluetooth and AUX, the speaker supports playback from:
- TF Card: Insert a TF (MicroSD) card with audio files into the designated slot. The speaker will automatically switch to TF card mode or can be selected via the MODE button.
- U Disk (USB Flash Drive): Insert a USB flash drive with audio files into the USB port. The speaker will automatically switch to U disk mode or can be selected via the MODE button.
- FM Radio: Press the MODE button to select FM radio. Use the previous/next track buttons to scan for stations.
5. Maintenance
5.1 Cleaning
- Wipe the exterior of the speaker and microphones with a soft, dry cloth.
- Do not use abrasive cleaners, alcohol, or solvents, as these can damage the finish.
- Avoid getting moisture into any openings or ports.
5.2 Battery Care
- To prolong battery life, avoid fully discharging the batteries frequently.
- Charge the device regularly, even if not in use for extended periods (e.g., once every 3 months).
- Store the device in a cool, dry place away from direct sunlight and extreme temperatures.
6. Troubleshooting
| Problem | Possible Cause | Solution |
|---|---|---|
| No power / Device won't turn on | Low battery; Power button not pressed correctly | Charge the speaker/microphones fully. Press and hold the power button for a few seconds. |
| No sound from speaker | Volume too low; Incorrect input mode; Device not connected | Increase speaker volume. Ensure correct MODE is selected. Reconnect Bluetooth/AUX device. |
| Microphone not working | Microphone off; Low microphone battery; Microphone not paired; Microphone volume low | Turn on microphone. Charge microphone. Ensure microphone is paired (A/B conversion if needed). Increase microphone volume. |
| Bluetooth connection issues | Device too far; Interference; Bluetooth not enabled on source device | Ensure devices are within 10m. Turn off other Bluetooth devices. Restart Bluetooth on both devices. |
| Poor sound quality / Distortion | Volume too high; EQ settings; Source audio quality | Lower volume on both speaker and source. Adjust EQ settings. Try a different audio source. |
7. Warranty and Support
This product is covered by a standard manufacturer's warranty. Please refer to the warranty card included in your package for specific terms and conditions, including the warranty period and coverage details.
For technical support, troubleshooting assistance, or warranty claims, please contact your retailer or the manufacturer's customer service. Contact information can typically be found on the product packaging or the official PADOM website.