
1. Introduction
This manual provides detailed instructions for the installation, operation, and maintenance of your Dahua N41C2P Lite-Series 4K 8-Channel PoE Network Video Recorder (NVR). This NVR is designed for professional surveillance applications, offering 4K resolution recording, 8 Power-over-Ethernet (PoE) ports for direct camera connection, Smart H.265+ video compression, and a pre-installed 2TB hard drive for extensive storage. Please read this manual thoroughly before using the product to ensure proper and safe operation.
2. Safety Information
Observe the following safety precautions to prevent injury and damage to the device:
- Power Supply: Use only the power adapter provided with the NVR. Ensure the power source matches the NVR's voltage requirements.
- Ventilation: Do not block ventilation openings. Ensure adequate airflow around the NVR to prevent overheating.
- Environment: Avoid exposing the NVR to extreme temperatures, humidity, dust, or direct sunlight. Do not place liquids on or near the device.
- Installation: Install the NVR on a stable, level surface. Avoid placing it in areas prone to vibration.
- Servicing: Do not attempt to open or service the NVR yourself. Refer all servicing to qualified personnel.
- Cables: Ensure all cables are securely connected and routed to prevent tripping hazards or accidental disconnection.
3. Package Contents
Verify that all items are present in your package:
- Dahua N41C2P NVR Unit (with 2TB HDD pre-installed)
- Power Adapter
- USB Mouse
- Network Cable
- Screws for HDD (if applicable, for additional HDD)
- Quick Start Guide
If any items are missing or damaged, contact your vendor immediately.
4. Product Overview
4.1. Front Panel
The front panel of the NVR typically features status indicators.

Figure 4.1: Front view of the Dahua N41C2P NVR, showing the compact black casing with the Dahua logo on top.

Figure 4.2: Top-front angled view of the Dahua N41C2P NVR, highlighting its sleek design and ventilation on the side.
- Power Indicator: Illuminates when the NVR is powered on.
- HDD Indicator: Flashes during hard drive activity.
- Network Indicator: Flashes when network activity is detected.
4.2. Rear Panel and Interfaces
The rear panel provides all necessary ports for connecting cameras, display monitors, network, and other peripherals.

Figure 4.3: Rear view of the Dahua N41C2P NVR, showing the array of input/output ports including PoE, LAN, HDMI, VGA, USB, and audio connections.
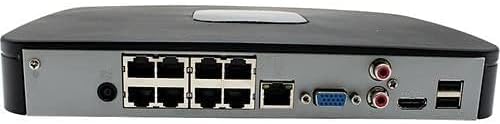
Figure 4.4: Close-up view of the rear panel ports on the Dahua N41C2P NVR, detailing the power input, 8 PoE ports, LAN port, VGA, HDMI, audio in/out, and USB ports.
- DC 12V Power Input: Connect the provided power adapter here.
- PoE Ports (1-8): Connect IP cameras directly to these ports. They provide both power and data.
- LAN Port: Connect to your network router or switch for internet access and remote viewing.
- HDMI Output: Connect to an HDMI-compatible monitor or TV for high-definition video output.
- VGA Output: Connect to a VGA-compatible monitor for video output.
- Audio In/Out (RCA): For connecting external audio input devices (e.g., microphone) and audio output devices (e.g., speakers).
- USB Ports: Connect the USB mouse, USB flash drive for backup, or external hard drive.
5. Setup
5.1. Hardware Installation
- Connect Cameras: Connect your PoE IP cameras to the NVR's PoE ports (1-8) using Ethernet cables.
- Connect Monitor: Connect a monitor to the NVR's HDMI or VGA output port.
- Connect Mouse: Plug the USB mouse into one of the NVR's USB ports.
- Connect to Network: Connect the NVR's LAN port to your router or network switch using an Ethernet cable.
- Connect Power: Connect the power adapter to the NVR's DC 12V input and then plug it into a power outlet. The NVR will power on automatically.
5.2. Initial Configuration
Upon first boot, the NVR will guide you through a setup wizard:
- Language Selection: Choose your preferred language.
- Password Setup: Create a strong password for the admin account. This is crucial for security.
- Unlock Pattern: Optionally set up an unlock pattern for quick access.
- Network Settings: Configure network parameters (DHCP is usually sufficient for most home networks).
- Date & Time: Set the correct date, time, and time zone.
- HDD Initialization: The pre-installed 2TB HDD may need to be initialized or formatted. Follow the on-screen prompts.
- Camera Search: The NVR will automatically search for and add connected Dahua PoE cameras. For third-party cameras, manual addition might be required.
- Recording Schedule: Set up continuous, motion-detection, or scheduled recording for each camera.
6. Operating
6.1. Live View
After initial setup, the NVR will display the live feed from connected cameras on the monitor. You can switch between single-camera view and multi-camera grid views.
- Mouse Control: Right-click to access the main menu. Left-click to select options or drag windows.
- PTZ Control: If your cameras support Pan/Tilt/Zoom, controls are available in the live view interface.
6.2. Recording
The NVR supports various recording modes:
- Continuous Recording: Records 24/7.
- Motion Detection Recording: Records only when motion is detected.
- Scheduled Recording: Records based on a predefined schedule.
- Alarm Recording: Records when an alarm event (e.g., sensor trigger) occurs.
Configure recording settings via the Main Menu > Storage > Schedule menu.
6.3. Playback
To view recorded footage:
- Right-click on the live view screen and select 'Playback'.
- Select the camera(s) and the date/time range you wish to review.
- Use the timeline to navigate through recordings. Different colors on the timeline indicate different recording types (e.g., green for continuous, yellow for motion).
- Playback controls (play, pause, fast forward, rewind) are available at the bottom of the screen.
6.4. Remote Access
Access your NVR remotely via a web browser or mobile application:
- Mobile App: Download the official Dahua mobile app (e.g., DMSS) from your app store. Register an account, add your NVR by scanning its QR code (found in the NVR's network settings), and follow the app's instructions.
- Web Browser: Enter the NVR's IP address into a web browser on a computer connected to the same network. Log in with your NVR credentials. For remote access outside your local network, port forwarding or P2P (Peer-to-Peer) settings may be required on your router. Refer to your router's manual or Dahua's online resources for detailed instructions on remote access configuration.
7. Maintenance
7.1. Hard Drive Management
The NVR comes with a 2TB hard drive. Regular checks are recommended:
- Check Status: Go to Main Menu > Storage > Disk Manage to view the hard drive status and remaining capacity.
- Format HDD: If the hard drive encounters errors or you wish to erase all data, you can format it from the Disk Manage menu. Warning: Formatting will delete all recorded data.
- Overwrite: The NVR is configured to overwrite the oldest recordings when the hard drive is full.
7.2. Firmware Updates
Firmware updates can improve performance, add new features, and fix bugs:
- Visit the official Dahua website to download the latest firmware for your N41C2P2 model.
- Copy the firmware file to a USB flash drive.
- Plug the USB drive into the NVR.
- Go to Main Menu > System > Upgrade.
- Select the firmware file from the USB drive and initiate the upgrade.
- Do not power off the NVR during the upgrade process. The NVR will restart automatically after the update is complete.
8. Troubleshooting
Here are solutions to common issues:
| Problem | Possible Cause | Solution |
|---|---|---|
| No video output on monitor | Loose HDMI/VGA cable, incorrect monitor input, NVR not powered on. | Check cable connections. Ensure monitor is set to correct input source. Verify NVR power. |
| Cameras not displaying live view | Camera not powered, network issue, camera not added/configured. | Check camera power (PoE). Verify network connection. Ensure cameras are added in NVR settings. |
| Cannot access NVR remotely | Network configuration issues, incorrect IP address/port, firewall blocking. | Verify NVR network settings. Check router's port forwarding or P2P status. Ensure mobile app/web browser settings are correct. |
| No recording | HDD not initialized, recording schedule not set, HDD full. | Initialize/format HDD. Configure recording schedule. Check HDD status. |
| Forgot password | Lost admin password. | Use the password reset function (if configured) or contact Dahua support for assistance. |
9. Specifications
| Feature | Detail |
|---|---|
| Model Number | N41C2P2 |
| Brand | Dahua |
| Number of Channels | 8 (PoE) |
| Video Input | IP |
| Connectivity Technology | HDMI, VGA, Ethernet |
| Compatible Devices | IP Cameras |
| Hard Disk Size | 2 TB (pre-installed) |
| Memory Storage Capacity | 2000 GB |
| Audio Input | RCA |
| Total USB Ports | 1 (typically 2, front and rear) |
| Product Dimensions | 30.48 x 10.16 x 25.4 cm |
| Item Weight | 2.28 kg |
| UPC | 819290029765 |
10. Warranty and Support
For warranty information, please refer to the warranty card included with your product or visit the official Dahua website. Technical support can be accessed through the Dahua support portal or by contacting your authorized dealer. Please have your product model number (N41C2P2) and serial number ready when seeking support.


