Introduction
This manual provides comprehensive instructions for the installation, operation, and maintenance of your Rough Country Power Running Boards with LED Step Lights, designed specifically for 2021-2025 Ford Bronco 4-Door models. These retractable electric side steps offer enhanced convenience and functionality.
Important Safety Notice: Rough Country recommends installation by a certified technician. Knowledge of Rough Country instructions, suspension procedures, and post-installation checks are required. Improper installation may impact the integrity and operating safety of the product.
Product Features
- Vehicle Specific Fit: Engineered for 2021–2024 Ford Bronco 4-Door models.
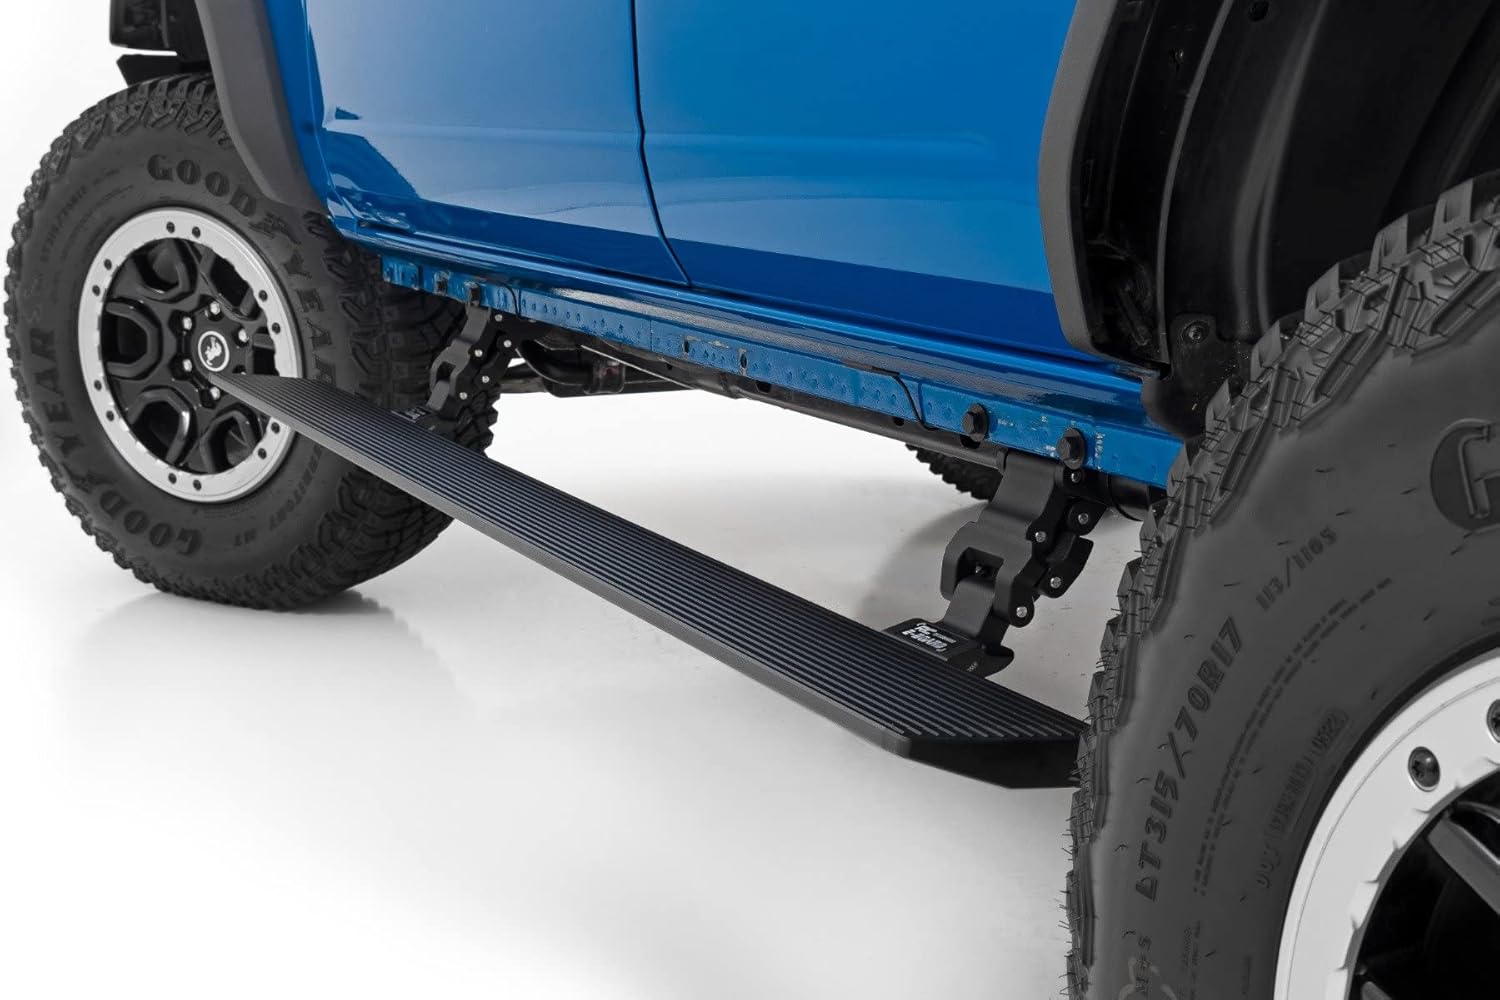
- Durable Construction: Dual-motor technology supports up to 660 lbs per side. Made from lightweight yet durable aluminum.
- Sleek Profile: Steps retract snugly under rocker panels when not in use, maintaining ground clearance.
- Enhanced Safety: 6-inch textured, anti-slip surface for secure footing. Built-in LED lights provide illumination for nighttime visibility.
- Smart Operation: Features a manual override switch for full control and an automatic 'SAFE-STOP' mechanism that engages if a blockage is detected.
What's in the Box
- (2) Electric Running Boards
- (4) Step Brackets/Actuators
- (4) EBoard Lights
- (4) Magnetic Door Triggers
Specifications
| Attribute | Value |
|---|---|
| Color | Black |
| Material | Alloy Steel, Aluminum |
| Exterior Finish | Powder Coated |
| Item Dimensions (L x W x H) | 40 x 10 x 10 inches |
| Vehicle Service Type | 2021-2025 Ford Bronco, Truck |
| Weight Limit | 660 Pounds (per side) |
| Drop from Rocker Panel | 5.13 inches |
| Drop from Door Entry | 12.99 inches |
| UPC | 840269922640 |
| Automotive Fit Type | Vehicle Specific Fit |
Setup (Installation)
No drilling is required for installation. If your vehicle is equipped with factory rock sliders, they must be removed prior to installation.
Required Tools:
- 9-10mm Socket
- 17-18mm Socket
- Ratchet Wrench
- Electric Impact Gun (use with caution)
Installation Steps:
- Prepare Running Boards: Tighten the black screws on the end caps of the running boards.
- Mount Linkage to Brackets: Attach the aluminum linkage to the mounting brackets using the provided carriage bolts and flange lock nuts. Ensure all bolts are hand-started before tightening.
- Prepare Vehicle Mounting Points: Remove the original screws from the vehicle's frame where the brackets will attach. These original screws will be reused. Note that mid and rear brackets are typically the same, while the front bracket is often the longest.
- Install Brackets: Position the brackets onto the vehicle's frame, aligning them with the factory mounting points. Use the original screws to fix the brackets in place. For the front, a flag bolt may be needed.
- Prepare Running Board for Mounting: Remove the nuts and washers from the running boards' T-screws for later use. Move the T-screws to align with the corresponding holes on the installed brackets.
- Attach Running Boards: Carefully lift the running board and align the T-screws with the bracket holes. Secure the running board by mounting and tightening all washers and nuts.
- Install ECU and Wiring Harness:
- Locate a suitable position for the ECU under the hood, preferably near the battery and away from elements.
- Connect the main ECU plugs.
- Route the wiring harness: passenger side wiring down the passenger side wheel well, and driver side wiring across the cowl and down the driver side wheel well.
- Connect positive and negative battery leads.
- Install the fuse permanently into the positive battery connection.
- Install LED Lights:
- Clean the area on the rocker panel where the LED lights will be installed using rubbing alcohol.
- Peel off the backing from the 3M adhesive on the LED lights and firmly attach them to the cleaned surface.
- Connect the LED harnesses (shorter harness for the battery side, longer for the opposite side).
- Install Magnetic Door Switches:
- Remove interior panels (floor mat, kick panel, seal panel, B-pillar panel) to access wiring routes.
- Drill through the plastic grommet in the floor pan (ensure no wires or fuel lines are in the way) to route the switch wires into the cabin.
- Line up the magnetic switch with the magnet on the door jamb. A trick is to attach a piece of foam to the magnet, close the door to mark the foam, then use a paint pen to mark the exact location for the switch.
- Peel off the adhesive backing and install the magnetic switch just below the door striker.
- Plug the switch into the routed wiring and tuck the wiring behind the trim.
- Final Check: Check all hardware for tightness. Ensure all wiring is securely routed and connections are firm.
Installation Videos:
Rough Country HT Running Boards - Installation
This video from Rough Country provides a detailed installation guide for the HT Running Boards, covering linkage assembly, bracket installation, wiring, and final step mounting.
Dual Motor Electric LED Power Running Boards
An official Rough Country video showcasing the features and installation process of the Dual Motor Electric LED Power Running Boards, highlighting key components and functionality.
Step-by-step Installation for the Bronco
This video provides a step-by-step guide for installing running boards on a Ford Bronco, demonstrating the process of attaching brackets and securing the steps.
Bronco Electric Running Boards
A short video demonstrating the installation of electric running boards on a Bronco, including bracket attachment and wiring connections.
Product Images:


Operating Instructions
Your Rough Country Power Running Boards are designed for convenient, automatic operation.
- Automatic Deployment: The running boards will automatically extend when a vehicle door is opened.
- Automatic Retraction: The running boards will automatically retract when all vehicle doors are closed.
- LED Illumination: Integrated LED lights will illuminate when the steps are deployed, providing visibility in low-light conditions.
- SAFE-STOP Mechanism: The system includes an automatic 'SAFE-STOP' mechanism that will engage if a blockage is detected during deployment or retraction to prevent damage.
- Manual Override: An interior bypass switch is provided for manual control, allowing you to deploy or retract the steps independently of door activity.
Maintenance
- Fastener Inspection: It is the buyer's responsibility to have all bolts and nuts checked for tightness after the first 500 miles of use, and then again every 1,000 miles.
- System Inspection: Wheel alignment, steering system, suspension, and driveline systems must be inspected by a qualified, professional mechanic at least every 3,000 miles.
- Cleaning: Regularly clean the textured anti-slip surface of the running boards to maintain traction and appearance. Use mild soap and water; avoid harsh chemicals that may damage the powder coating.
Troubleshooting
- Steps Not Deploying/Retracting: Check for any obstructions that might be engaging the 'SAFE-STOP' mechanism. Clear any debris or objects.
- System Not Responding After Installation: After initial installation and power-up, open all doors, then close all doors. Allow 15-20 seconds for the system to recognize and configure. Sensors should then operate properly upon opening a door.
- No Power to Steps: Verify all wiring connections are secure and the fuse is properly installed and not blown.
- Steps Malfunctioning: If issues persist, utilize the interior bypass switch to manually test deployment and retraction. If problems continue, consult a qualified technician.
Warranty & Support
Rough Country backs its products with a five-year limited replacement warranty. This warranty protects against structural and workmanship damage after purchase. Our industry-leading warranty provides peace of mind when using Rough Country products.
EU spare part availability duration is 5 years.
For support or warranty claims, please refer to your purchase documentation or contact Rough Country customer service directly.