
1. Introduction
This manual provides detailed instructions for the assembly, operation, and maintenance of your Outvita Walk-in Greenhouse. Please read these instructions carefully before assembly and use to ensure proper setup and safe operation. Retain this manual for future reference.
The Outvita Walk-in Greenhouse is designed to provide a protected environment for plants, shielding them from frost and adverse weather conditions while allowing sufficient light for growth. It features a sturdy metal frame, a durable PE cover, and multiple shelves for plant organization.
2. Safety Information
- Placement: Position the greenhouse in a sheltered area, ideally under a roof or against a building, to protect it from strong winds and heavy rain, especially during storms.
- Anchoring: Always use the provided ground stakes and ropes to secure the greenhouse firmly to the ground. For added stability, place heavy objects like stones or bricks on the extended bottom cover edges.
- Weight Capacity: Each shelf has a maximum weight capacity of 6.8 lbs. Do not exceed this limit to prevent collapse or damage. Distribute weight evenly.
- Assembly: Ensure all connections are secure during assembly. While no tools are required, verify that all poles are fully inserted into connectors and shelves are properly fixed with clips.
- Ventilation: Ensure adequate ventilation, especially on warm days, to prevent overheating and maintain optimal plant health. Use the roll-up zipper door for air circulation.
- Children and Pets: Keep children and pets away from the greenhouse during assembly and ensure they do not play inside unsupervised.
3. Package Contents
Verify that all components are present before beginning assembly. If any parts are missing or damaged, contact customer support.
| Component | Description | Quantity |
|---|---|---|
| Metal Poles | Powder-coated steel pipes for the frame. | (Varies by specific pole type) |
| Plastic Connectors | Reinforced plastic components for joining poles. | (Varies by specific connector type) |
| Grid Shelves | Wire shelves for holding plant pots. | 8 |
| Shelf Clips | Plastic clips to secure shelves to the frame. | 16 (2 per shelf) |
| PE Cover | Green polyethylene cover with roll-up zipper door. | 1 |
| Ground Stakes | Stakes for anchoring the greenhouse to the ground. | (Quantity as supplied) |
| Ropes | Ropes for additional anchoring. | (Quantity as supplied) |
4. Assembly Instructions
Assembly is designed to be tool-free. Follow these steps carefully:
Step 1: Set up the Metal Frame
Connect the metal poles using the plastic connectors to form the basic structure of the greenhouse. Ensure all poles are fully inserted into the connectors for a stable frame. Refer to the diagram for the correct configuration.
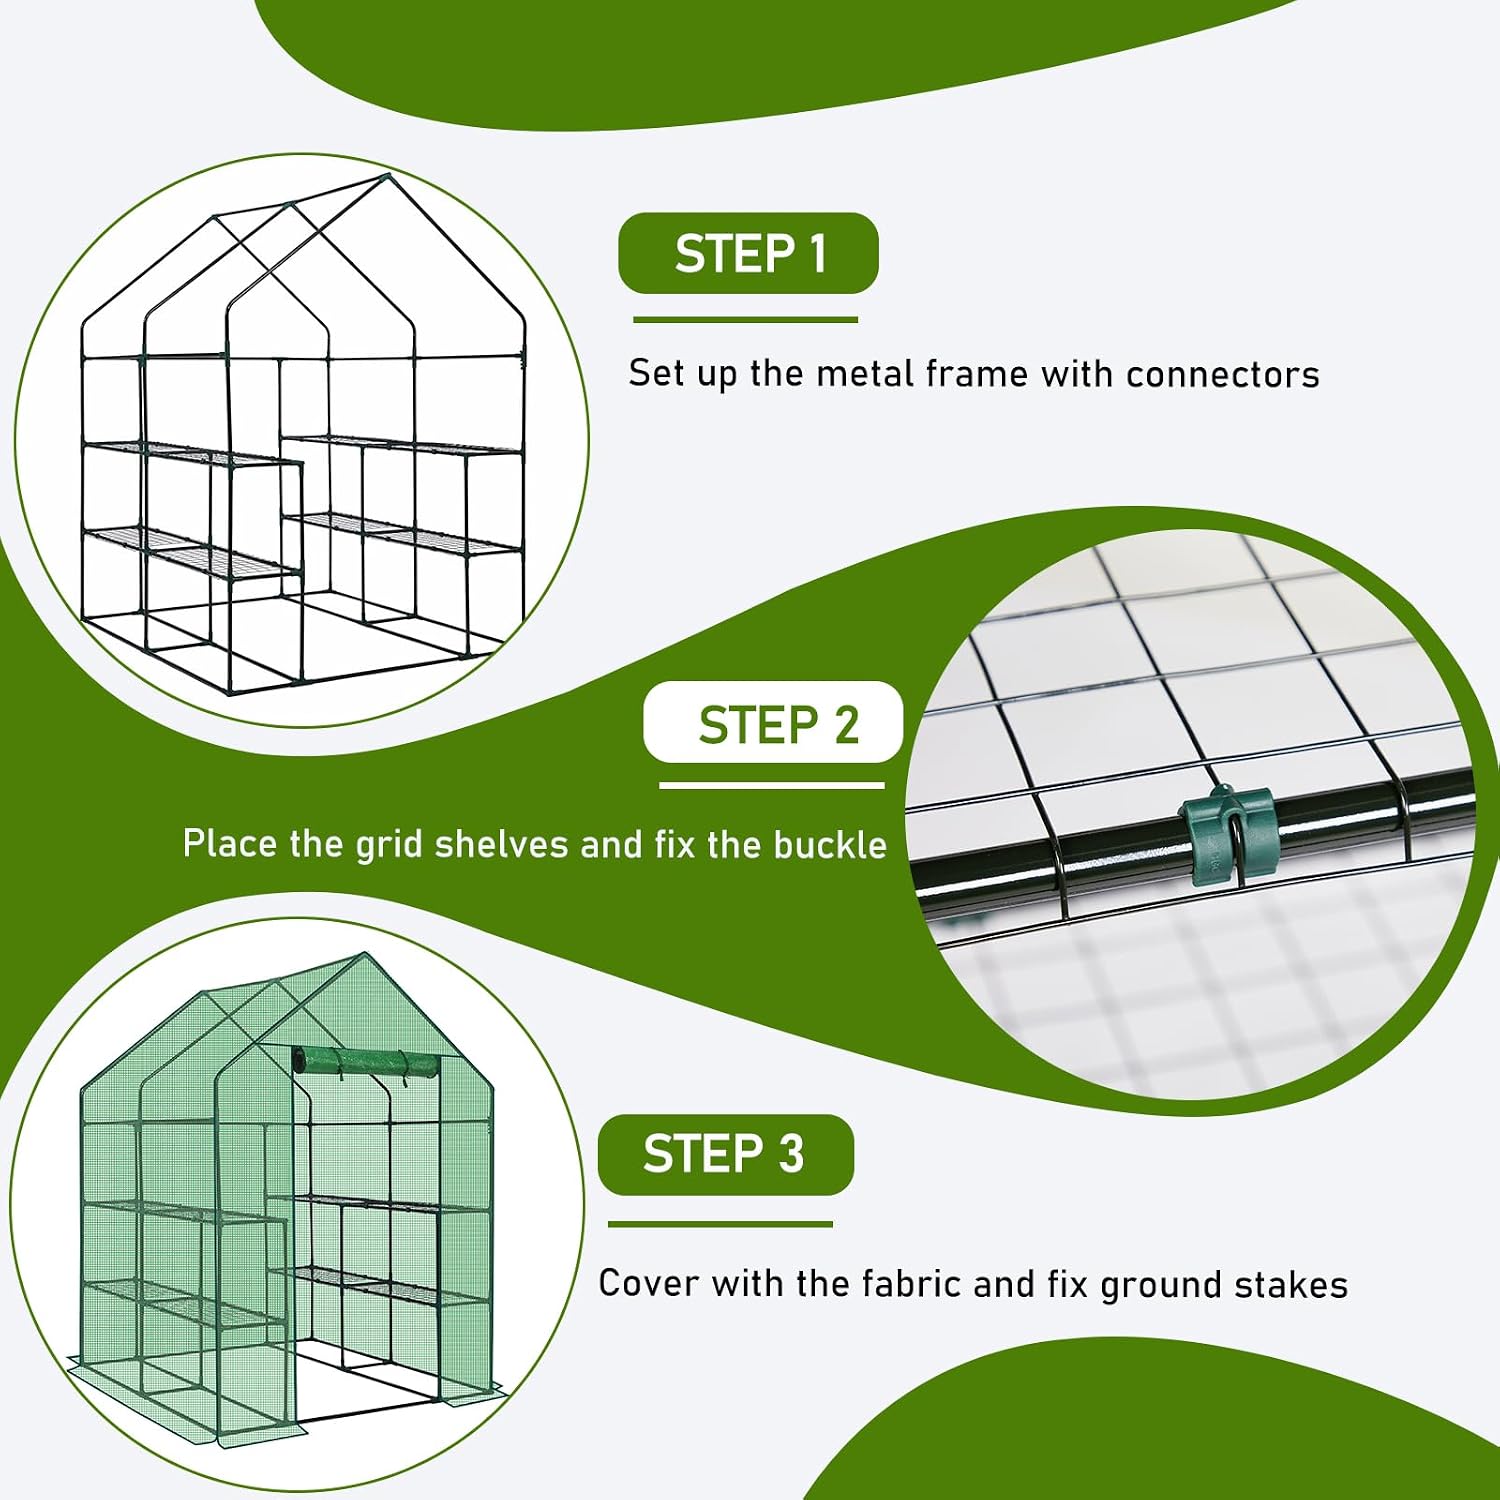
Image: Step 1 - Assembling the metal frame.
Step 2: Place Grid Shelves and Fix with Clips
Once the frame is complete, place the grid shelves onto the designated support bars. Use the provided plastic shelf clips to secure each shelf firmly to the frame. Each shelf requires two clips for stability.

Image: Step 2 - Installing shelves and clips.
Step 3: Cover with Fabric and Fix Ground Stakes
Drape the PE cover over the assembled frame, ensuring it fits snugly. Zip up the door. Secure the greenhouse to the ground using the provided ground stakes and ropes. For enhanced stability, place heavy objects on the extended bottom edges of the cover.

Image: Step 3 - Attaching the cover and anchoring.
Key Components for Assembly and Stability:

Image: Detailed view of metal poles, zipper, and plastic connectors.
- Metal Poles: Precision-cut iron pipes with powder-coated finish to prevent rusting.
- Smooth Zipper: High-quality zipper for easy opening and closing of the door.
- Reinforced Plastic Components: Connectors designed for a stable structure.
- Fixing Plastic Parts (Shelf Clips): Used to enhance shelf stability.
Image: Stability features including ground stakes and cover straps.
- Sturdy Ground Stakes & Rope: Essential for anchoring the greenhouse.
- Straps: Secure the cover and frame firmly.
- Extended Bottom Cover: Designed to hold weights (e.g., stones, bricks) for increased stability.
5. Operating Instructions
- Access: The greenhouse features a roll-up zipper door for easy access to your plants. Unzip and roll up the door, securing it at the top with the integrated ties.
- Ventilation: To ensure optimal air circulation and prevent excessive heat buildup, especially on sunny days, keep the door rolled up for a period. This helps regulate temperature and humidity.
- Plant Placement: Utilize the 8 shelves to organize your plants. Remember the 6.8 lbs weight capacity per shelf. Place heavier pots on lower shelves or directly on the ground inside the greenhouse.
- Environmental Control: The PE cover provides high humidity and temperature, protecting seedlings from frost. Monitor internal conditions and adjust ventilation as needed based on external weather.

Image: Greenhouse benefits: ventilation, windproof, frost protection, and humidity preservation.
6. Maintenance
- Cleaning the Cover: Periodically clean the PE cover with a soft cloth and mild soapy water to remove dirt and debris, ensuring maximum light penetration. Rinse thoroughly and allow to air dry.
- Frame Inspection: Regularly check the metal frame for any signs of rust or damage. The powder-coated finish helps prevent rust, but inspect for scratches or chips that could expose the metal.
- Connector Integrity: Ensure all plastic connectors remain securely attached to the poles. Re-seat any loose connections.
- Shelf Stability: Verify that shelf clips are holding the shelves firmly. Replace any broken clips.
- Seasonal Storage: If disassembling for storage, clean all components thoroughly. Store the cover in a dry, shaded area to prolong its lifespan.
7. Troubleshooting
| Problem | Possible Cause | Solution |
|---|---|---|
| Greenhouse is unstable or sways in wind. | Insufficient anchoring; loose frame connections. | Ensure ground stakes and ropes are properly installed. Place heavy objects on the extended bottom cover. Verify all frame poles are fully inserted into connectors. Consider relocating to a more sheltered spot. |
| Shelves are flimsy or collapse. | Exceeded weight capacity; shelf clips not properly installed or broken. | Do not exceed 6.8 lbs per shelf. Distribute weight evenly. Ensure all shelf clips are securely attached. Replace any damaged clips. |
| Zipper on door is stuck or separates. | Debris in zipper teeth; zipper misalignment; manufacturing defect. | Carefully clear any debris from the zipper teeth. Try to realign the zipper pull. If the zipper is damaged or consistently separates, contact customer support for a replacement cover. |
| Tie-downs for cover or door ripped. | Excessive force; material fatigue. | Handle tie-downs gently. If ripped, use alternative methods to secure the cover (e.g., additional ropes, clips) or contact customer support for replacement parts. |
8. Specifications
- Product Dimensions: 56"L x 56"W x 77"H
- Item Weight: 21 Pounds
- Cover Material: Polyethylene (PE)
- Frame Material: Metal (Powder-coated steel)
- Number of Tiers: 3
- Number of Shelves: 8
- Shelf Weight Capacity: 6.8 Pounds per shelf
- Door Style: Roll-Up Zipper Door
- Color: Green

Image: Product dimensions.
9. Warranty and Support
Outvita provides a standard warranty for this product. For specific warranty details, claims, or technical support, please refer to the warranty card included with your purchase or visit the official Outvita website. You may also contact Outvita customer service through the retailer where the product was purchased.
When contacting support, please have your product model number (56x56x77 Green PE Cover 3 Tiers 8 Shelves) and purchase information readily available.