1. Introduction
Thank you for choosing the Banda Audioparts BD400.4 Four Channel Car Audio Amplifier. This amplifier is designed to deliver high-quality audio performance for your vehicle's sound system. This manual provides essential information for proper installation, operation, and maintenance of your amplifier. Please read it thoroughly before installation and retain it for future reference.
2. Safety Instructions
To prevent injury or damage to the amplifier, please observe the following safety precautions:
- Professional Installation Recommended: Installation of car audio components requires experience with electrical wiring and automotive procedures. If you are unsure, consult a qualified professional.
- Disconnect Battery: Always disconnect the vehicle's negative battery terminal before beginning any installation to prevent electrical shorts.
- Proper Wiring: Ensure all wiring is correctly connected and insulated to prevent short circuits and damage. Use appropriate gauge wires as specified.
- Mounting Location: Mount the amplifier securely in a dry, well-ventilated area, away from heat sources and moisture. Avoid mounting in locations that obstruct vehicle operation or safety devices.
- Fuse Protection: Always use the recommended fuse size for the power input. Never replace a fuse with one of a higher amperage rating.
- Volume Levels: Prolonged exposure to high volume levels can cause hearing damage. Adjust volume to a safe and comfortable level.
3. Package Contents
Verify that all items are present in the package:
- Banda Audioparts BD400.4 Four Channel Car Audio Amplifier
- Instruction Manual (this document)
4. Features
The Banda Audioparts BD400.4 amplifier offers the following key features:
- Class D Operation: Provides high power output with exceptional efficiency.
- Four Channels: Delivers 4 x 100 WRMS at 2 Ohms or 4 x 70 WRMS at 4 Ohms.
- Bridged Mode: Capable of 2 x 200 WRMS when bridged at 2-4 Ohms.
- Active Crossover: Features adjustable High Pass Filter (HPF) and Low Pass Filter (LPF) for precise sound tuning.
- Full Range Capability: Suitable for various audio components including midrange, midbass, tweeters, and subwoofers.
- Compact Design: Space-saving dimensions for versatile installation in cars and motorcycles.
5. Controls and Connections
Familiarize yourself with the amplifier's input, output, and control layout.
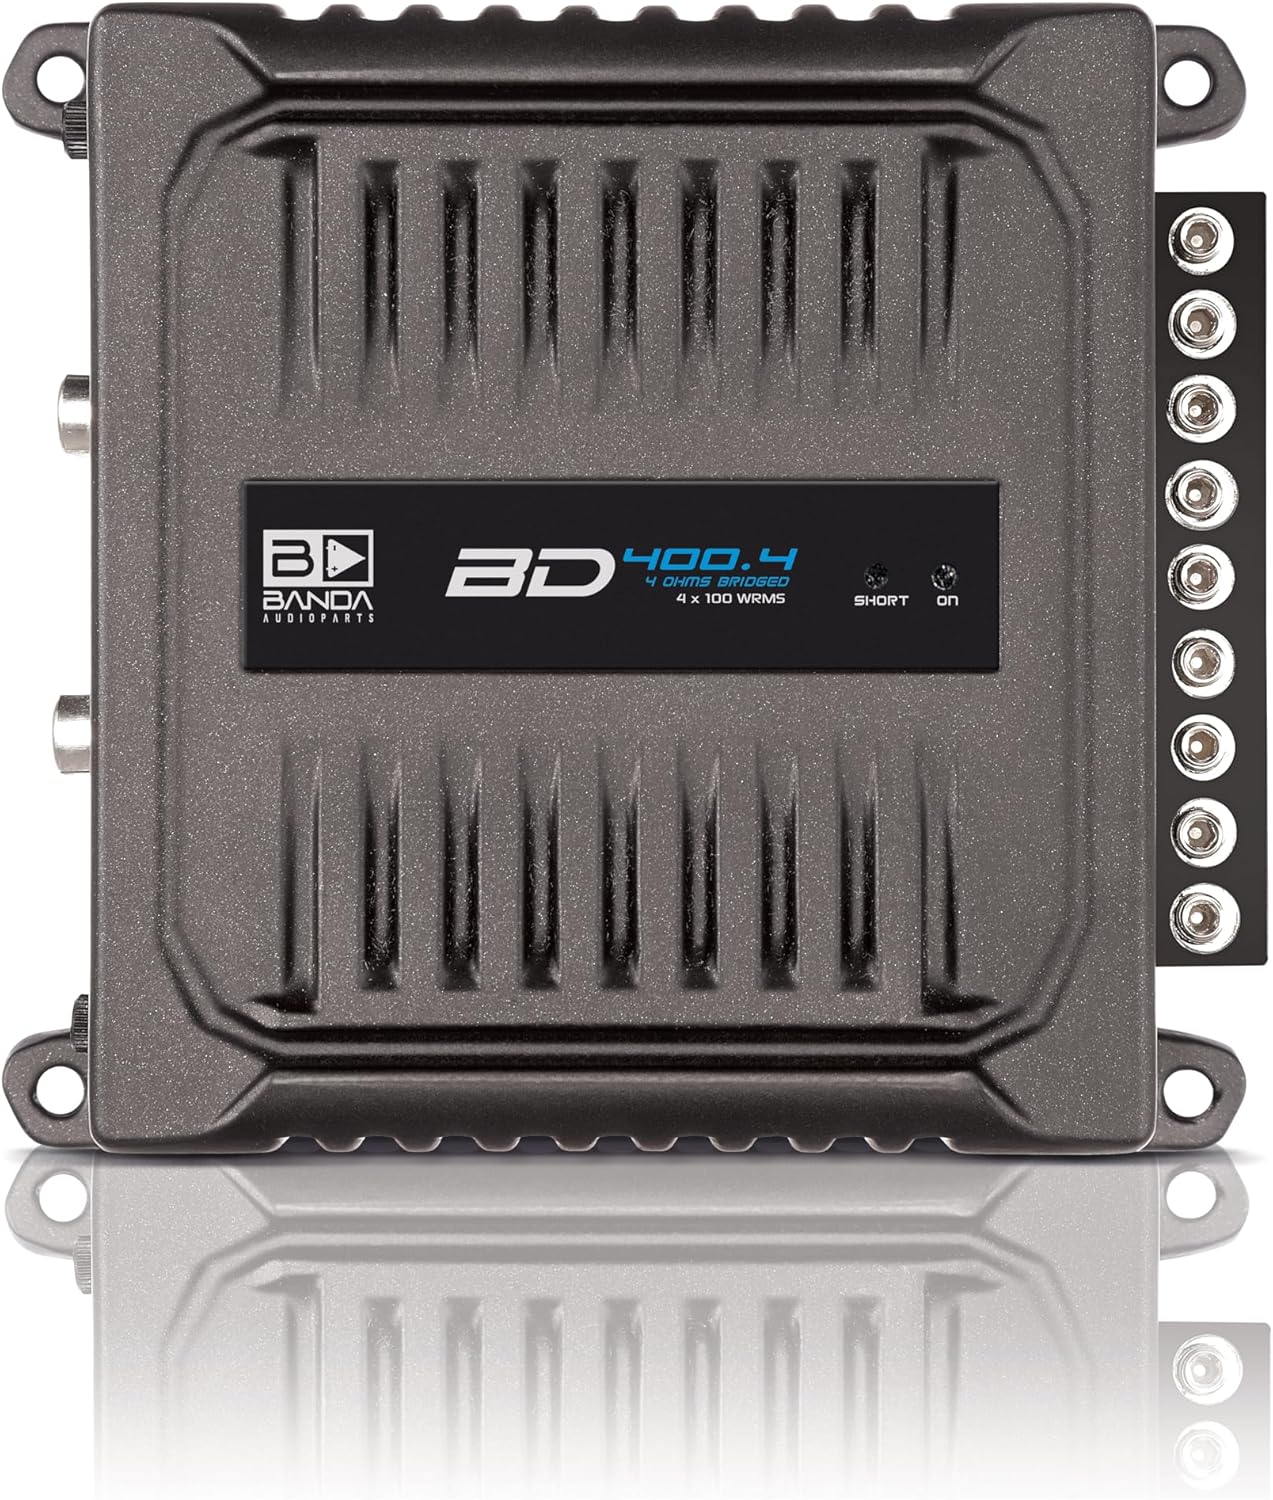
Image 1: Front view of the BD400.4 amplifier, highlighting the RCA inputs, gain controls, and crossover switches.
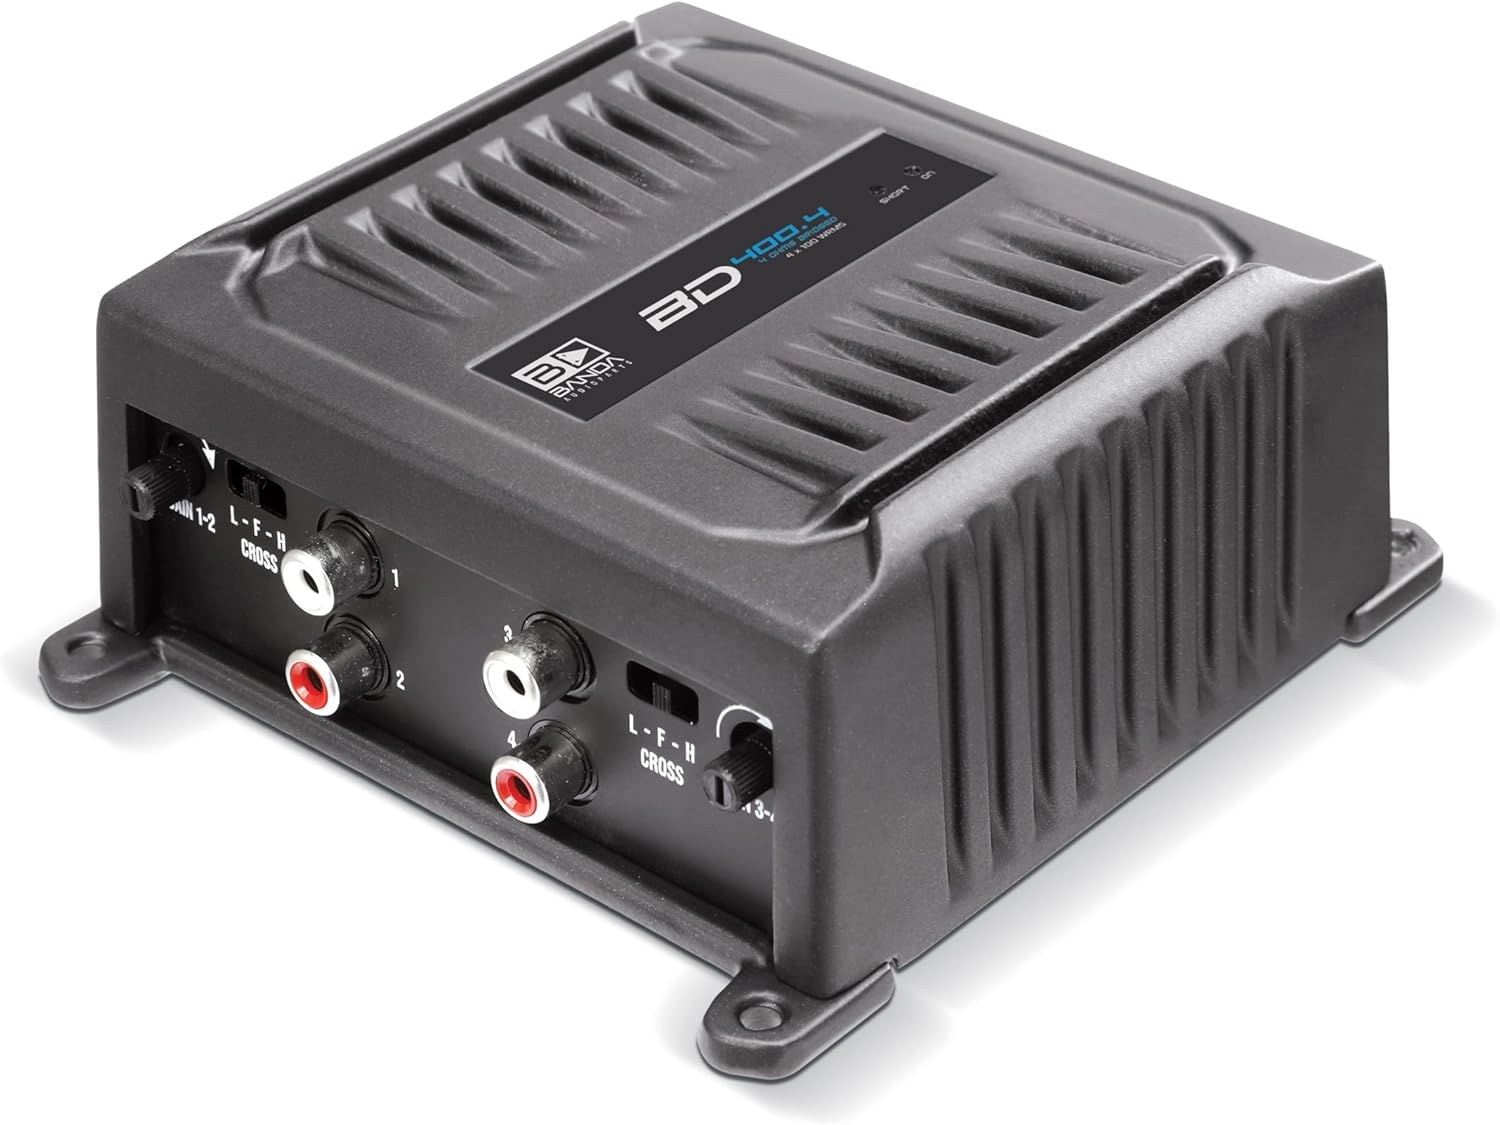
Image 2: Back view of the BD400.4 amplifier, showing the power, remote, ground, and speaker terminals.
5.1 Input Side (Image 1)
- RCA Inputs (1-2, 3-4): Connect to your head unit's RCA pre-outs.
- GAIN 1-2 / GAIN 3-4: Adjusts the input sensitivity for channels 1-2 and 3-4 respectively.
- CROSS 1-2 / CROSS 3-4 (L-F-H Switch): Selects the crossover mode for channels 1-2 and 3-4.
- L (LPF): Low Pass Filter. Allows only low frequencies to pass.
- F (FULL): Full Range. Allows all frequencies to pass.
- H (HPF): High Pass Filter. Allows only high frequencies to pass.
5.2 Output Side (Image 2)
- GND (Ground): Connect to a solid chassis ground point.
- REM (Remote): Connect to the remote turn-on output of your head unit.
- 12VDC (Power): Connect to the positive terminal of your vehicle's battery via a fuse.
- BRIDGED Speaker Terminals: Output terminals for connecting speakers. Can be used for standard stereo or bridged mono configurations.
6. Setup and Installation
Follow these steps for proper installation of your amplifier.
6.1 Mounting the Amplifier
- Choose a mounting location that is dry, well-ventilated, and secure. Ensure adequate airflow around the amplifier for cooling.
- Mark the mounting holes using the amplifier as a template.
- Drill pilot holes if necessary, taking care not to damage any vehicle wiring or components.
- Secure the amplifier using appropriate screws.
6.2 Power Wiring
- Power Wire (12VDC): Run a power wire (minimum 9 AWG / 6mm²) directly from the positive terminal of the vehicle's battery to the amplifier's 12VDC terminal. Install an in-line fuse holder within 18 inches (45 cm) of the battery, using a 30A fuse.
- Ground Wire (GND): Run a ground wire (minimum 9 AWG / 6mm²) from the amplifier's GND terminal to a clean, unpainted metal point on the vehicle's chassis. Ensure a solid electrical connection. The ground wire should be as short as possible, ideally less than 3 feet (1 meter).
- Remote Turn-On Wire (REM): Run a remote turn-on wire from your head unit's remote output (typically a blue/white wire) to the amplifier's REM terminal. This wire signals the amplifier to turn on and off with the head unit.
6.3 Audio Input Connection
- Connect RCA cables from your head unit's pre-amp outputs to the amplifier's RCA inputs (1-2 and 3-4).
6.4 Speaker Wiring
The BD400.4 can operate in stereo or bridged mono mode.

Image 3: Detailed view of the speaker terminals, indicating standard and bridged wiring configurations.
- Stereo Mode: Connect each speaker to its corresponding positive (+) and negative (-) terminal on the amplifier. Ensure correct polarity. The amplifier supports 4 channels at 2 or 4 Ohms.
- Bridged Mode: To bridge channels (e.g., for a subwoofer), connect the speaker's positive (+) lead to the positive (+) terminal of one channel and the speaker's negative (-) lead to the negative (-) terminal of the adjacent channel, as indicated by the 'BRIDGED' labels on the amplifier (refer to Image 3). The amplifier supports 2 channels when bridged at 2-4 Ohms.
7. Operating Instructions
After installation, follow these steps to configure and operate your amplifier.
7.1 Gain Adjustment
- Set the GAIN controls on the amplifier to their minimum (fully counter-clockwise) position.
- Turn on your head unit and set its volume to about 75% of maximum.
- Slowly increase the GAIN control on the amplifier until you hear distortion, then back it off slightly until the sound is clear.
- Repeat for both GAIN 1-2 and GAIN 3-4 controls if using all four channels.
7.2 Crossover Settings
Use the CROSS switches (L-F-H) to optimize the frequency response for your speakers.
- HPF (High Pass Filter): Use for full-range speakers, tweeters, or midrange drivers to block low frequencies that can cause distortion or damage. The HPF is adjustable from 20 to 90Hz at 12dB/octave.
- LPF (Low Pass Filter): Use for subwoofers to block high frequencies. The LPF is adjustable from 90 to 20kHz at 12dB/octave.
- FULL (Full Range): Use if your speakers require a full frequency signal or if you are using an external crossover.
8. Specifications
Technical specifications for the Banda Audioparts BD400.4 amplifier:
| Parameter | Value |
|---|---|
| Total Power 14.4V @ 2 Ohms | 4 x 100 WRMS |
| Total Power 14.4V @ 4 Ohms | 4 x 70 WRMS |
| Total Power 14.4V Bridged @ 2-4 Ohms | 2 x 200 WRMS |
| Efficiency @ 4 Ohms | 0.84 |
| Efficiency @ 2 Ohms | 0.77 |
| Input Voltage | 9 – 15V |
| Input Impedance | 22K Ohms |
| THD+Noise | 0.10% |
| Input Sensitivity | 140mV – 680V |
| SNR (Signal-to-Noise Ratio) | 85dB |
| Frequency Response | 5 to 22KHz (-3dBs) |
| HPF (High Pass Filter) | 20 to 90Hz @ 12dB/octave Linkwitz-Riley |
| LPF (Low Pass Filter) | 90 to 20kHz @ 12dB/octave Linkwitz-Riley |
| Recommended Fuse | 30 A |
| Current at Rest | 1 A |
| Average Current Draw (Sinusoidal) | 30 A |
| Average Current Draw (Music) | 20 A |
| Power Wire Gauge (min. Recommended) | 6mm² / 9 AWG |
| Weight | 1.8 Lb (0.82 kg) |
| Height | 1.6 in (4.06 cm) |
| Width | 4.8 in (12.19 cm) |
| Depth | 8.0 in (20.32 cm) |
9. Troubleshooting
If you experience issues with your amplifier, refer to the following common problems and solutions:
- No Power / Amplifier Not Turning On:
- Check the in-line fuse near the battery. Replace if blown.
- Verify 12VDC power connection at the amplifier terminal.
- Ensure the ground connection is secure and free of paint or corrosion.
- Check the remote turn-on wire for 12V when the head unit is on.
- No Sound:
- Confirm the amplifier is powered on (indicator light).
- Check RCA input connections from the head unit.
- Verify speaker wire connections and ensure correct polarity.
- Check head unit settings (volume, source selection, fader/balance).
- Ensure GAIN controls are not set to minimum.
- Distorted Sound:
- Reduce the GAIN control on the amplifier.
- Check for proper crossover settings (HPF/LPF).
- Ensure speaker impedance matches amplifier capabilities.
- Inspect speaker wires for shorts or damage.
- Noise (Hiss, Whine, Buzz):
- Ensure all ground connections are solid and at the same potential.
- Route RCA cables away from power wires to prevent interference.
- Check for faulty RCA cables.
- Verify the head unit's ground connection.
- Amplifier Overheating:
- Ensure adequate ventilation around the amplifier.
- Check speaker impedance; ensure it is not below the amplifier's minimum rating.
- Reduce the GAIN setting.
10. Maintenance
The Banda Audioparts BD400.4 amplifier requires minimal maintenance.
- Cleaning: Use a soft, dry cloth to wipe the amplifier's exterior. Do not use harsh chemicals or abrasive cleaners.
- Connections: Periodically check all power, ground, remote, RCA, and speaker connections to ensure they are secure and free from corrosion.
- Ventilation: Ensure that the amplifier's cooling fins are not obstructed by debris or other objects to maintain proper heat dissipation.
11. Warranty and Support
Banda Audioparts products are designed for reliability and performance. For specific warranty information, please refer to the warranty card included with your product or contact your authorized Banda Audioparts dealer. For technical support or service inquiries, please reach out to your point of purchase or visit the official Banda Audioparts website.