Introduction
Welcome to the GHKWXUE 22 Quart Pressure Canner Cooker. This versatile appliance is designed for efficient and safe pressure canning and cooking, compatible with gas, electric, and induction stovetops. Please read this manual thoroughly before first use to ensure proper operation and safety.
Important Safety Information
WARNING: Failure to follow these safety instructions may result in serious injury or property damage.
- Always read all instructions before using the pressure canner.
- Do not fill the canner more than two-thirds full for solid foods or half full for liquids to prevent clogging the vent pipe.
- Ensure the lid is properly locked before applying heat. Never force the lid open.
- Never attempt to open the canner until the pressure gauge reads zero and the pressure indicator has dropped.
- Use caution when handling hot surfaces and steam. Always use oven mitts or heat-resistant gloves.
- Regularly inspect the gasket, vent pipe, and pressure gauge for wear or damage. Replace parts as needed.
- This pressure canner is designed for stovetop use. Do not use in an oven.
- Keep out of reach of children.
Product Components
Your GHKWXUE 22 Quart Pressure Canner Cooker includes the following parts:
- Canner Body: The main pot, made of durable aluminum.
- Lid: Features a secure locking mechanism, pressure gauge, and pressure relief valves.
- Pressure Gauge: Displays internal pressure during operation.
- Pressure Regulator/Weight: Controls and maintains desired pressure.
- Vent Pipe: Releases steam during venting and processing.
- Safety Valve: An additional safety mechanism to release excess pressure.
- Gasket/Sealing Ring: Ensures an airtight seal between the lid and the body.
- Steaming Tray/Rack: Keeps jars off the bottom of the canner and allows for even heat distribution.
- Handles: Heat-resistant handles for safe transport.
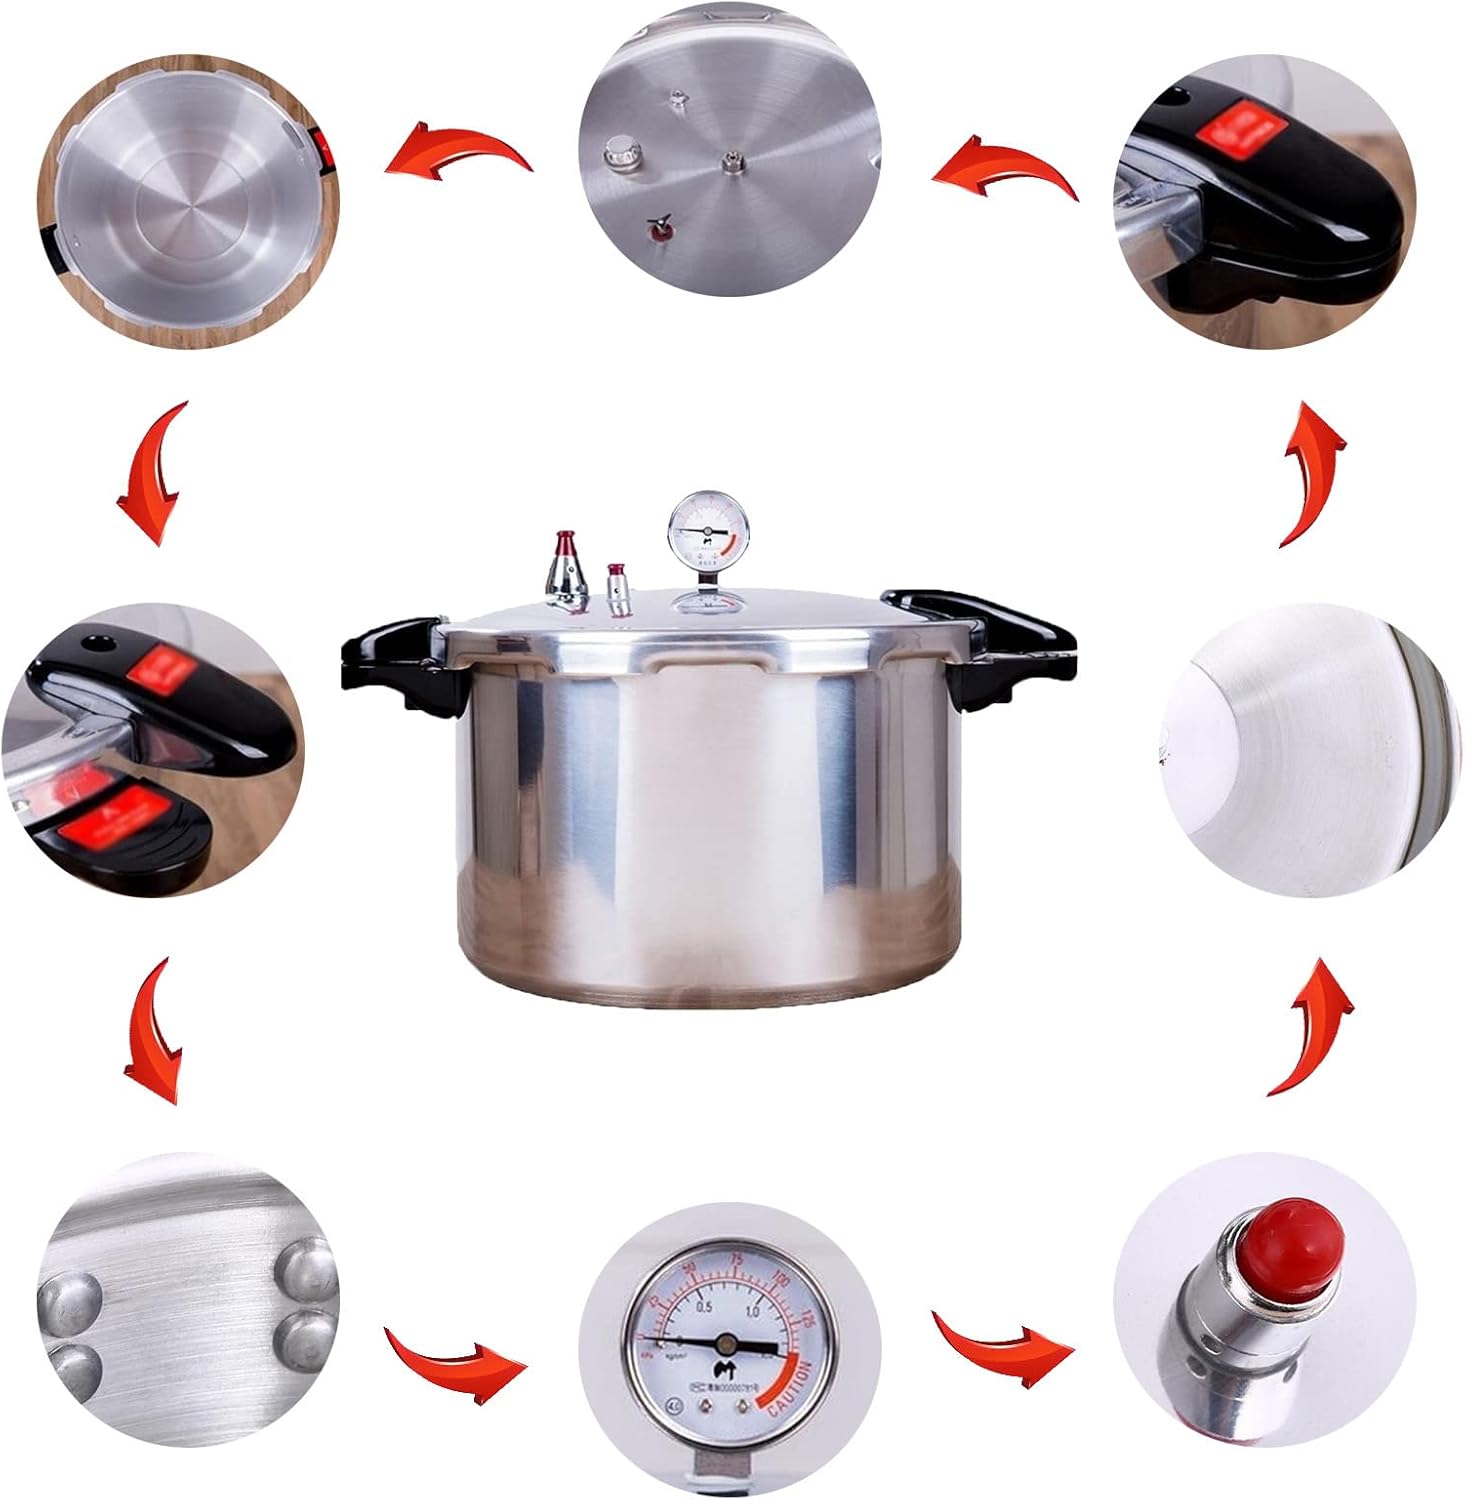
Figure 1: Exploded view showing the main components of the pressure canner, including the pot body, lid with gauge and valves, and handles.

Figure 2: Close-up of the pressure gauge and pressure relief valve on the canner lid.
Setup
- Unpack: Carefully remove all components from the packaging.
- Clean: Wash the canner body, lid, and all accessories with warm, soapy water. Rinse thoroughly and dry.
- Assemble Lid: Ensure the sealing ring is properly seated inside the lid rim. Attach the pressure gauge and pressure regulator/weight according to the instructions provided with those specific parts.
- Place Rack: Insert the steaming tray/rack at the bottom of the canner body.
- Initial Water Test: Before first use, perform a water test to familiarize yourself with the canner's operation and ensure all parts are functioning correctly. Fill the canner with 2-3 inches of water, secure the lid, and heat until pressure builds and is released through the vent.
Video 1: Demonstration of assembling the pressure canner lid and preparing it for use. This video shows the secure locking mechanism and placement of the pressure regulator.
Operating Instructions
This section outlines the general steps for using your pressure canner. Always refer to a tested canning recipe for specific processing times and pressure levels for different foods.
- Prepare Food and Jars: Follow your chosen recipe for preparing food and sterilizing canning jars.
- Load Canner: Place the filled jars on the steaming tray inside the canner. Ensure there is adequate water in the canner (usually 2-3 inches, or as specified by your recipe).
- Secure Lid: Place the lid on the canner body, aligning the arrows or indicators, and rotate the handles to securely lock it in place.
- Heat and Vent: Place the canner on a suitable stovetop burner (gas, electric, or induction). Heat on high until a steady stream of steam escapes from the vent pipe. Allow steam to vent for 10 minutes to ensure all air is removed.
- Apply Pressure Regulator: After venting, place the pressure regulator/weight onto the vent pipe. The pressure will begin to build inside the canner.
- Process: Monitor the pressure gauge. Once the desired pressure is reached (as specified by your recipe), adjust the heat to maintain a steady pressure. Begin timing the processing according to your recipe.
- Cool Down: After the processing time is complete, turn off the heat. Allow the canner to cool naturally until the pressure gauge reads zero and the pressure indicator has dropped completely. Do not rush this process by cooling with water.
- Open Canner: Once pressure is fully released, carefully remove the pressure regulator. Unlock and remove the lid, tilting it away from you to avoid steam burns.
- Remove Jars: Using a jar lifter, carefully remove the hot jars and place them on a towel-lined surface, allowing space between jars for cooling.

Figure 3: The pressure canner in use on a stovetop, demonstrating its compatibility with gas, electric, induction, and halogen furnaces.
Video 2: A brief overview of the pressure canner's features, including the pressure gauge and safety mechanisms, demonstrating its ease of use during the canning process.
Canning Guide
The GHKWXUE 22 Quart Pressure Canner is ideal for preserving a wide variety of low-acid foods, including vegetables, meats, poultry, and seafood. It can also be used for water bath canning high-acid foods like fruits and pickles.
- Always use up-to-date, tested canning recipes from reliable sources (e.g., USDA, university extension offices).
- Ensure proper headspace in jars to allow for food expansion and proper sealing.
- Maintain consistent pressure throughout the processing time. Fluctuations can compromise food safety.
- This 22-quart model can accommodate multiple jars, allowing for efficient batch processing.

Figure 4: The pressure canner shown with various foods, illustrating its versatility for cooking and canning different ingredients.
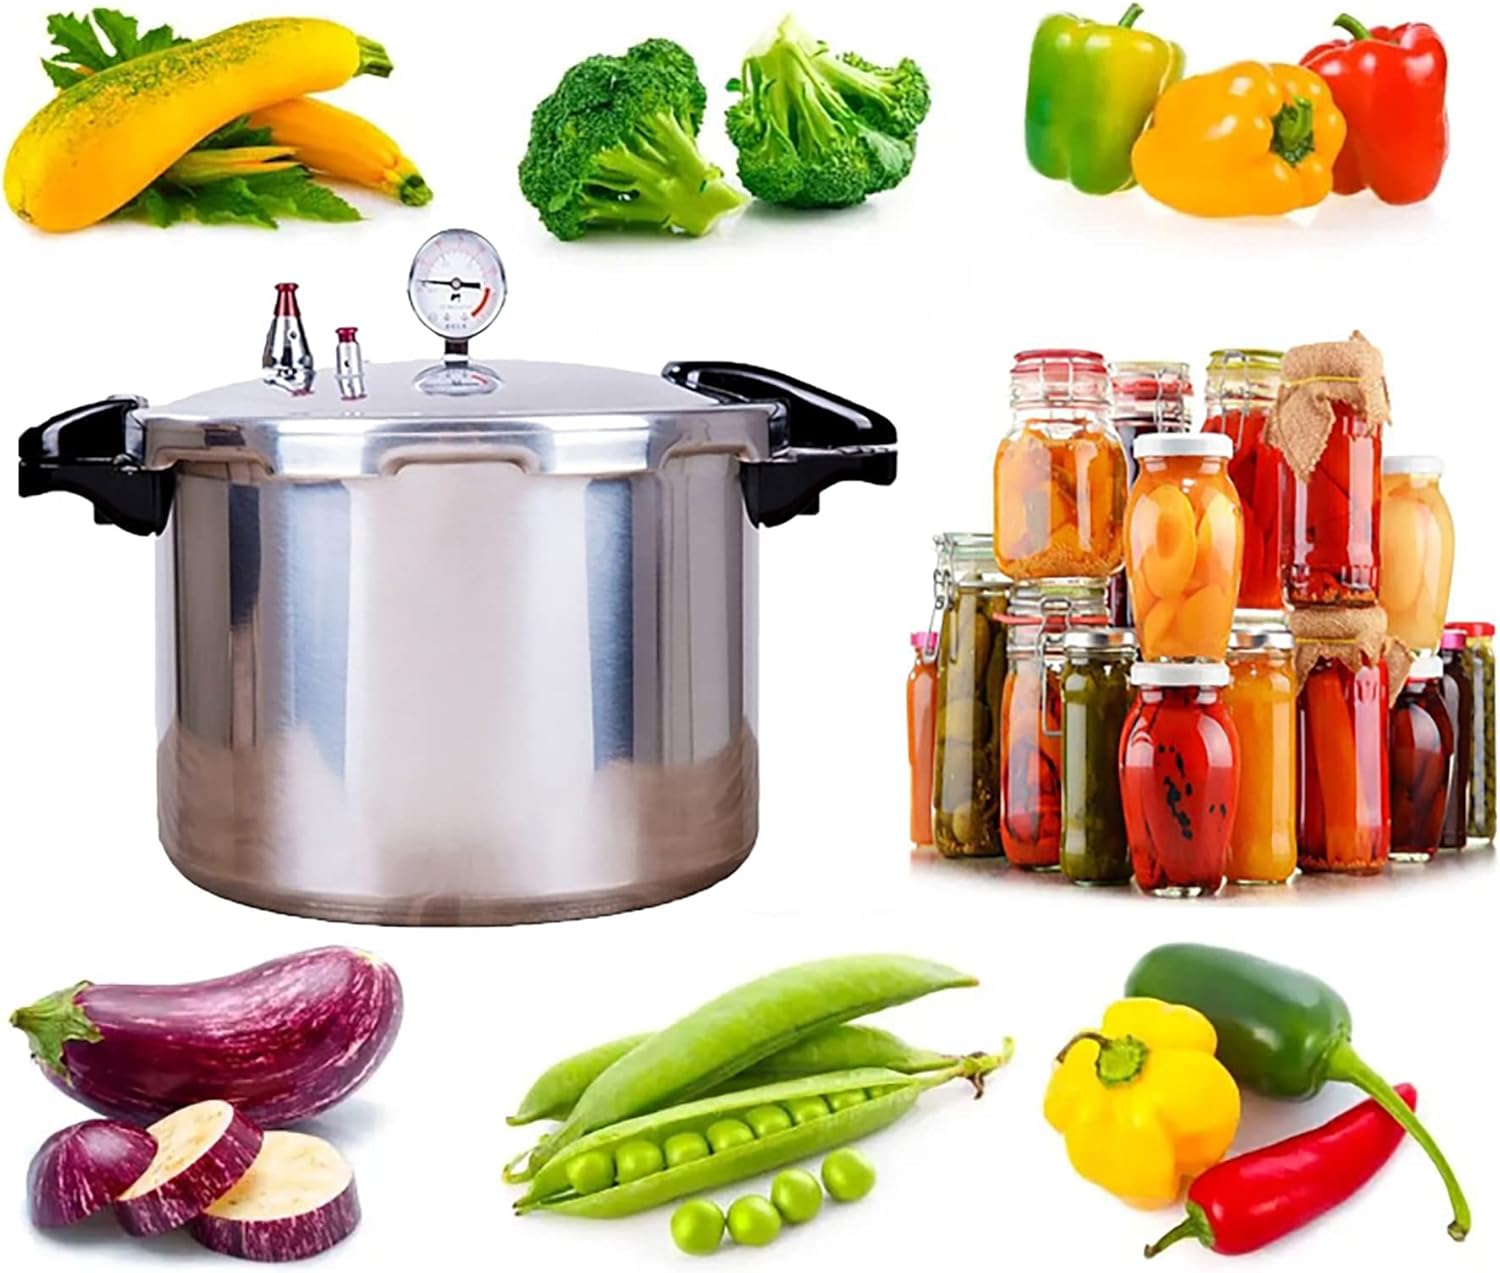
Figure 5: The pressure canner positioned among fresh vegetables and jars of canned goods, highlighting its role in food preservation.
Maintenance and Cleaning
Proper maintenance ensures the longevity and safe operation of your pressure canner.
- Cleaning: After each use, wash all parts with warm, soapy water. Do not use abrasive cleaners or steel wool, as this can damage the aluminum.
- Gasket Care: Remove the sealing ring from the lid after each use for thorough cleaning. Store it flat or hanging to prevent distortion. Replace the gasket annually or if it shows signs of cracking, stickiness, or hardening.
- Vent Pipe: Ensure the vent pipe is clear of any food debris before each use. Use a small brush or pipe cleaner if necessary.
- Pressure Gauge: The pressure gauge should be tested annually for accuracy. Contact a local extension office or appliance service center for testing.
- Storage: Store the canner with the lid inverted on the pot to allow air circulation and prevent odors.
Troubleshooting
| Problem | Possible Cause | Solution |
|---|---|---|
| Pressure not building | Lid not sealed properly, insufficient heat, damaged gasket. | Ensure lid is locked correctly. Increase heat. Inspect and replace gasket if damaged. |
| Steam leaking from lid | Gasket not seated, damaged gasket, food debris on rim. | Reposition gasket. Clean rim and gasket. Replace gasket if worn. |
| Pressure gauge inaccurate | Gauge malfunction or damage. | Have gauge tested or replaced by a qualified professional. |
| Food not cooked/canned properly | Incorrect pressure, insufficient processing time, improper venting. | Verify pressure and time with a tested recipe. Ensure proper venting before pressurizing. |
Specifications
- Brand: GHKWXUE
- Model Number: 893699
- Capacity: 22 Quarts
- Material: Aluminum
- Color: Silver
- Stovetop Compatibility: Gas, Electric, Induction
- Special Features: Built-in digital pressure gauge, 1 steaming tray included.

Figure 6: Visual representation of the pressure canner with key dimensions and specifications.
Warranty and Support
For warranty information, technical support, or replacement parts, please refer to the contact details provided with your product packaging or visit the official GHKWXUE website. Keep your purchase receipt as proof of purchase.