1. Product Overview
The CNDST DST-42IPB is a compact 4MP HD CCTV IP camera designed for discreet surveillance. It features Power over Ethernet (PoE) support, H.265/H.264 video compression, and remote viewing capabilities via mobile applications. This manual provides detailed instructions for installation, operation, and maintenance.

Image: Front view of the CNDST 4MP Mini POE IP Security Camera, showcasing its compact black casing and lens.

Image: The camera with overlaid labels highlighting key features: POE, 4.0MP High Resolution, H.265 Video Compression, and Mini size.
2. What's in the Box
- 1 x CNDST 4MP Mini POE IP Security Camera
- 1 x User Manual (English)
- 1 x Screws Set for mounting

Image: The camera shown with its attached cable, which includes a POE adapter and a DC power input option.
3. Product Features
- 4MP High Resolution: Captures clear and smooth high-quality images at 2304 x 1296P resolution using a 1/3'' CMOS Sensor at 30 frames per second.
- Built-in POE Function (Power Over Ethernet): Simplifies installation by allowing power and data transmission over a single Ethernet cable, reducing cable clutter. Can also be powered by a DC 12V 2A power supply if a POE switch is not used.
- Mini Size for Easy Installation: Features an f3.6mm lens with a 90-degree field of view, making it easy to install discreetly.
- Dual H.265/H.264 Encode: Utilizes H.265 compression for efficient bandwidth usage and reduced storage requirements compared to H.264, while maintaining image quality.
- Mobile App Compatibility: Supports remote viewing and control via "ICSee" or "XMEye" free applications, available for download on mobile devices.
- Human and Vehicle Motion Detection: Advanced detection capabilities for improved security alerts.
- Face Record: Supports face recording functionality.
4. Specifications
| Chipset | 1/3 CMOS 4MP |
| Illumination | Color 0.01Lux/F1.2; B&W 0.001Lux/F1.2 |
| SNR | ≥50db (AGC OFF) |
| WDR | DWDR, >80db |
| Compression Format | H.265/H.264 |
| Main Stream | 2560*1440 (1-25 FPS/S), 2304*1296, 1920*1080, 1280*720 (1-30 FPS/S) |
| Sub Stream | 704*576, 640*480, 640*360, 352*288 (1-30 FPS/S) |
| Video-coding Compression | 128Kbps-8192bps continuous adjustable |
| Storage Method | Circular Recording, Alarm Recording |
| Support Protocol | ONVIFPC |
| Browser/Mobile App | IE6.0 and above browser, IOS, Android (ICSee, XMEye) |
| Operating Temperature/Humidity | -30℃ - +60℃ |
| Power Supply | POE Switch or POE NVR or DC 12V 2A power supply |
| Dimensions (L x W x H) | 1.68 x 1.68 x 1.75 inches |
| Item Weight | 3.68 ounces |
| International Protection Rating | IP67 |
5. Setup and Installation
Before installation, ensure you have all necessary components and tools. The camera offers flexible power options: Power over Ethernet (PoE) or a standard DC 12V power supply.
5.1. Powering the Camera
The camera can be powered in three ways:
- Using a POE NVR: Connect the camera directly to a POE port on your Network Video Recorder (NVR). This method provides both power and data connectivity through a single Ethernet cable.
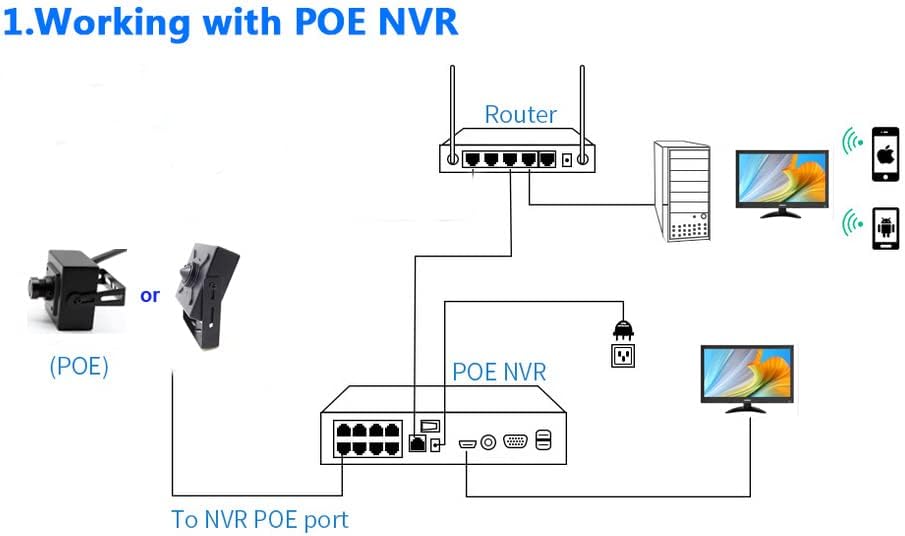
Image: Diagram illustrating the connection of the camera to a POE NVR, which is then connected to a router and monitoring devices.
- Using a POE Switch: Connect the camera to a POE switch, which then connects to your router or NVR. This is suitable for expanding your POE network.

Image: Diagram illustrating the connection of the camera to a POE switch, which then connects to a router and NVR for monitoring.
- Using a DC 12V 2A Power Supply: If you do not have a POE setup, you can power the camera using a standard DC 12V 2A power adapter (not included). Connect the camera's Ethernet cable to your router or NVR for data.

Image: Diagram illustrating the camera powered by a DC 12V adapter, with its Ethernet cable connected to a router and NVR.
5.2. Network Connection
Once powered, connect the camera to your network via an Ethernet cable. The camera supports ONVIF protocol for compatibility with various NVRs and surveillance software.
For initial setup, it is recommended to connect the camera to the same network as your computer or mobile device. You may need to use a network scanning tool to find the camera's assigned IP address.

Image: Rear view of the camera, showing the cable entry point and mounting screw holes.
5.3. Physical Mounting
The camera comes with a screws set for mounting. Choose a suitable indoor location that provides the desired field of view. Ensure the mounting surface is stable and can support the camera's weight. Use the provided screws to secure the camera in place.

Image: The camera is shown in an industrial setting, demonstrating its potential for discreet placement in various environments.
6. Operating Instructions
6.1. Mobile App Setup (ICSee or XMEye)
- Download the "ICSee" or "XMEye" application from your mobile device's app store (available for iOS and Android).
- Register an account and log in.
- Add your camera:
- Use the "Add Device" or "+" option within the app.
- Select "Add by LAN" or "Search Device" to find the camera on your local network.
- Follow the on-screen prompts to add the camera. You may need to enter the camera's default username and password (often "admin" and "123456" or a blank password).
- Once added, you can view the live feed, access recorded footage, and configure camera settings remotely.
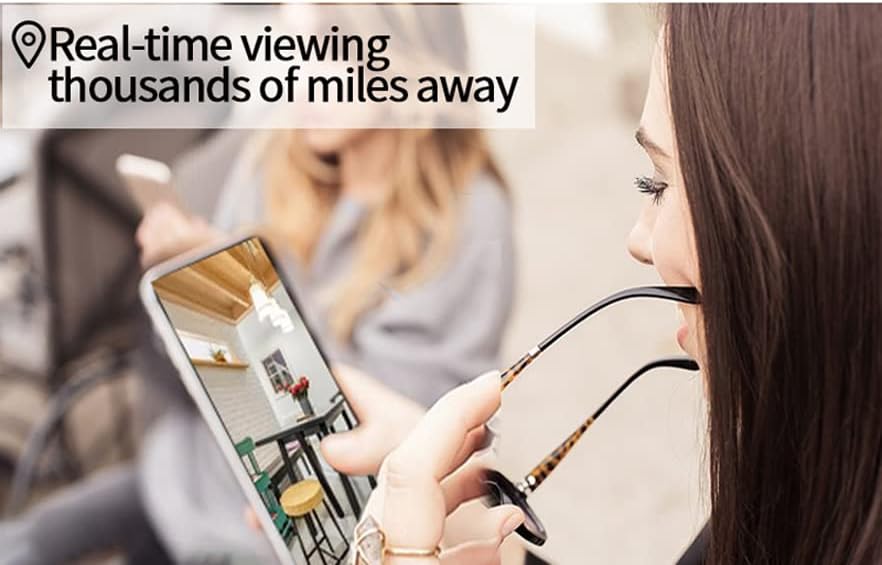
Image: A person is shown viewing the live camera feed on a smartphone, demonstrating the remote viewing capability.
6.2. NVR/PC Software Integration (ONVIF)
The camera supports ONVIF protocol, allowing integration with compatible NVRs and PC-based surveillance software (e.g., Blue Iris). Refer to your NVR or software's manual for instructions on adding an ONVIF IP camera.
- Ensure the camera and NVR/PC are on the same network.
- Use the camera's IP address and login credentials (default: username "admin", password "123456" or blank) to add it as an ONVIF device.
6.3. Recording and Playback
The camera supports circular recording and alarm recording. Storage is typically managed by the connected NVR or PC software. Refer to your recording device's manual for specific recording schedules, motion detection settings, and playback procedures.
7. Maintenance
- Cleaning: Gently wipe the camera lens and body with a soft, dry cloth. Avoid using harsh chemicals or abrasive materials.
- Firmware Updates: Periodically check the manufacturer's website or the mobile application for available firmware updates to ensure optimal performance and security.
- Network Security: Regularly change default passwords for the camera and your network devices. Use strong, unique passwords.
- Environmental Conditions: Ensure the camera operates within its specified temperature and humidity ranges (-30℃ to +60℃).
8. Troubleshooting
| Problem | Solution |
|---|---|
| Camera does not power on. |
|
| Camera not detected on the network / Cannot connect. |
|
| Picture is blurry or unclear. |
|
| Time displayed on OSD is incorrect. |
|
| Cannot change OSD label (e.g., stuck on CAM01). |
|
9. Warranty and Support
This product comes with a standard manufacturer's warranty. For specific warranty terms and conditions, please refer to the documentation included with your purchase or contact the seller directly.
For technical support, troubleshooting assistance, or inquiries regarding your CNDST product, please contact the manufacturer or your point of purchase. Provide your model number (DST-42IPB) and a detailed description of the issue for faster service.
Manufacturer: ShenZhen Shi DST Electronic Co. LTD