EEEONE DX-M75
EEEONE Replacement Laser Head for AIWA DX-M75 CD Player - Instruction Manual
Introduction
This manual provides detailed instructions for the installation, operation, maintenance, and troubleshooting of the EEEONE replacement laser head (optical pick-up) for AIWA DX-M75 and DXM75 radio CD players. Please read these instructions carefully before proceeding with the replacement to ensure proper function and to avoid damage to the component or your device.
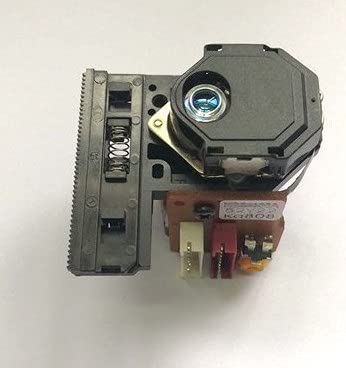
Image: EEEONE Replacement Laser Head for AIWA DX-M75 CD Player. This image shows the compact laser head unit, typically consisting of the laser diode, optical lens, and tracking mechanism, designed for precise data reading from CDs.
Safety Information
Warning: Electronic repairs can be complex and carry risks. If you are not comfortable with electronic component replacement, seek professional assistance. Always disconnect the device from its power source before beginning any repair work.
- Ensure the AIWA DX-M75 CD player is unplugged from the mains power supply before starting.
- Handle the laser head by its edges; avoid touching the lens or internal components.
- Wear anti-static gloves or use an anti-static wrist strap to prevent electrostatic discharge (ESD) damage to sensitive electronic components.
- Keep small parts away from children.
Setup and Installation
This section guides you through the process of replacing the old laser head with the new EEEONE unit.
Tools Required:
- Small Phillips head screwdriver
- Flathead screwdriver (optional, for prying)
- Soldering iron and desoldering wick/pump (essential for anti-static solder point removal)
- Anti-static wrist strap or gloves
- Clean, lint-free cloth
Installation Steps:
- Prepare the Work Area: Ensure a clean, well-lit, and static-free environment. Disconnect the AIWA DX-M75 from all power sources.
- Disassemble the CD Player: Carefully remove the outer casing of your AIWA DX-M75 CD player. Refer to your device's original service manual if available for specific disassembly instructions. Locate the CD mechanism and the existing laser head.
- Disconnect the Old Laser Head: Gently disconnect the ribbon cable and any other connectors attached to the old laser head. Note their orientation for reassembly.
- Remove the Old Laser Head: Unscrew any retaining screws holding the old laser head in place. Carefully lift it out of the CD mechanism.
- Install the New Laser Head: Place the EEEONE replacement laser head into the CD mechanism, ensuring it aligns correctly with the rails and mounting points. Secure it with the retaining screws.
- Reconnect Cables: Reconnect the ribbon cable and any other connectors to the new laser head, ensuring they are seated firmly and in the correct orientation.
- Remove Anti-Static Solder Point: This is a critical step. Most new laser heads come with an anti-static solder point (often a small blob of solder connecting two pads on the flexible PCB) to protect the laser diode during shipping. This point must be removed before operation. Use a soldering iron to carefully desolder and remove this protective short. Failure to do so will prevent the laser head from functioning.
Image description: A close-up view of a flexible PCB on a laser head, highlighting a small solder bridge that needs to be removed. This protective measure prevents electrostatic discharge damage during handling and shipping.
- Initial Test (Optional): Before fully reassembling, you may perform a preliminary test. Connect the CD player to power, insert a CD, and observe if the laser head moves and attempts to read the disc. Disconnect power immediately after this brief test.
- Reassemble the CD Player: Carefully reattach the outer casing of the AIWA DX-M75 CD player, ensuring all screws are tightened and no cables are pinched.
Operating the CD Player After Replacement
Once the new laser head is installed and the CD player is reassembled, you can test its functionality.
- Connect the AIWA DX-M75 CD player to its power source and turn it on.
- Open the CD tray and place a clean, scratch-free audio CD onto the spindle.
- Close the CD tray. The player should now attempt to read the disc.
- Observe the display for track information and press the Play button. Audio should begin playing.
- Test various functions such as track skipping, fast forward/rewind, and disc recognition to ensure full functionality.
Maintenance
Proper care can extend the life of your new laser head and CD player.
- Keep Discs Clean: Always use clean, scratch-free CDs. Dust and fingerprints on discs can cause reading errors and potentially strain the laser mechanism.
- Clean the Lens (If Necessary): If you experience persistent reading issues, the laser lens might be dirty. Use a specialized CD lens cleaning disc or a soft, lint-free cloth with a small amount of isopropyl alcohol to gently wipe the lens. Avoid excessive pressure.
- Environment: Operate the CD player in a clean, dust-free environment. Avoid extreme temperatures or humidity.
Troubleshooting
If you encounter issues after installing the replacement laser head, consider the following:
| Problem | Possible Cause | Solution |
|---|---|---|
| "No Disc" error or disc not recognized. |
|
|
| Disc skipping or intermittent playback. |
|
|
| No power to the CD player after reassembly. |
|
|
Specifications
- Product Type: Replacement Laser Head / Optical Pick-up
- Compatibility: AIWA DX-M75, AIWA DXM75 Radio CD Player
- Manufacturer: EEEONE (Replacement Part)
- Item Weight: Approximately 200 Grams
- ASIN: B0BWF8XLFD
Warranty and Support
For warranty information or technical support regarding your EEEONE replacement laser head, please refer to the seller's policies or contact the seller directly through the platform where the purchase was made. Keep your purchase receipt as proof of purchase.
Ask a question about this manual
Ask about setup, troubleshooting, compatibility, parts, safety, or missing instructions. Manuals+ will review the question and use this page’s manual context to help answer it.